> ## Documentation Index
> Fetch the complete documentation index at: https://ona.com/docs/llms.txt
> Use this file to discover all available pages before exploring further.
# Enterprise CloudFormation templates v1
These templates are deprecated. Please use the [new
templates](/classic/admin/getting-started/overview) instead.
# Getting Started with Enterprise CloudFormation templates v1
You will need to have familiarity with AWS, specifically CloudFormation, in
order to execute this guide. Please read through the entire guide or review
it with your Gitpod engineer to ensure you understand all the requirements
and steps.
{' '}
Enterprise is currently available in the following AWS regions:
* `us-east-1`
* `us-east-2`
* `us-west-2`
* `ap-northeast-1`
* `ap-southeast-2`
* `eu-west-1`
* `eu-west-2`
* `eu-west-3`
* `eu-central-1`
* `sa-east-1 `
## 0. Prerequisites
Here's a list of what you'll need to get started with Enterprise:
* **An AWS account.** For a production installation, there should be no other resources, EC2 instances, containers, functions or applications running in the account. For a pre-production (e.g. proof-of-concept) installation, other resources may be running in the account, however this does introduce a risk of interference with the running installation - please speak to your Gitpod account manager. If your company requires security policies or roles to be present in new accounts please review them with a Gitpod Engineer to ensure there are no items that will block Enterprise from running.
* **Private network address ranges.** Provide a list of network CIDR ranges to your Gitpod engineer to ensure that traffic is routed correctly to internal resources. This list should include the network address space for any internal or on-premise networks that developers will need to access from their Gitpod workspaces.
* **List of resources developers require to build and test.** This should include any external databases, APIs, PaaS endpoints, cloud resources and anything else that your developers need to build and test their code. Review this list with your Gitpod engineer to ensure the right architecture is set up for your installation. Enterprise has four supported modes - public, private, mixed public, and mixed private. We will help you choose the right mode for your environment.
* **The ability to run an AWS Cloudformation template.** The Enterprise installer is provided as a set of Cloudformation templates. These should be run by a user with Administrator level access to the AWS account. We do not support running the Cloudformation template through terraform. You may run the Cloudformation templates either in the AWS Console (recommended) or via the AWS CLI (expert).
* **Optional - AWS Transit Gateway.** For private, mixed private, and mixed public installations you will create a transit gateway attachment that allows workspaces to connect to private resources on your network. Work with your Gitpod engineer to get this set up correctly.
## 1. Set up an AWS Account for Enterprise
For pre-production (e.g. proof of concept) installations, it is acceptable
to use an existing AWS account. Using an empty AWS account removes risks of
existing resources interfering with the Enterprise installation, please
speak to your Gitpod account manager for more information. For a production
installation, Enterprise requires an empty AWS account as the account acts
as a security and responsibility boundary.
Ensure that the AWS account meets the following quota requirements in the region where Enterprise will be installed. AWS quota increases may take up to a day to be approved, so make sure you do this step first.
Visit the correct quota increase page for your region. For example this link goes to us-west-2. Replace the region with your own, search for each Service type below, and request an increase to the new value. *On most new AWS accounts you will only need to increase the Elastic IPs and Lambda executions.*
[https://us-west-2.console.aws.amazon.com/servicequotas/home/services](https://us-west-2.console.aws.amazon.com/servicequotas/home/services)
| Service | Name | Value | Reasoning |
| :---------------------------------------: | :--------------------------------------------------------------: | :---: | :--------------------------------------------------------------------------------------------------------------------------------------------------------------------------------------------------------------------------------------------------------------------------------------------------------------------------------------------------------------------------------------------------------------------------------------------------------------------------------------------------------------: |
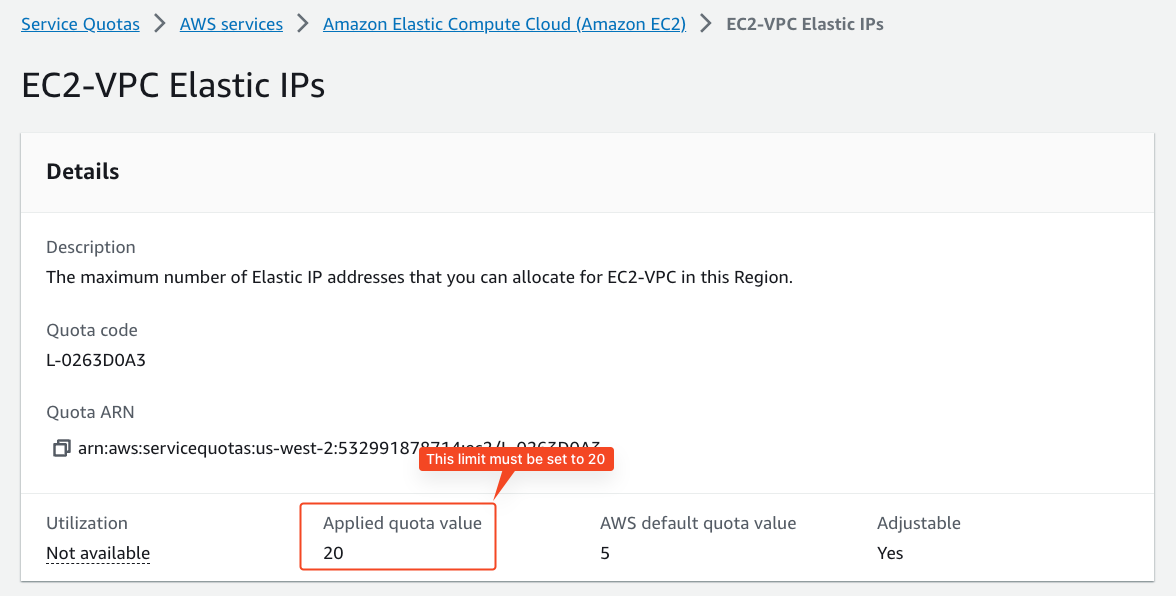
| Amazon Elastic Compute Cloud (Amazon EC2) | EC2-VPC Elastic IPs | 20 | Gitpod requires 3 IP addresses for each load balancer (Gitpod has 2 load balancers, one for meta and one for the workspace cluster). Additionally, 3 IPs are needed for each NAT gateway (Gitpod has 3 VPCs, so 3x). Therefore, at a minimum, 15 IPs are needed. The additional 5 act as a buffer in case a new load balancer needs to be provisioned and runs in parallel to the old one, ensuring a smooth transition. For more information, please see [Architecture](/classic/admin/reference/architecture). |
| Amazon Elastic Compute Cloud (Amazon EC2) | Running On-Demand Standard (A, C, D, H, I, M, R, T, Z) Instances | 256 | This value depends on the number of concurrent developers using the instance. 256 the minimum recommended setting and is suitable for proof-of-value trials. Consult with your engineer on an appropriate setting for your expected usage levels. |
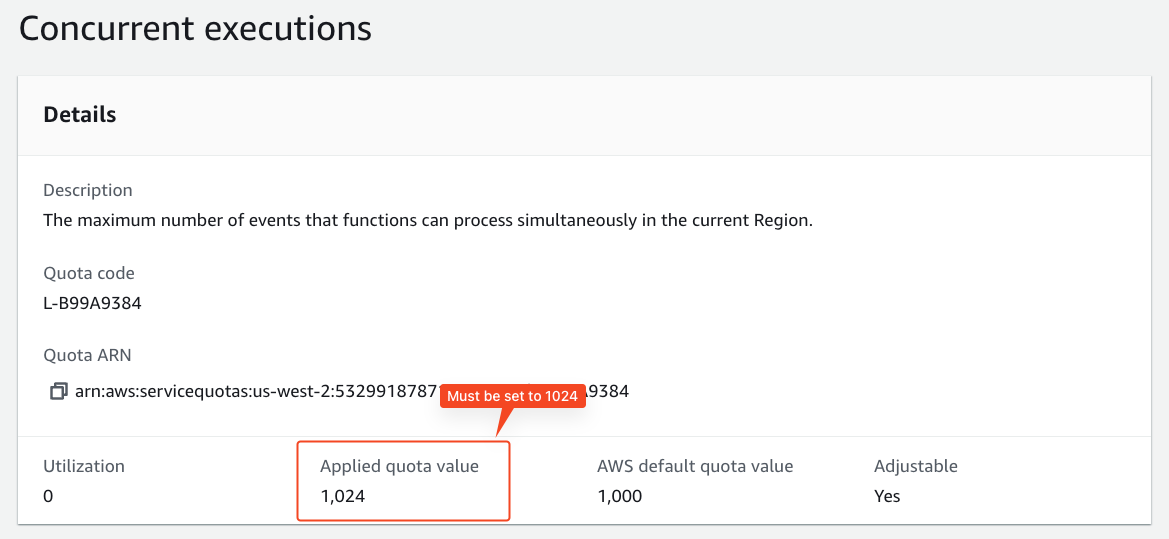
| AWS Lambda | Concurrent Executions | 1024 | To ensure Gitpod can install and operate properly, the default concurrent execution quota should be increased to 1024. Increasing the quota to 1024 guarantees that Gitpod will function properly. |
| Amazon Virtual Private Cloud (Amazon VPC) | VPCs per Region | 4 | Enterprise requires four VPCs. One is the default VPC that comes pre-installed in new accounts. The Enterprise platform runs in a second VPC. The other two VPCs are reserved for upcoming feature enhancements. |
When your request has been approved verify that you have at least 20 Elastic IPs and 1024 concurrent Lambdas enabled. The screenshots below show how these limits look after they've been raised.
 Ensure that you allow for cross-account and cross-region communication with `eu-central-1`. For example, this could be restricted by [SCPs](https://docs.aws.amazon.com/organizations/latest/userguide/orgs_manage_policies_scps.html) such as a [Region deny SCP](https://docs.aws.amazon.com/controltower/latest/userguide/region-deny.html). To roll out updates to the application, an AWS Lambda function pulls several configurations from a known S3 bucket owned by Gitpod. This bucket is hosted in the Enterprise control plane located in the `eu-central-1` region.
## 2. Execute two CloudFormation templates
Notify your Gitpod account manager if you want an overview of what is
installed and configured by the Cloudformation templates. You may share
these templates with your security and network teams if approval is
required. Please see [AWS IAM permission
requirements](/classic/admin/reference/aws-iam-permission-requirements) for
information on the permissions needed.
Follow the process below to acquire and install your Cloudformation templates:
### 2.1 Provide information
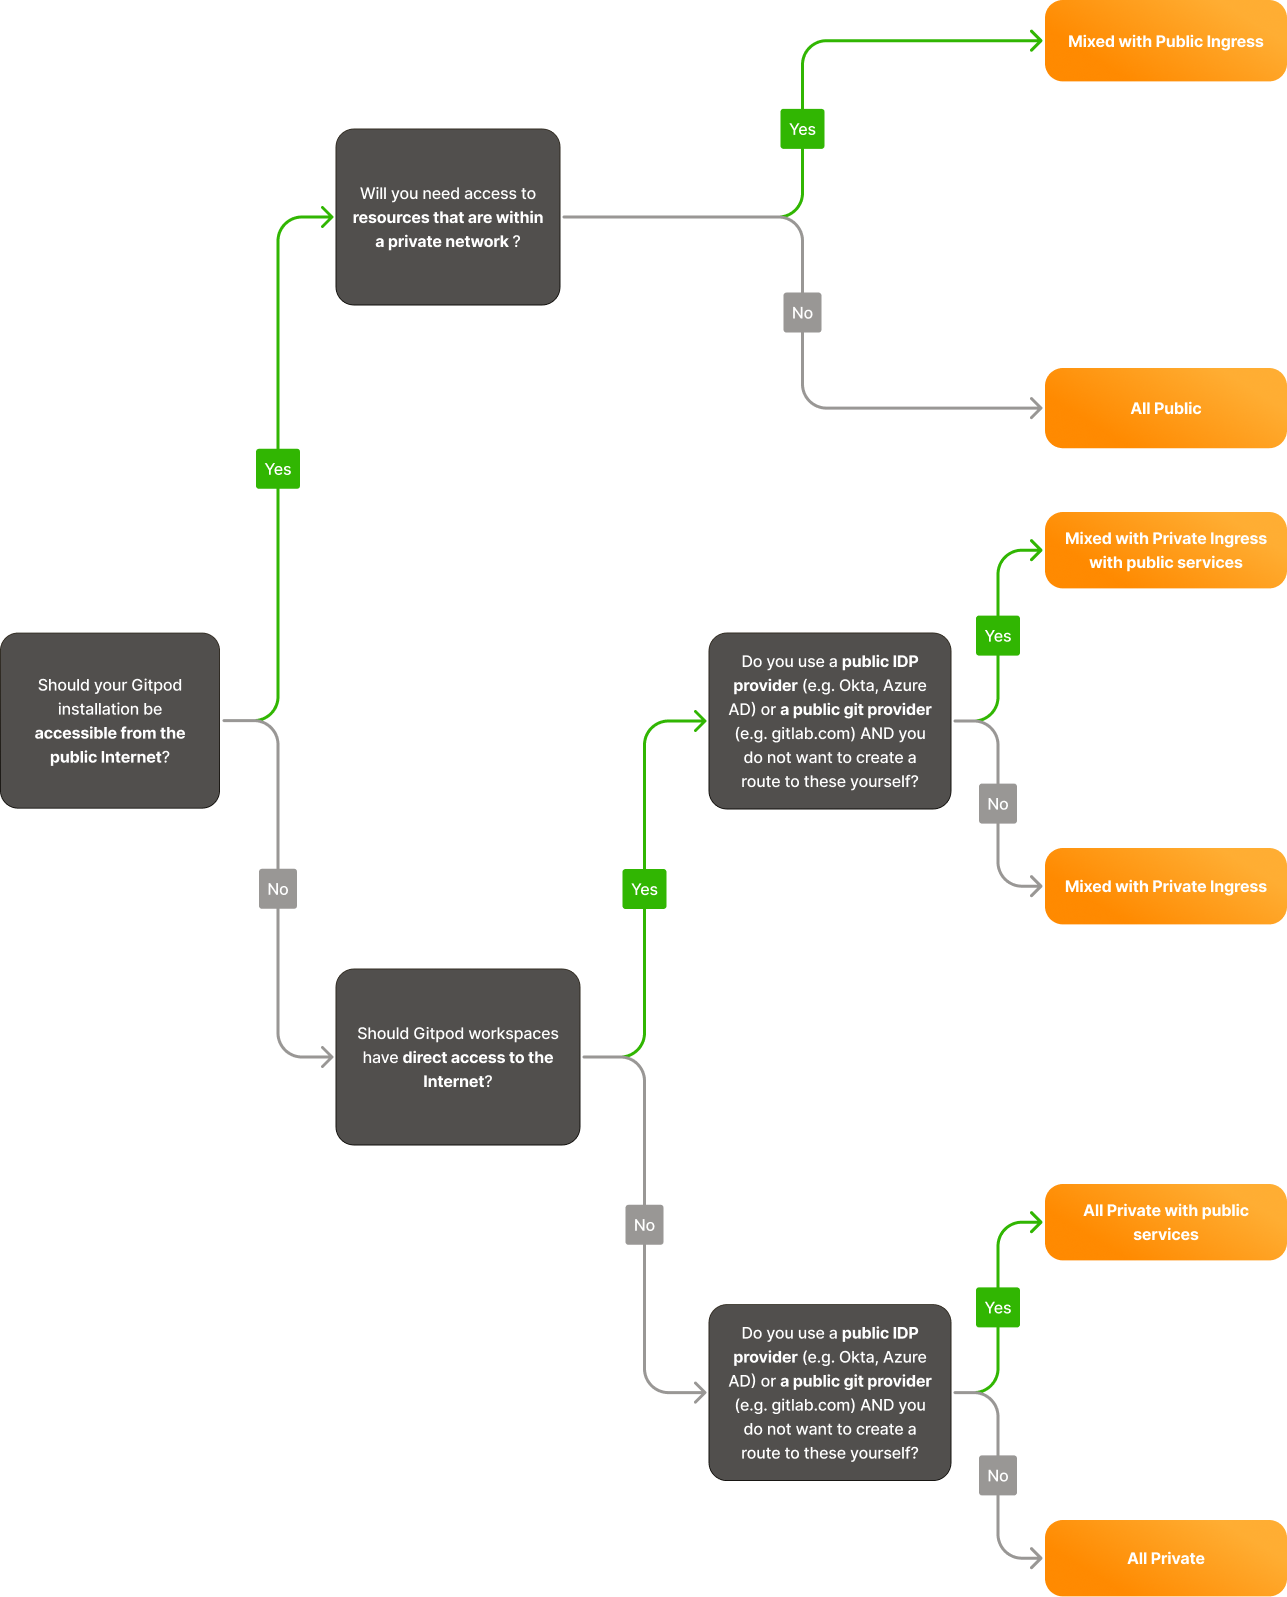
Your Gitpod account manager will ask for information needed to generate the CloudFormation templates used to install Gitpod. The information required depends on the choice of networking mode. To help choose the right networking mode, please see [Networking and Data flows](/classic/admin/reference/networking-data-flows) for general guidance and requirements on which services Gitpod needs to be able to route to.
This flow chart helps select the right networking mode:
Ensure that you allow for cross-account and cross-region communication with `eu-central-1`. For example, this could be restricted by [SCPs](https://docs.aws.amazon.com/organizations/latest/userguide/orgs_manage_policies_scps.html) such as a [Region deny SCP](https://docs.aws.amazon.com/controltower/latest/userguide/region-deny.html). To roll out updates to the application, an AWS Lambda function pulls several configurations from a known S3 bucket owned by Gitpod. This bucket is hosted in the Enterprise control plane located in the `eu-central-1` region.
## 2. Execute two CloudFormation templates
Notify your Gitpod account manager if you want an overview of what is
installed and configured by the Cloudformation templates. You may share
these templates with your security and network teams if approval is
required. Please see [AWS IAM permission
requirements](/classic/admin/reference/aws-iam-permission-requirements) for
information on the permissions needed.
Follow the process below to acquire and install your Cloudformation templates:
### 2.1 Provide information
Your Gitpod account manager will ask for information needed to generate the CloudFormation templates used to install Gitpod. The information required depends on the choice of networking mode. To help choose the right networking mode, please see [Networking and Data flows](/classic/admin/reference/networking-data-flows) for general guidance and requirements on which services Gitpod needs to be able to route to.
This flow chart helps select the right networking mode:
 Please provide the information required by the chosen networking mode:
1. `Subdomain` of your Gitpod installation. The full domain will be `.gitpod.cloud` unless a custom domain is used (see below).
Depending on your compliance and regulatory requirements, you may want
to avoid including your company name in the URL. Although efforts are
taken to minimize any exposure, avoiding using the company name can
further increase confidentiality and reduce exposure risk.
2. `AWS account ID` of the AWS account to be used for Gitpod.
3. `AWS region` where Gitpod will be installed. See [above](/classic/admin/getting-started/overview#:~:text=Currently%2C%20Gitpod%20Dedicated%20is%20only%20available%20in%20the%20following%20AWS%20regions%3A) for available regions.
4. `Relay CIDR range`: The small part of the Enterprise VPC that needs to be routable from your network. This is called the **relay subnet** and it attaches to your Transit Gateway (see below). See [Networking and Data flows](/classic/admin/reference/networking-data-flows) for more details and a networking diagram.
Please provide the information required by the chosen networking mode:
1. `Subdomain` of your Gitpod installation. The full domain will be `.gitpod.cloud` unless a custom domain is used (see below).
Depending on your compliance and regulatory requirements, you may want
to avoid including your company name in the URL. Although efforts are
taken to minimize any exposure, avoiding using the company name can
further increase confidentiality and reduce exposure risk.
2. `AWS account ID` of the AWS account to be used for Gitpod.
3. `AWS region` where Gitpod will be installed. See [above](/classic/admin/getting-started/overview#:~:text=Currently%2C%20Gitpod%20Dedicated%20is%20only%20available%20in%20the%20following%20AWS%20regions%3A) for available regions.
4. `Relay CIDR range`: The small part of the Enterprise VPC that needs to be routable from your network. This is called the **relay subnet** and it attaches to your Transit Gateway (see below). See [Networking and Data flows](/classic/admin/reference/networking-data-flows) for more details and a networking diagram.
-
The only restriction in place is that the `Relay CIDR range`
must be `/25` and not in the range `100.70.0.0/10` (the parent
range used by Gitpod).
-
The `Relay CIDR range`{' '}
must not overlap with any of your internal services that
Gitpod needs to communicate with.
{' '}
For example, your source code repository, SSO provider, or
package repositories.
-
The `Relay CIDR range` must be routable from your source code
repository (SCM) server for{' '}
Prebuilds to
work. Prebuilds are powered by webhooks, so Gitpod must be able
to get notifications of changes to your code repos to trigger
prebuilds.
5. `CIDR range of your network` or the IP address space used by your company network that you want workspaces to be able to route to. At the very least, provide the relevant ranges that you want Gitpod to be able to interact with. This helps Gitpod ensure there are no possible IP conflicts with CIDR ranges used internally in the Gitpod instance (100.70.0.0/16, part of CGNAT range). Note that this internal Gitpod range does not need to be routable from your network.
6. `transitGatewayID` of your Transit Gateway. Network traffic to your internal resources will be routed through a new transit gateway attachment. Enterprise control plane traffic does not route through the transit gateway, it is reserved for your internal traffic. See [Networking and Data flows](/classic/admin/reference/networking-data-flows) for more information.
When using auto-propagation by default, delete the propagation from your
Transit Gateway Routetable associated with the Gitpod Transit Gateway
Attachment and replace it with a static route pointing the Relay CIDR range
(/25) to the Gitpod Transit Gateway Attachment ID. This ensures only the
required relay range is shared on your Transit Gateway network and no other
routes are accidentally broadcasted.
7. `Expose public services?` : This optional feature may be enabled to expose webhooks and Identity Provider (IDP) services on public endpoints. The added API gateway does not expose your entire instance to the public Internet. This can be helpful for connecting to OIDC providers such as Okta, Azure AD. This option also makes it easy for developers to connect to your instance without having to route through a VPN or transit gateway.
1. `Subdomain` of your Gitpod installation. The full domain will be `.gitpod.cloud` unless a custom domain is used (see below).
Depending on your compliance and regulatory requirements, you may want to
avoid including your company name in the URL. Although efforts are taken to
minimize any exposure, avoiding using the company name can further increase
confidentiality and reduce exposure risk.
2. `AWS account ID` of the AWS account to be used for Gitpod.
3. `AWS region` where Gitpod will be installed. See [above](/classic/admin/getting-started/overview#:~:text=Currently%2C%20Gitpod%20Dedicated%20is%20only%20available%20in%20the%20following%20AWS%20regions%3A) for available regions.
4. `Relay CIDR range`: The small part of the Enterprise VPC that needs to be routable from your network. This is called the **relay subnet** and it attaches to your Transit Gateway (see below). See [Networking and Data flows](/classic/admin/reference/networking-data-flows) for more details and a networking diagram.
-
The only restriction in place is that the `Relay CIDR range` must be
`/25` and not in the range `100.70.0.0/10` (the parent range used by
Gitpod).
-
The `Relay CIDR range`{' '}
must not overlap with any of your internal services that Gitpod
needs to communicate with.
{' '}
For example, your source code repository, SSO provider, or package
repositories.
-
The `Relay CIDR range` must be routable from your source code
repository (SCM) server for{' '}
Prebuilds to work.
Prebuilds are powered by webhooks, so Gitpod must be able to get
notifications of changes to your code repos to trigger prebuilds.
5. `CIDR range of your network` or the IP address space used by your company network that you want workspaces to be able to route to. It is essential to provide the relevant ranges that you want Gitpod to be able to interact with. At a minimum, this should include the CIDR range of the VPC where the transit gateway associated with Gitpod is deployed, as this ensures Gitpod can identify the route back to the origin of its connections. Providing these CIDR ranges also helps Gitpod ensure there are no possible IP conflicts with CIDR ranges used internally in the Gitpod instance (100.70.0.0/16, part of CGNAT range). Note that this internal Gitpod range does not need to be routable from your network.
6. `transitGatewayID` of your Transit Gateway. Network traffic to your internal resources will be routed through a new transit gateway attachment. Enterprise control plane traffic does not route through the transit gateway, it is reserved for your internal traffic. See [Networking and Data flows](/classic/admin/reference/networking-data-flows) for more information.
When using auto-propagation by default, delete the propagation from your
Transit Gateway Routetable associated with the Gitpod Transit Gateway
Attachment and replace it with a static route pointing the Relay CIDR range
(/25) to the Gitpod Transit Gateway Attachment ID. This ensures only the
required relay range is shared on your Transit Gateway network and no other
routes are accidentally broadcast.
7. `Expose public services?` : This optional feature may be enabled to expose webhooks and Identity Provider (IDP) services on public endpoints. The added API gateway does not expose your entire instance to the public Internet. This can be helpful for connecting to OIDC providers such as Okta, Azure AD. This option also makes it easy for developers to connect to your instance without having to route through a VPN or transit gateway.
1. `Subdomain` of your Gitpod installation. The full domain will be `.gitpod.cloud` unless a custom domain is used (see below).
Depending on your compliance and regulatory requirements, you may want to
avoid including your company name in the URL. Although efforts are taken to
minimize any exposure, avoiding using the company name can further increase
confidentiality and reduce exposure risk.
2. `AWS account ID` of the AWS account to be used for Gitpod.
3. `AWS region` where Gitpod will be installed. See [above](/classic/admin/getting-started/overview#:~:text=Currently%2C%20Gitpod%20Dedicated%20is%20only%20available%20in%20the%20following%20AWS%20regions%3A) for available regions.
4. `Relay CIDR range`: The small part of the Enterprise VPC that needs to be routable from your network. This is called the **relay subnet** and it attaches to your Transit Gateway (see below). See [Networking and Data flows](/classic/admin/reference/networking-data-flows) for more details and a networking diagram.
-
The only restriction in place is that the `Relay CIDR range` must be
`/25` and not in the range `100.70.0.0/10` (the parent range used by
Gitpod).
-
The `Relay CIDR range`{' '}
must not overlap with any of your internal services that Gitpod
needs to communicate with.
{' '}
For example, your source code repository, SSO provider, or package
repositories.
-
The `Relay CIDR range` must be routable from your source code
repository (SCM) server for{' '}
Prebuilds to work.
Prebuilds are powered by webhooks, so Gitpod must be able to get
notifications of changes to your code repos to trigger prebuilds.
5. `CIDR range of your network` or the IP address space used by your company network that you want workspaces to be able to route to. At the very least, provide the relevant ranges that you want Gitpod to be able to interact with. This helps Gitpod ensure there are no possible IP conflicts with CIDR ranges used internally in the Gitpod instance (100.70.0.0/16, part of CGNAT range). Note that this internal Gitpod range does not need to be routable from your network.
6. `transitGatewayID` of your Transit Gateway. Network traffic to your internal resources will be routed through a new transit gateway attachment. Enterprise control plane traffic does not route through the transit gateway, it is reserved for your internal traffic. See [Networking and Data flows](/classic/admin/reference/networking-data-flows) for more information.
When using auto-propagation by default, delete the propagation from your
Transit Gateway Routetable associated with the Gitpod Transit Gateway
Attachment and replace it with a static route pointing the Relay CIDR range
(/25) to the Gitpod Transit Gateway Attachment ID. This ensures only the
required relay range is shared on your Transit Gateway network and no other
routes are accidentally broadcast.
1. `Subdomain` of your Gitpod installation. The full domain will be `.gitpod.cloud` unless a custom domain is used (see below).
Depending on your compliance and regulatory requirements, you may want to
avoid including your company name in the URL. Although efforts are taken to
minimize any exposure, avoiding using the company name can further increase
confidentiality and reduce exposure risk.
2. `AWS account ID` of the AWS account to be used for Gitpod.
3. `AWS region` where Gitpod will be installed. See [above](/classic/admin/getting-started/overview#:~:text=Currently%2C%20Gitpod%20Dedicated%20is%20only%20available%20in%20the%20following%20AWS%20regions%3A) for available regions.
**Special Situations**
The information required further depends on whether the choice of using an allowlist and custom domain:
The allowlist will apply to all inbound traffic to the Enterprise Instance. In addition to the above, the following information is required:
* `allowlist` of IPs or CIDR ranges that should be allowed to access the instance. Any CIDRs provided in the `CIDR range of your network` above are always allowed. Example:
```
allowListIPs:
- 32.45.67.4/32
- 32.45.67.18/32
```
Please see Using Custom Domains for more information about using a custom domains. In addition to the above, the following information is required:
* `domainName` that is to be used
* `ARN of the certificate` to be used
Please see [Using a Custom or Private CA](/classic/admin/getting-started/using-custom-or-private-ca) for more information about using custom domains. In addition to the above, the following information is required:
* `ARN of the Custom CA certificate` that is stored in secrets manager
### 2.2 Receive your Cloudformation Templates
You will need to execute two CloudFormation templates to install the infrastructure and subsequently Enterprise:
1. `gitpod-role` Template: This template creates a new IAM role with specific policies attached. These policies grant the minimum permissions necessary to install and run Enterprise in your account.
2. `gitpod-instance` Template: This template installs the infrastructure for Enterprise. The role created by the `gitpod-role` template is used to execute this second template.
Both of these templates will be provided by your Gitpod Account Manager via direct links to the CloudFormation creation wizard. If you whish to see the templates as files for review before execution, please contact your Gitpod Account Manager.
### 2.3 Execute CloudFormation templates
Do not modify the CloudFormation templates outside of adding AWS resource
tags. Doing so will likely result in a failed installation.
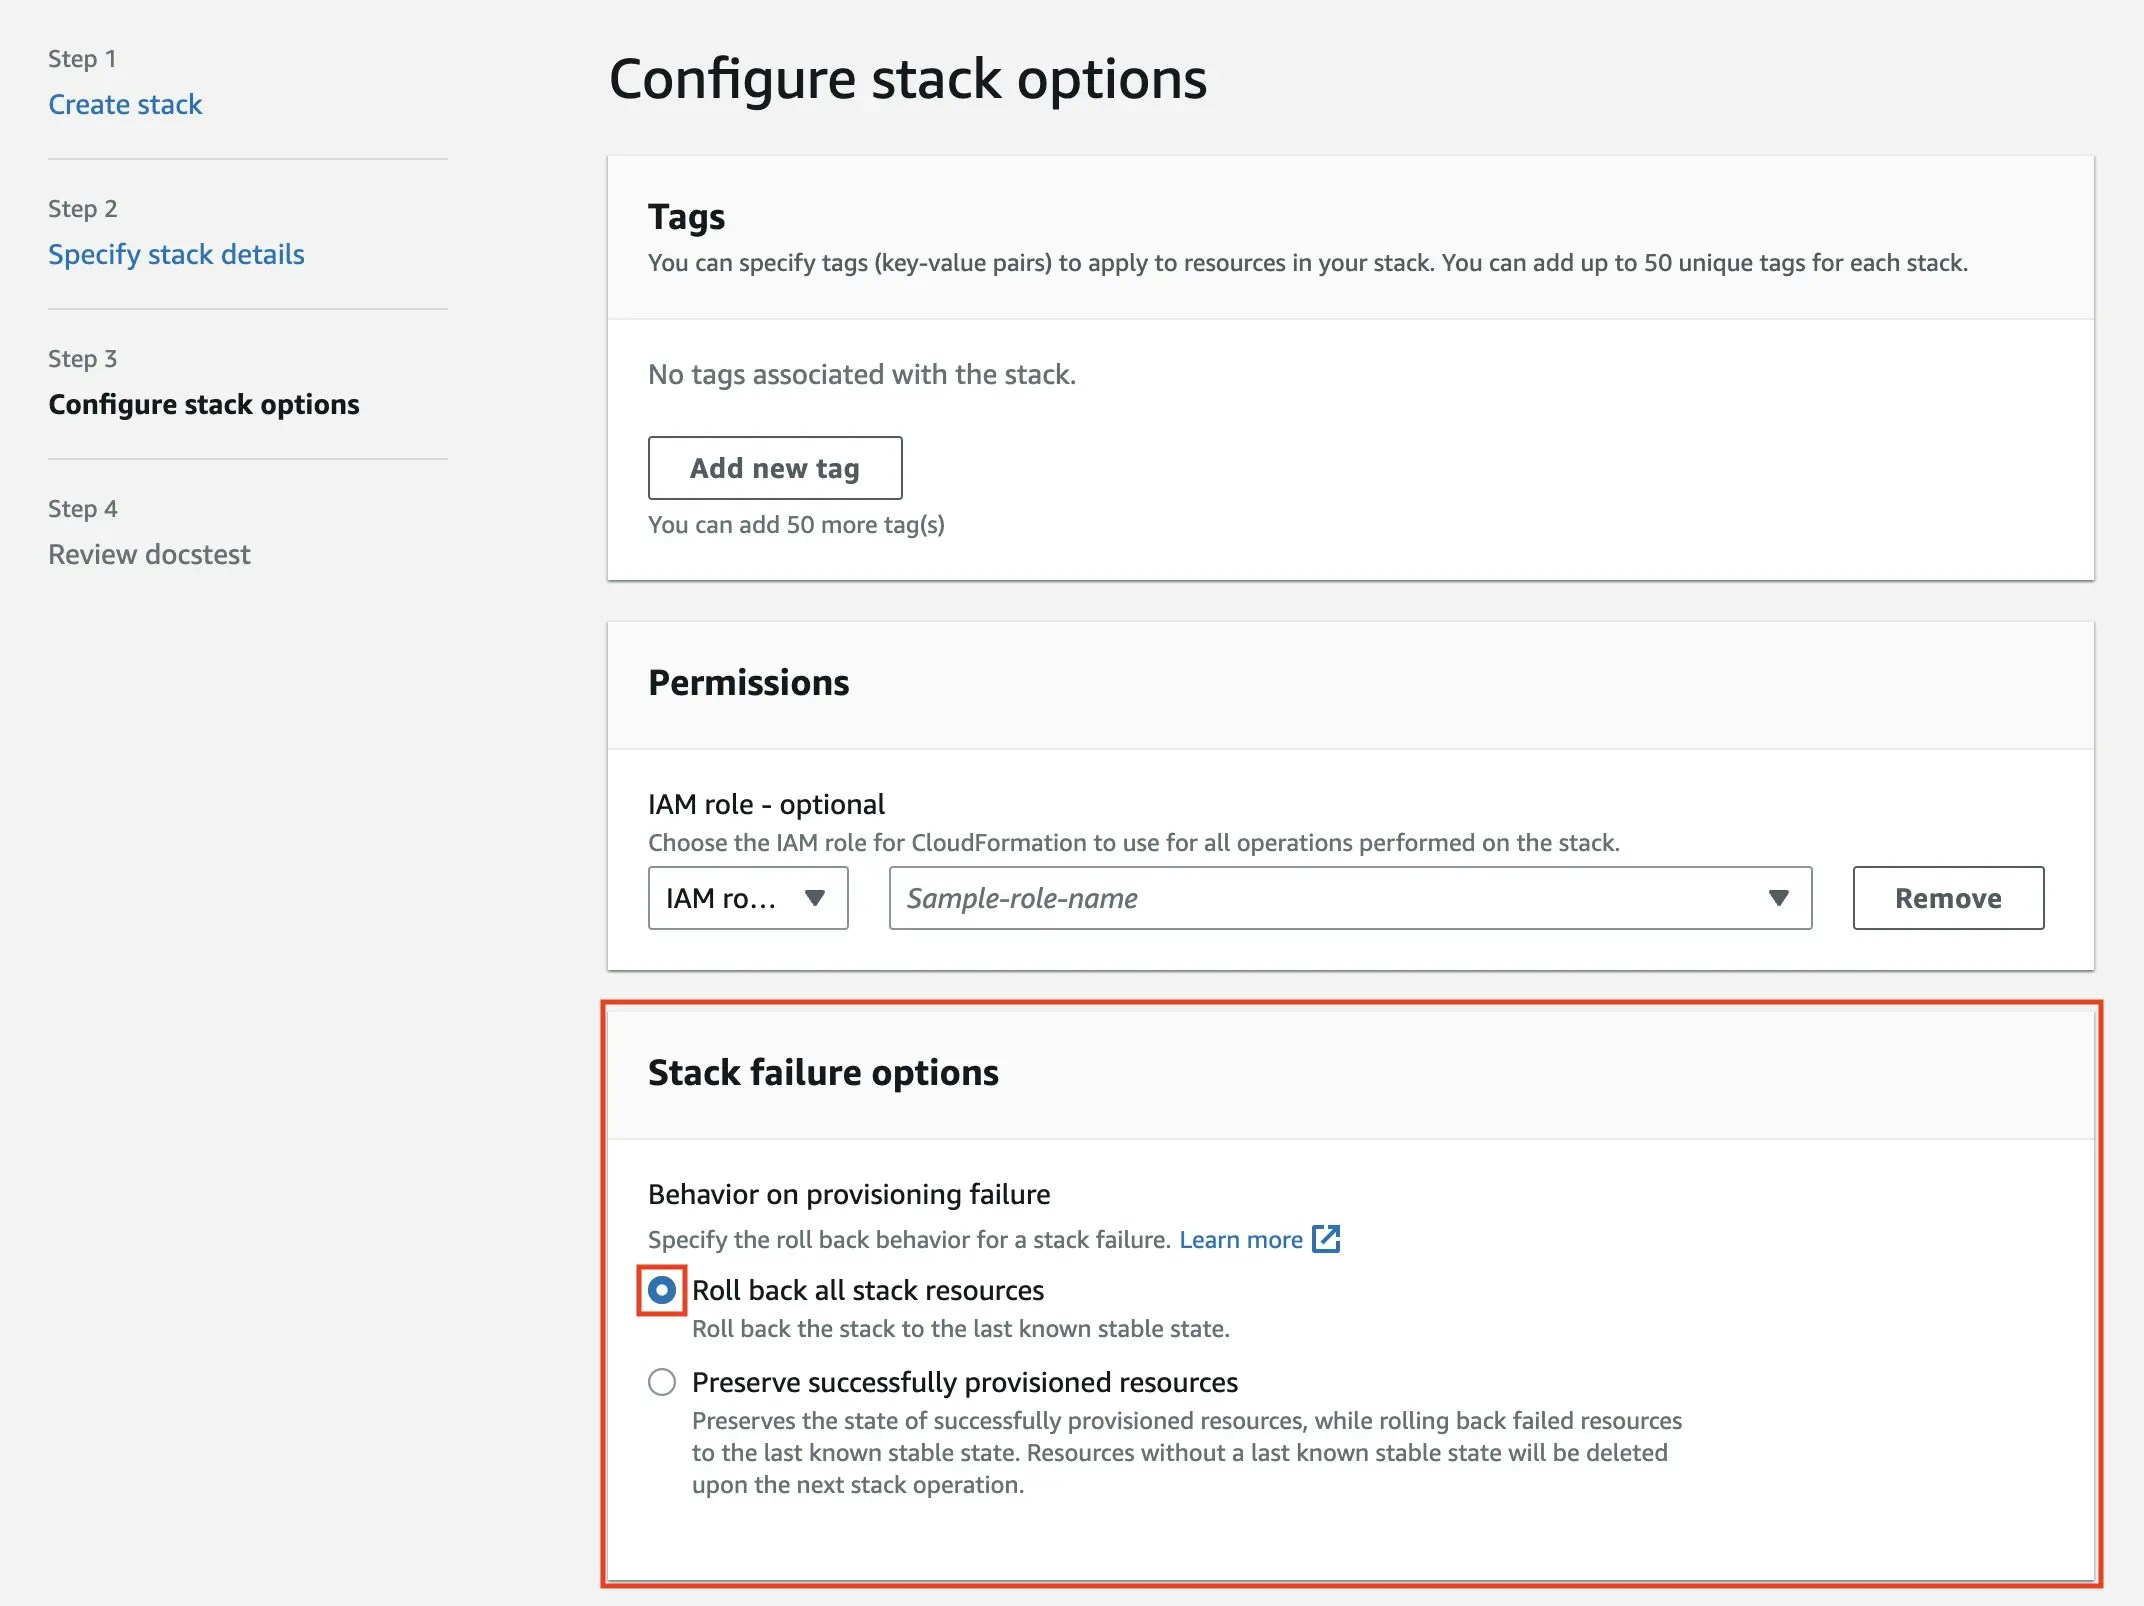
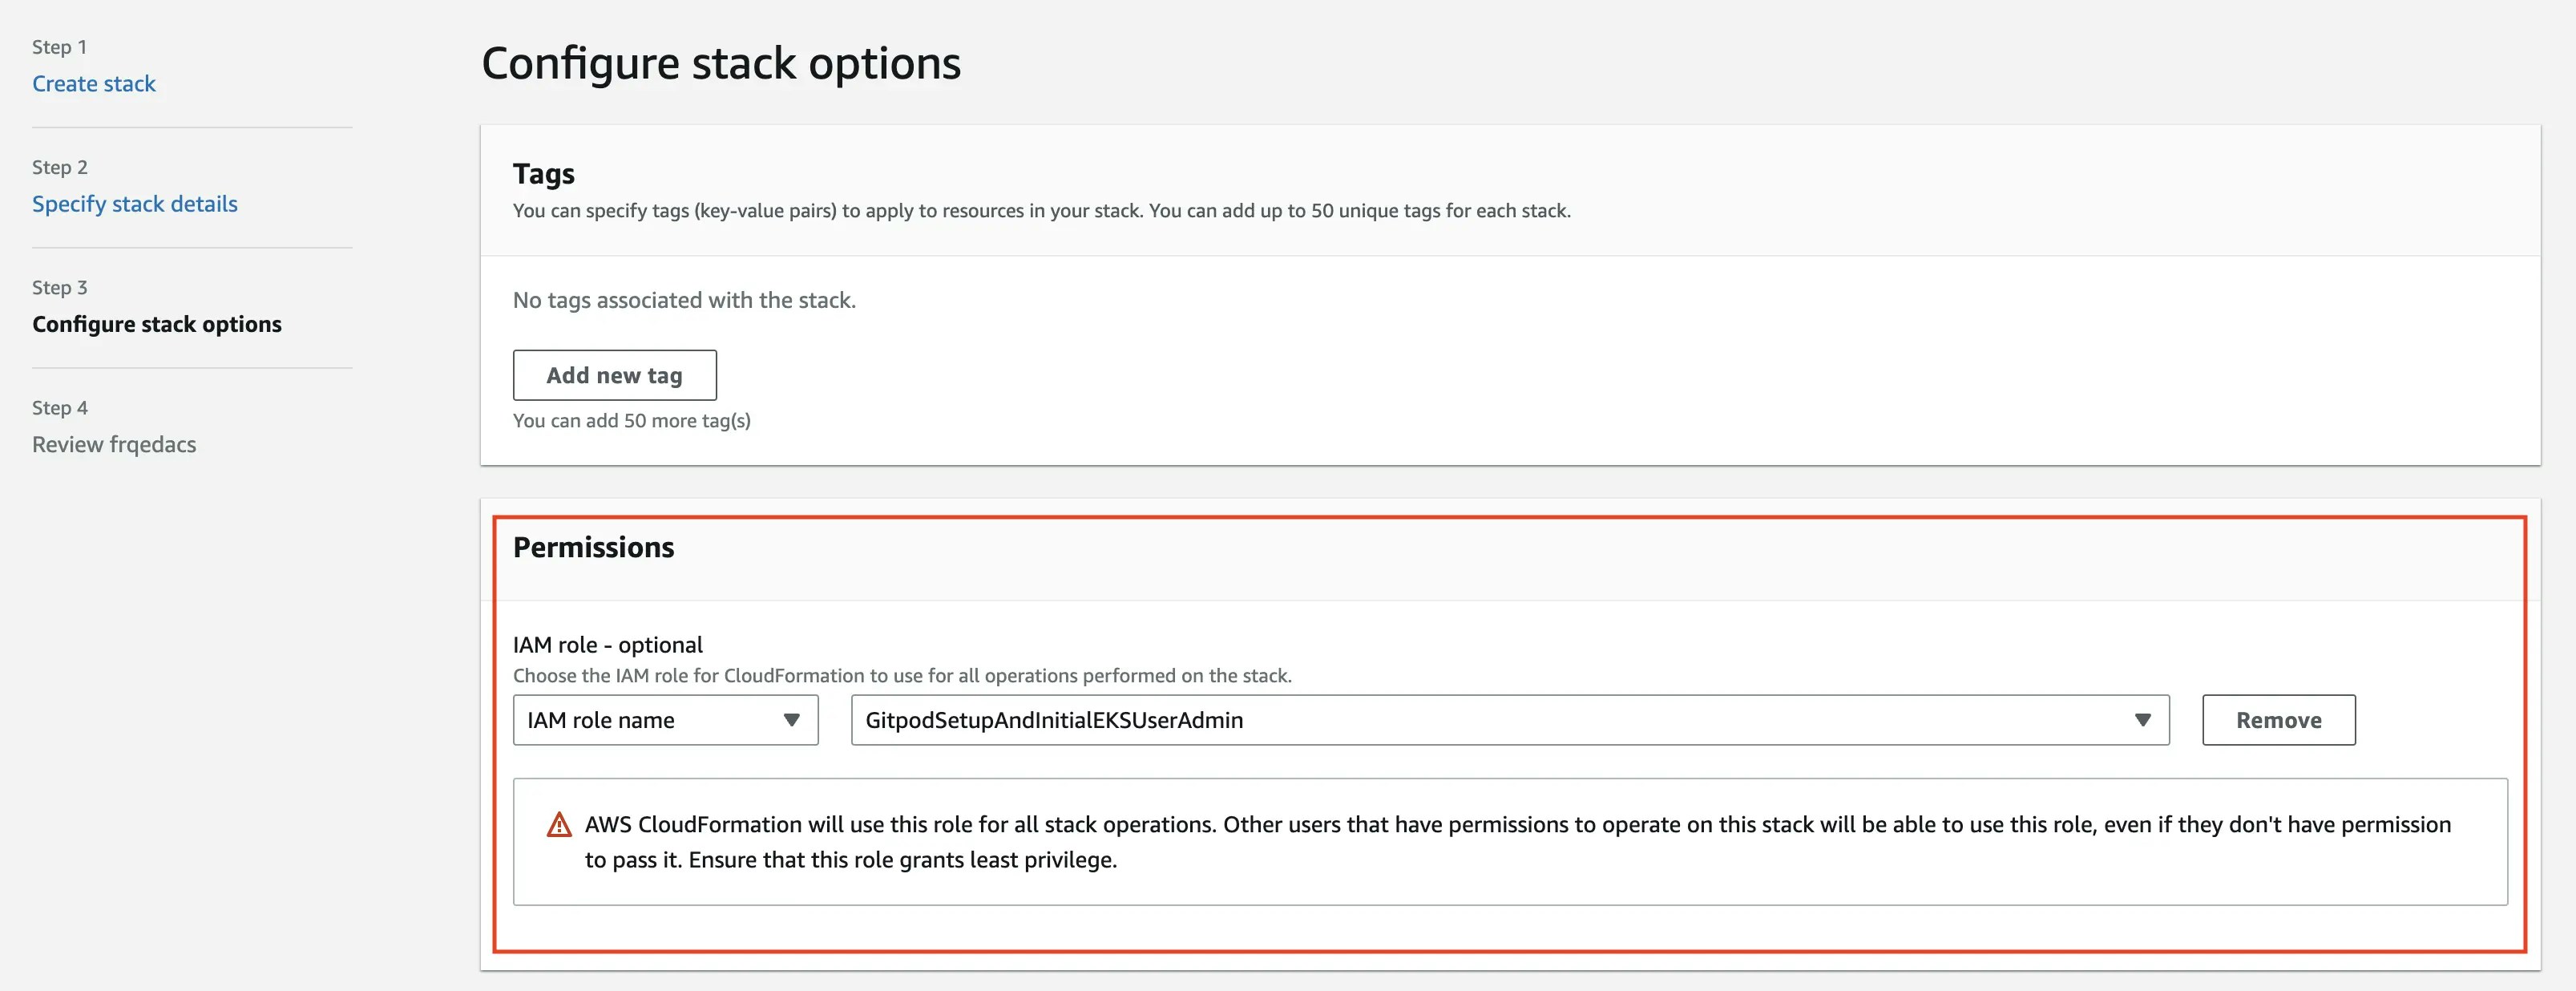
1. First, execute the `gitpod-role` template by navigating to the link shared by your Gitpod Account Manager. During the "configure stack options" step, ensure you select the "roll back all the stack resources" option under "Stack failure options". This will ensure that all resources created by the template are deleted if the template fails to execute.
 2. Then, execute `gitpod-instance` template also by navigating to the link shared by your Gitpod Account Manager in the same AWS account. This will create the infrastructure that Enterprise requires.
{' '}
During the “configure stack options” step, select the role created by the first
CloudFormation template (`GitpodSetupAndInitialEKSUserAdmin`) as the role used
for permissions. Depending on timing, you may need to manually select the role
using its ARN. Again, select the “roll back all the stack resources” option.
2. Then, execute `gitpod-instance` template also by navigating to the link shared by your Gitpod Account Manager in the same AWS account. This will create the infrastructure that Enterprise requires.
{' '}
During the “configure stack options” step, select the role created by the first
CloudFormation template (`GitpodSetupAndInitialEKSUserAdmin`) as the role used
for permissions. Depending on timing, you may need to manually select the role
using its ARN. Again, select the “roll back all the stack resources” option.
1. Before executing the CloudFormation template, you need to ensure the Transit Gateway that the Gitpod instance attaches to is able to accept attachment requests. For this, the Transit Gateway needs to be shared using AWS Resource Access Manager (RAM) to allow for other AWS accounts in your Organization to send attachment requests for approval. More info on Transit Gateway attachments can be found in the [AWS documentation](https://docs.aws.amazon.com/vpc/latest/tgw/tgw-vpc-attachments.html).
2. During the execution of the CloudFormation template, a Transit Gateway attachment to the Transit Gateway defined above is initiated. If you do not have resource sharing policies for this or auto accept turned on, you will have to manually accept this attachment request.
3. The flow to manually approve the attachment request is as follows: Navigate to the AWS account the Transit Gateway attachment is in and navigate to the Transit Gateway Attachments page. Within 5 minutes of starting the CloudFormation execution, you should see a pending attachment in which you have limited time to approve else stack creation fails. Find out more in the [AWS documentation](https://docs.aws.amazon.com/vpc/latest/tgw/tgw-vpc-attachments.html).
3. If you run into errors during the Cloudformation deployment you should remove all existing resources before trying again. There are a few resources that need to be cleaned up manually before you attempt another installation. See [Deleting your Gitpod installation](/classic/admin/manage-gitpod/deleting-your-gitpod-installation) for details.
4. Instance will install Gitpod: After the infrastructure has been created, the instance will register itself with the Enterprise Control plane. It will then ask for the newest version of Gitpod, and install it onto the created infrastructure.
Please see [Deployment and Updates](/classic/admin/background/deployment-updates) for more background information around how deployment subsequent operations of Enterprise function.
## 3. Set Up Gitpod
Gitpod is now ready to be setup. Your Gitpod account manager will provide the URL to access it. This URL will contain a one time admin password. This is used to authenticate when no Single Sign-On (SSO) has been set up yet.
You are three steps away from launching your first Gitpod workspace:
We suggest your company name, but you know best. Don’t worry you can always change this later. For example, if the name of your company was “Amazing Co.”
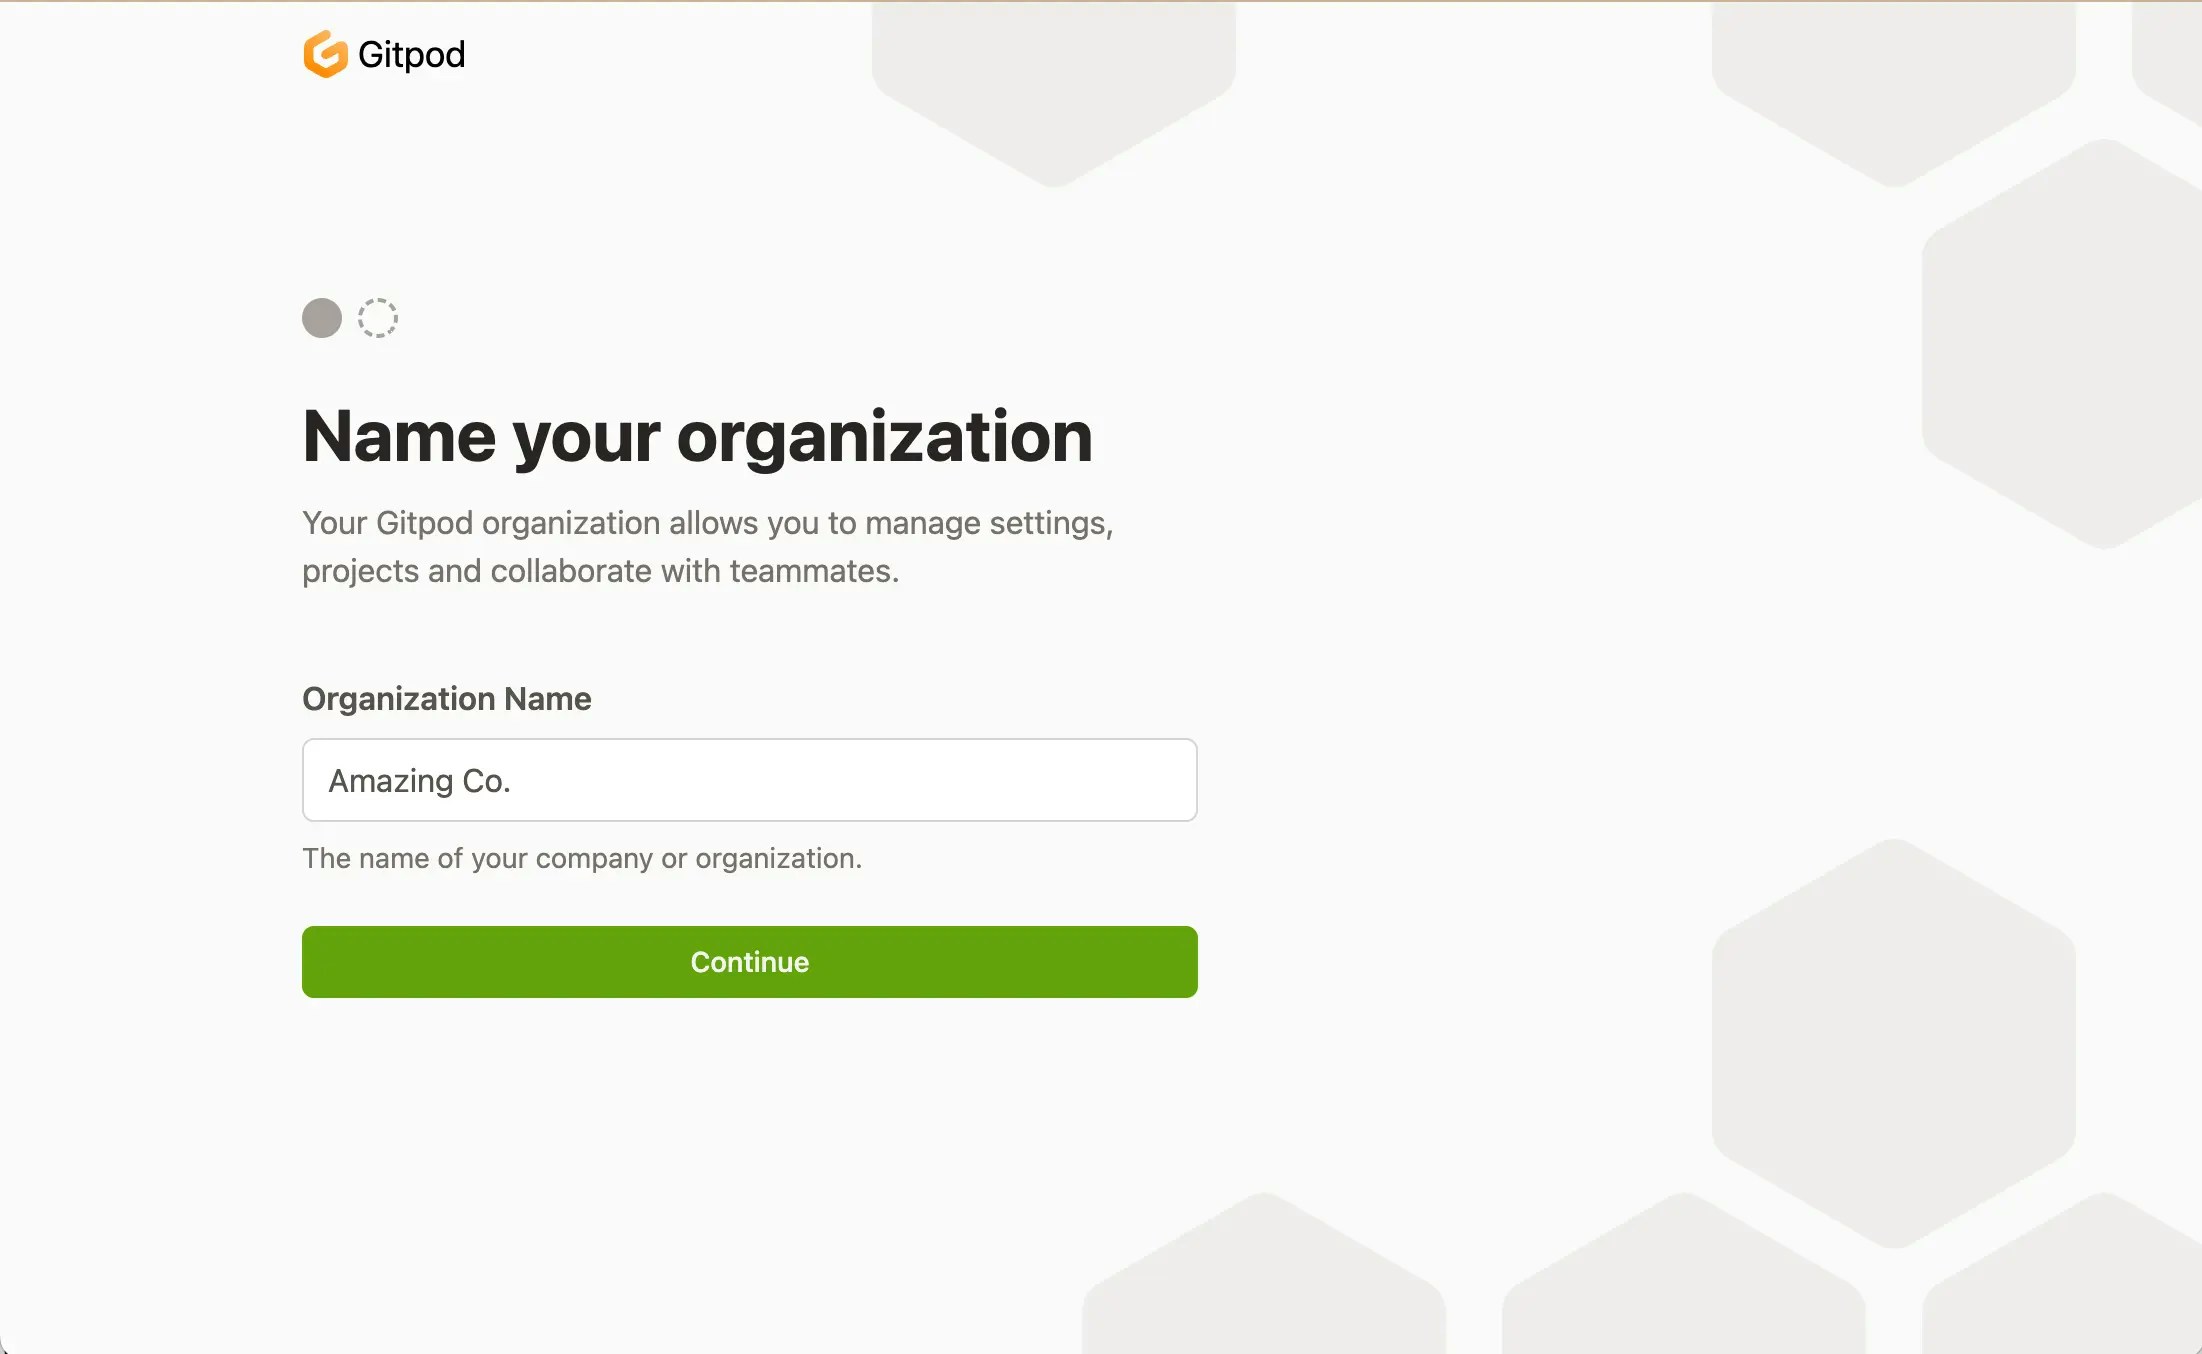 It will appear in Gitpod like this:
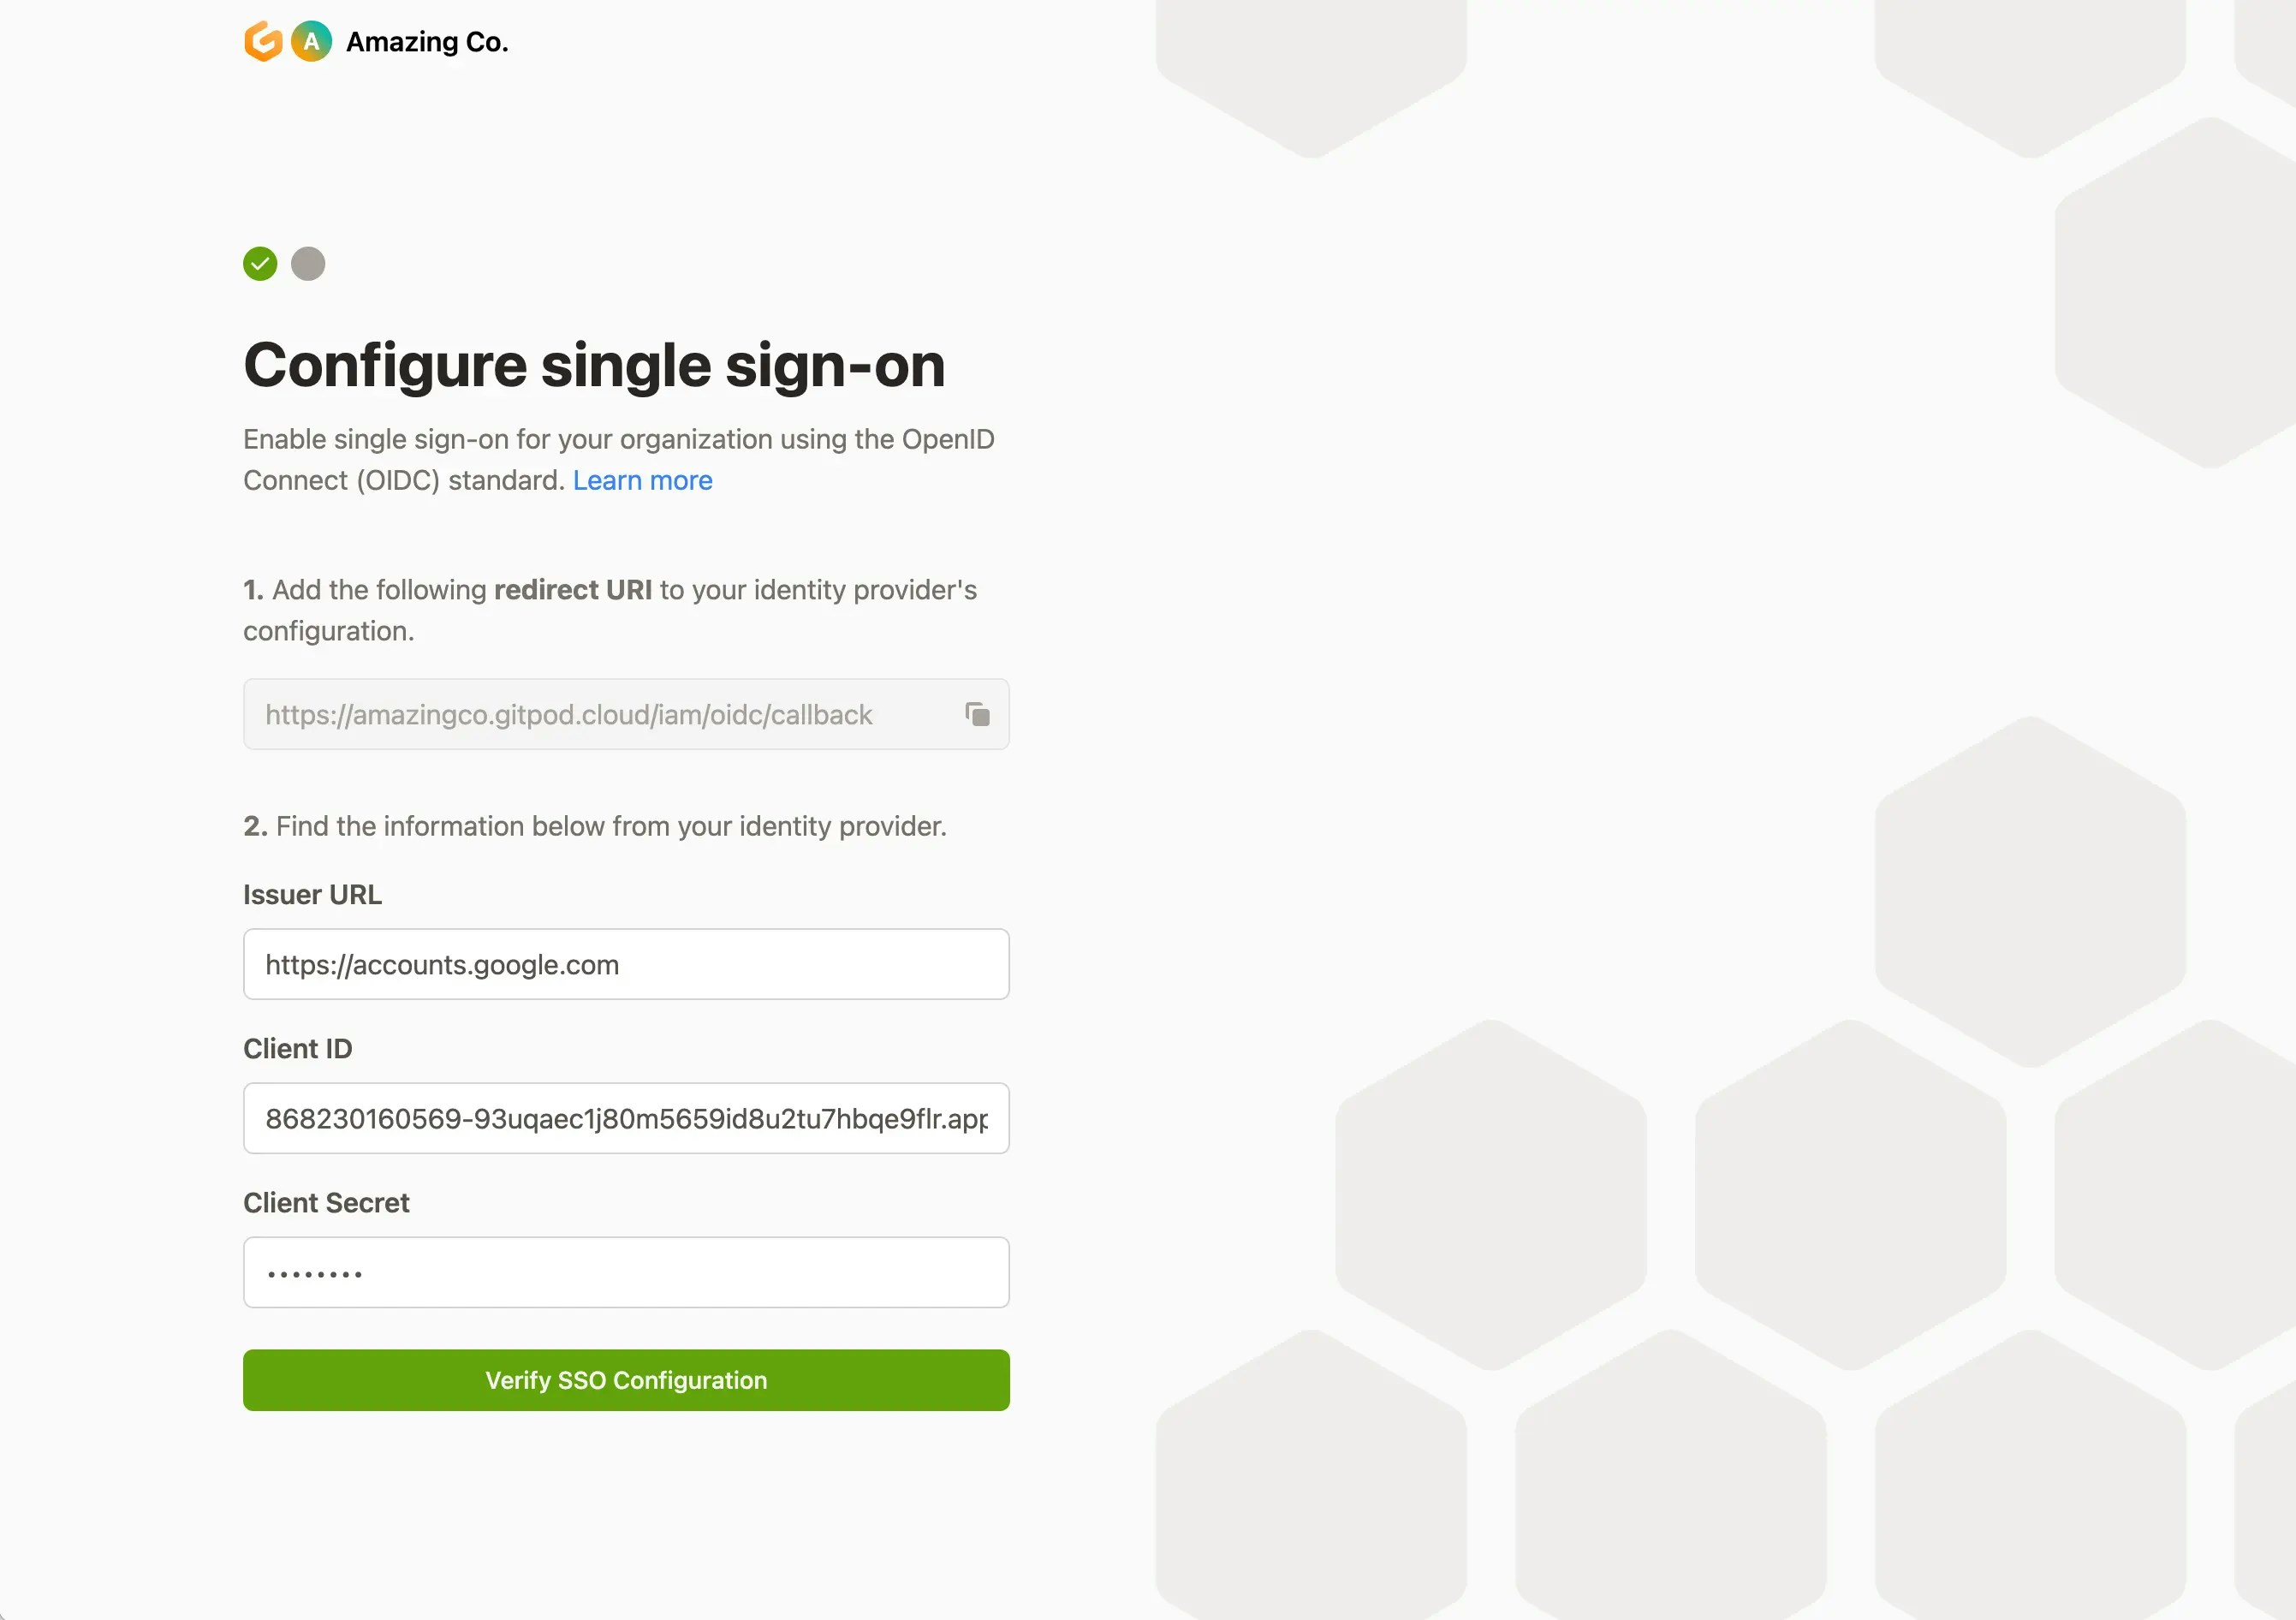
 Enterprise requires OpenID Connect (OIDC) for authentication, for example with Identity Providers (IdP) such as Google, Okta, Azure AD and AWS Cognito.
**General instructions**
* You will need to create a configuration with your Identity Provider and provide the “redirect URI” you can copy from this screen.
* Once you’ve created your Identity Provider configuration, you should copy and paste the Issuer URL, Client ID and Client Secret values on this screen.
* Clicking “Verify SSO Configuration” will ensure that validity of the values by authenticating your account. If successful, your user will be created and configured with the “owner” role. Subsequent users that log in will be granted the default “member” role.
Enterprise requires OpenID Connect (OIDC) for authentication, for example with Identity Providers (IdP) such as Google, Okta, Azure AD and AWS Cognito.
**General instructions**
* You will need to create a configuration with your Identity Provider and provide the “redirect URI” you can copy from this screen.
* Once you’ve created your Identity Provider configuration, you should copy and paste the Issuer URL, Client ID and Client Secret values on this screen.
* Clicking “Verify SSO Configuration” will ensure that validity of the values by authenticating your account. If successful, your user will be created and configured with the “owner” role. Subsequent users that log in will be granted the default “member” role.
 **Identity Provider specific instructions**
As *prerequisites*, you will need the following:
* Access to your Okta instance
* Permission to create an [app integration](https://help.okta.com/oie/en-us/Content/Topics/Apps/apps-overview-get-started.htm)
*Creating a Gitpod SSO Integration*
1. On the Okta Admin dashboard, navigate to Applications
2. Select `Create App Integration`
**Identity Provider specific instructions**
As *prerequisites*, you will need the following:
* Access to your Okta instance
* Permission to create an [app integration](https://help.okta.com/oie/en-us/Content/Topics/Apps/apps-overview-get-started.htm)
*Creating a Gitpod SSO Integration*
1. On the Okta Admin dashboard, navigate to Applications
2. Select `Create App Integration`
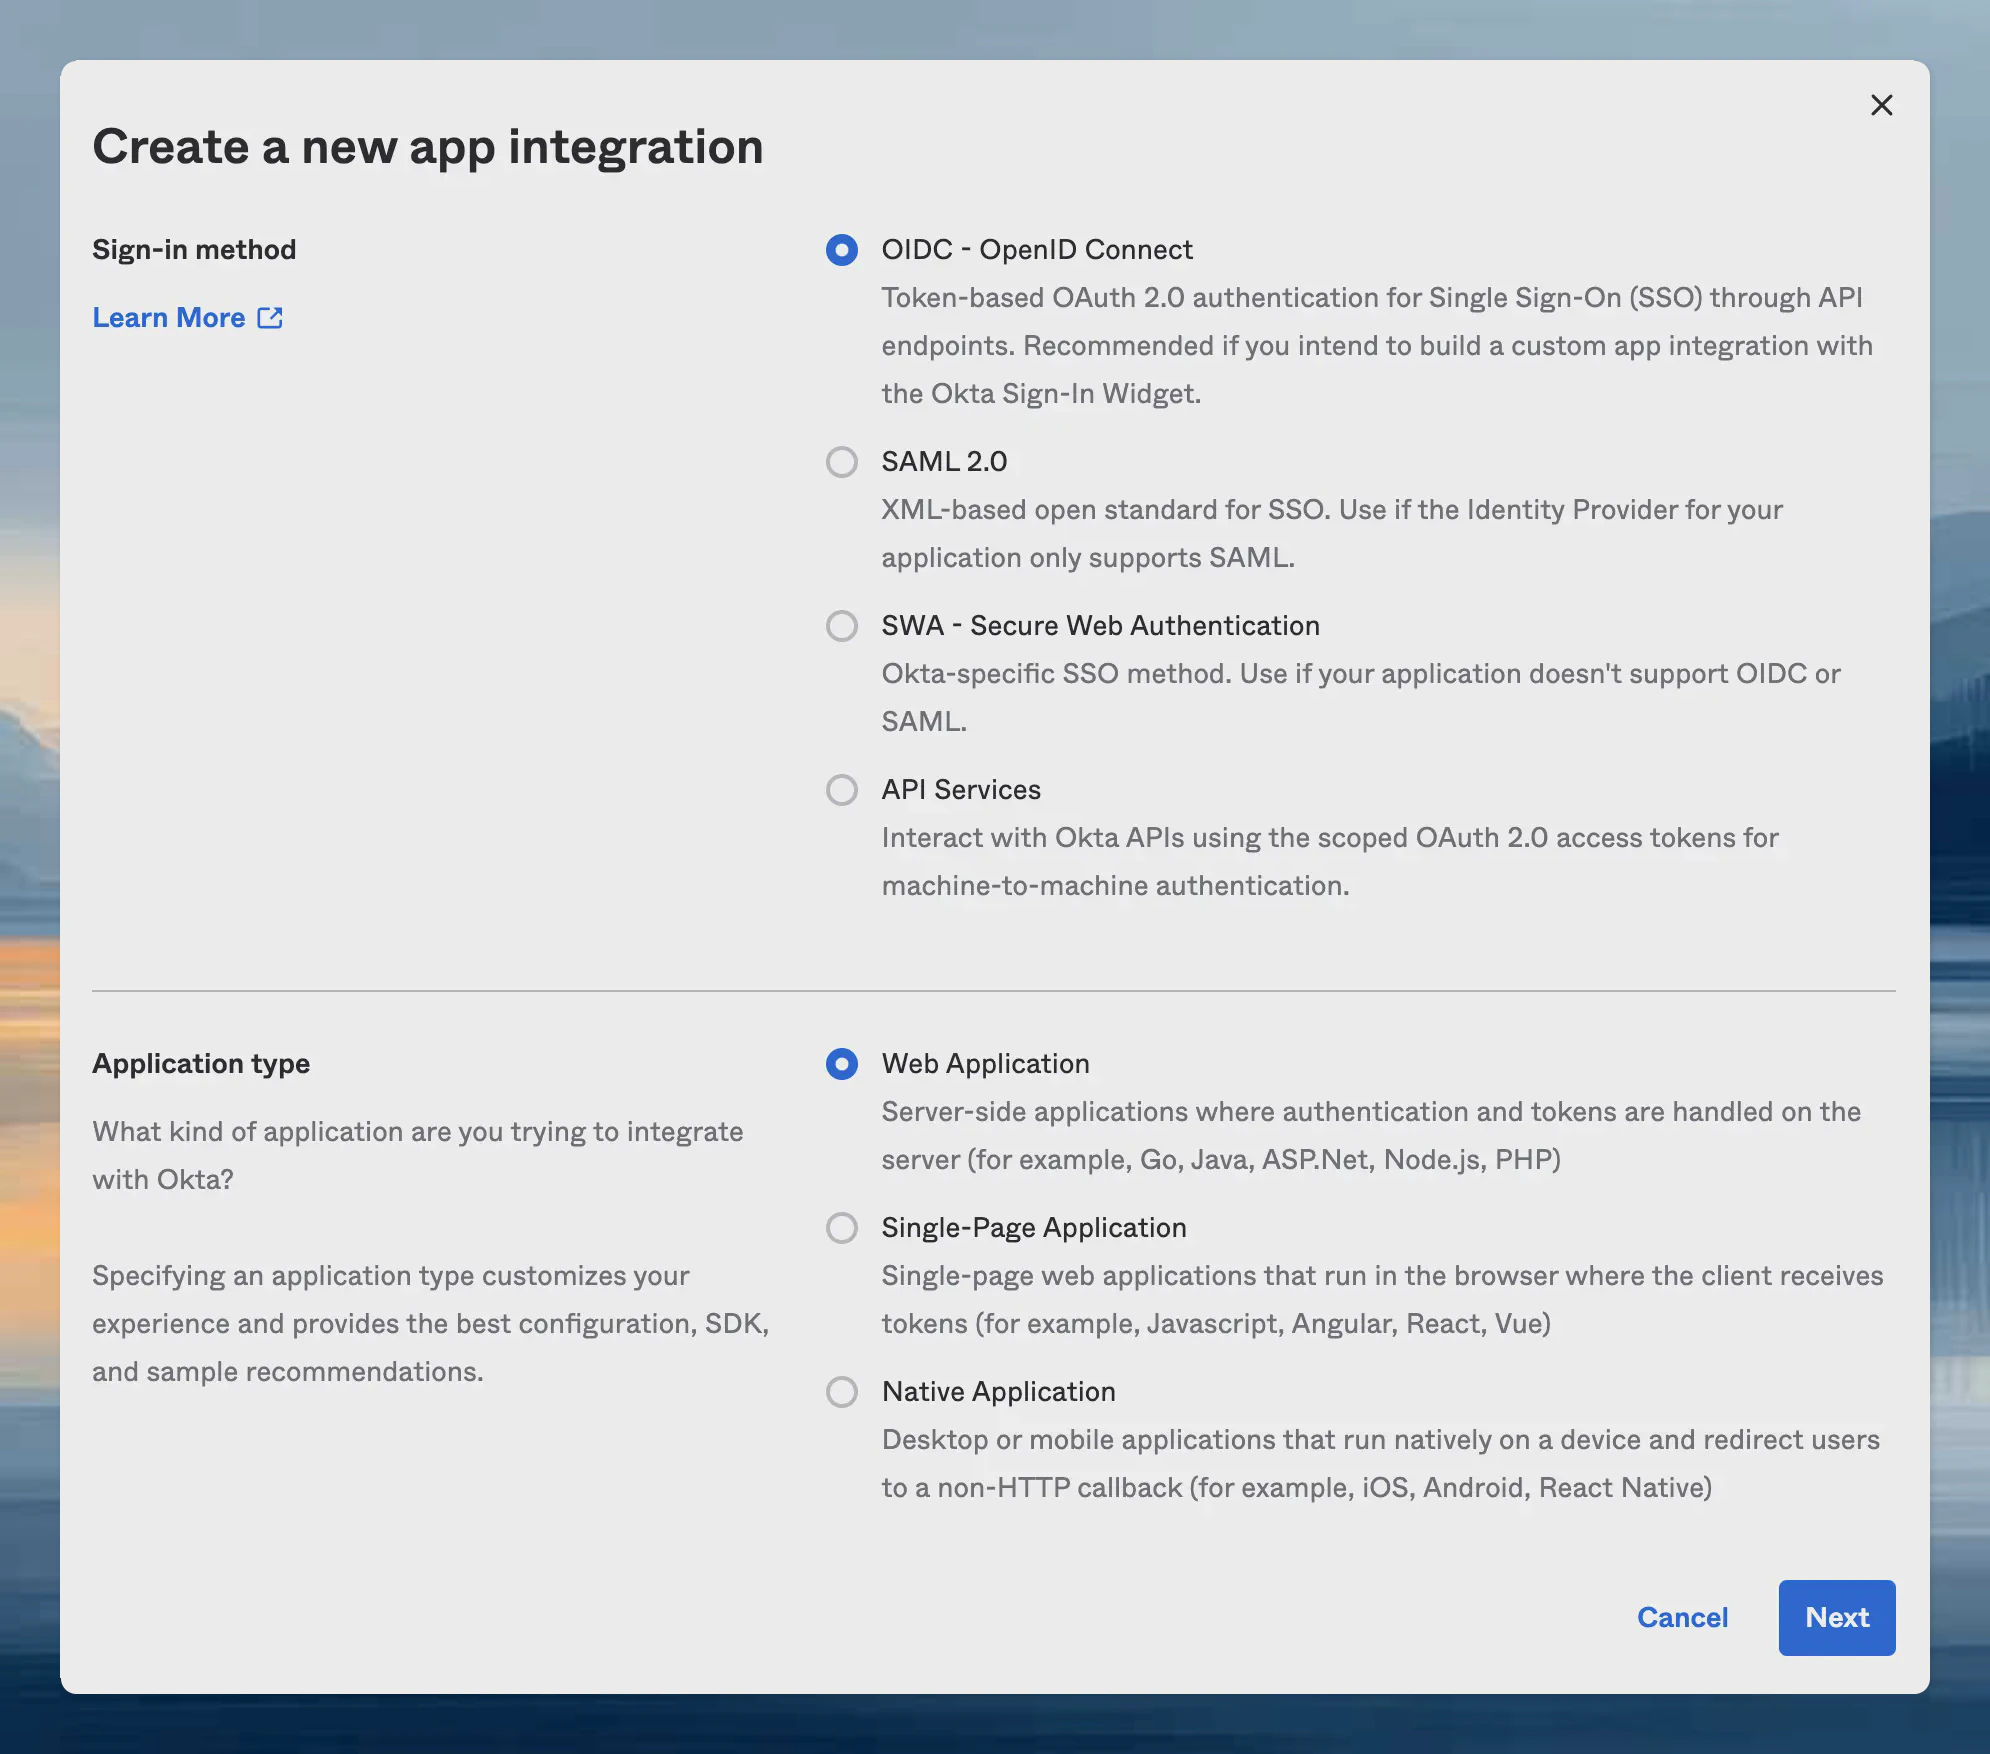
 3. Select the following options and click `Next`
* Sign-in method: `OIDC - Open ID Connect`
* Application type: `Web Application`
3. Select the following options and click `Next`
* Sign-in method: `OIDC - Open ID Connect`
* Application type: `Web Application`
 4. Specify General Settings
* App integration name: `Gitpod` (or choose your own name)
* Sign-in redirect URIs: *copy this value from your Gitpod setup screen* (see [details](/classic/admin/getting-started/overview#:~:text=or%20Azure%20AD.-,General%20instructions,-You%20will%20need) above under "General instructions")
* Sign-out redirect URIs: `none`
* Trusted Origins: `none`
* Assignments: *choose option appropriate to your organization*
4. Specify General Settings
* App integration name: `Gitpod` (or choose your own name)
* Sign-in redirect URIs: *copy this value from your Gitpod setup screen* (see [details](/classic/admin/getting-started/overview#:~:text=or%20Azure%20AD.-,General%20instructions,-You%20will%20need) above under "General instructions")
* Sign-out redirect URIs: `none`
* Trusted Origins: `none`
* Assignments: *choose option appropriate to your organization*
 5. Obtain Client ID & Client Secret
* Copy the `Client ID` and use it as input in Gitpod setup (see [details](/classic/admin/getting-started/overview#:~:text=or%20Azure%20AD.-,General%20instructions,-You%20will%20need) above under "General instructions")
* Copy `Client Secret` and use it as input in Gitpod setup (see [details](/classic/admin/getting-started/overview#:~:text=or%20Azure%20AD.-,General%20instructions,-You%20will%20need) above under "General instructions")
* Set the `Issuer` to your Okta instance, eg: `https://amazingco.okta.com/`
5. Obtain Client ID & Client Secret
* Copy the `Client ID` and use it as input in Gitpod setup (see [details](/classic/admin/getting-started/overview#:~:text=or%20Azure%20AD.-,General%20instructions,-You%20will%20need) above under "General instructions")
* Copy `Client Secret` and use it as input in Gitpod setup (see [details](/classic/admin/getting-started/overview#:~:text=or%20Azure%20AD.-,General%20instructions,-You%20will%20need) above under "General instructions")
* Set the `Issuer` to your Okta instance, eg: `https://amazingco.okta.com/`
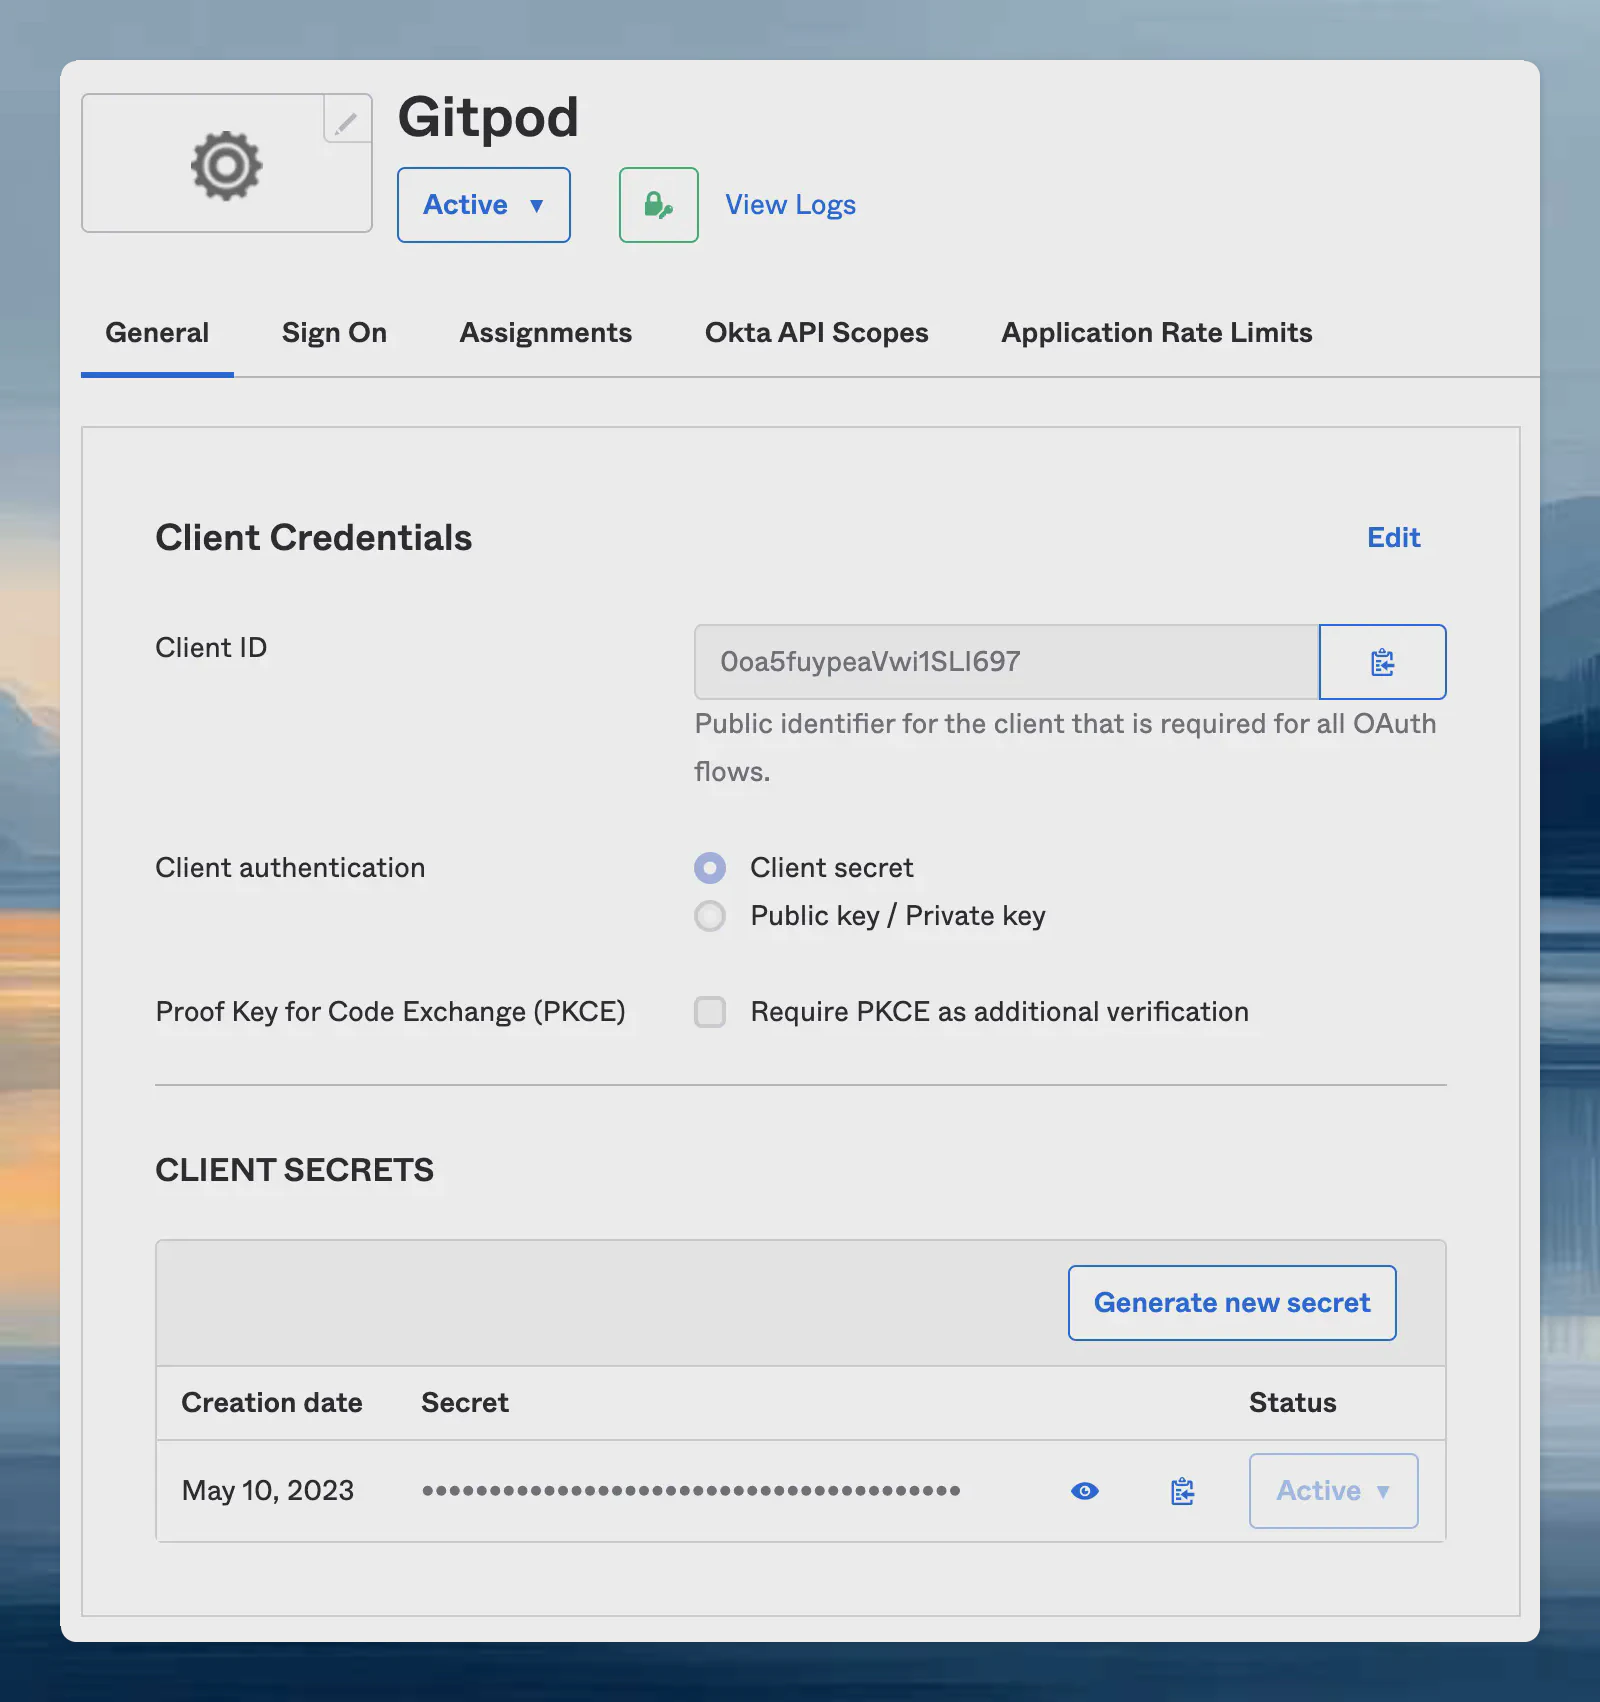 6. Continue with Gitpod SSO Configuration verification: [Clicking “Verify SSO Configuration”](/classic/admin/getting-started/overview#:~:text=or%20Azure%20AD.-,General%20instructions,-You%20will%20need)
*As prerequisites* you will need the following:
* Access to setup a new [API Credentials](https://console.cloud.google.com/apis/credentials) in your GCP Account
*Creating a Gitpod SSO Integration*
1. Navigate to your Google Cloud Console, API Credentials
2. Select Create Credentials, and choose OAuth client ID
6. Continue with Gitpod SSO Configuration verification: [Clicking “Verify SSO Configuration”](/classic/admin/getting-started/overview#:~:text=or%20Azure%20AD.-,General%20instructions,-You%20will%20need)
*As prerequisites* you will need the following:
* Access to setup a new [API Credentials](https://console.cloud.google.com/apis/credentials) in your GCP Account
*Creating a Gitpod SSO Integration*
1. Navigate to your Google Cloud Console, API Credentials
2. Select Create Credentials, and choose OAuth client ID
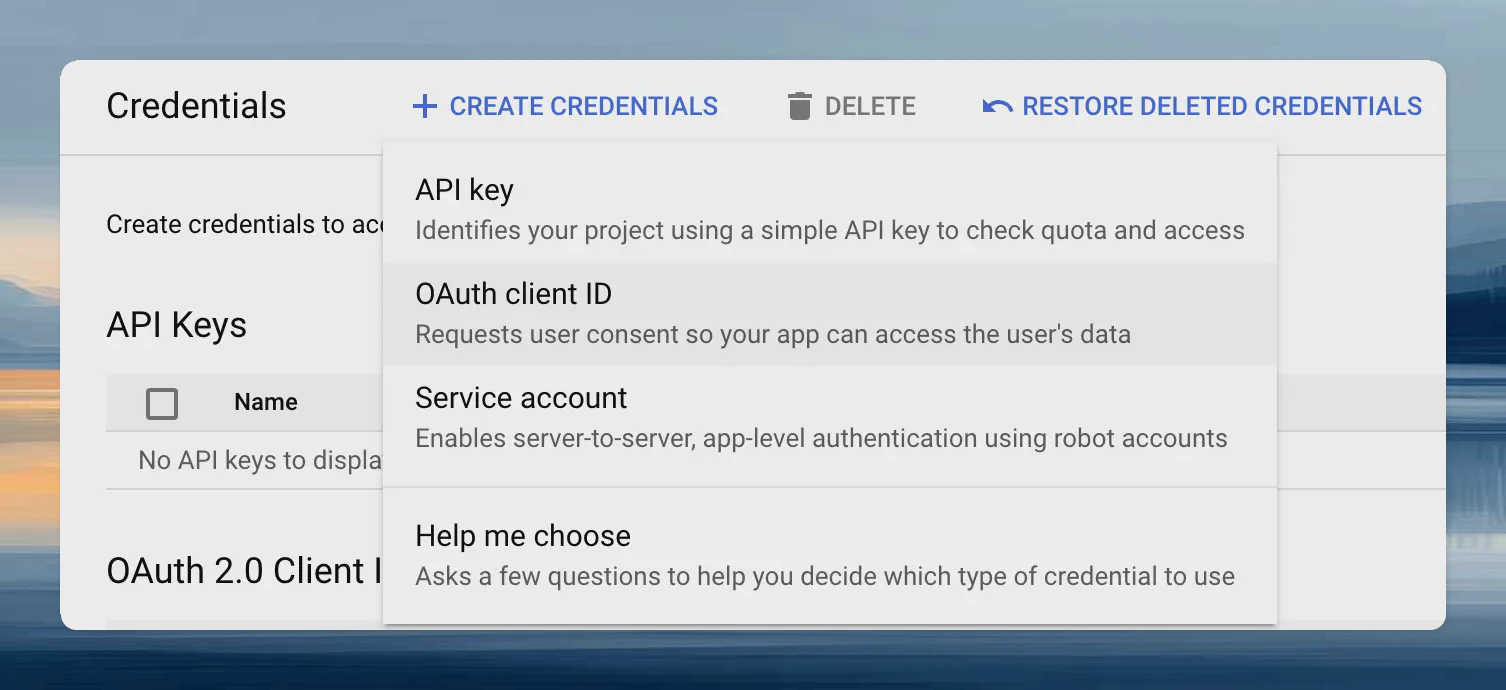 3. Configure your OAuth Client ID, by specifying the Authorized Redirect URIs: [Once you’ve created your Identity Provider configuration, you should copy...](/classic/admin/getting-started/overview#:~:text=or%20Azure%20AD.-,General%20instructions,-You%20will%20need)
4. Obtain the Client ID & Client Secret and input these into your Gitpod Setup page
3. Configure your OAuth Client ID, by specifying the Authorized Redirect URIs: [Once you’ve created your Identity Provider configuration, you should copy...](/classic/admin/getting-started/overview#:~:text=or%20Azure%20AD.-,General%20instructions,-You%20will%20need)
4. Obtain the Client ID & Client Secret and input these into your Gitpod Setup page
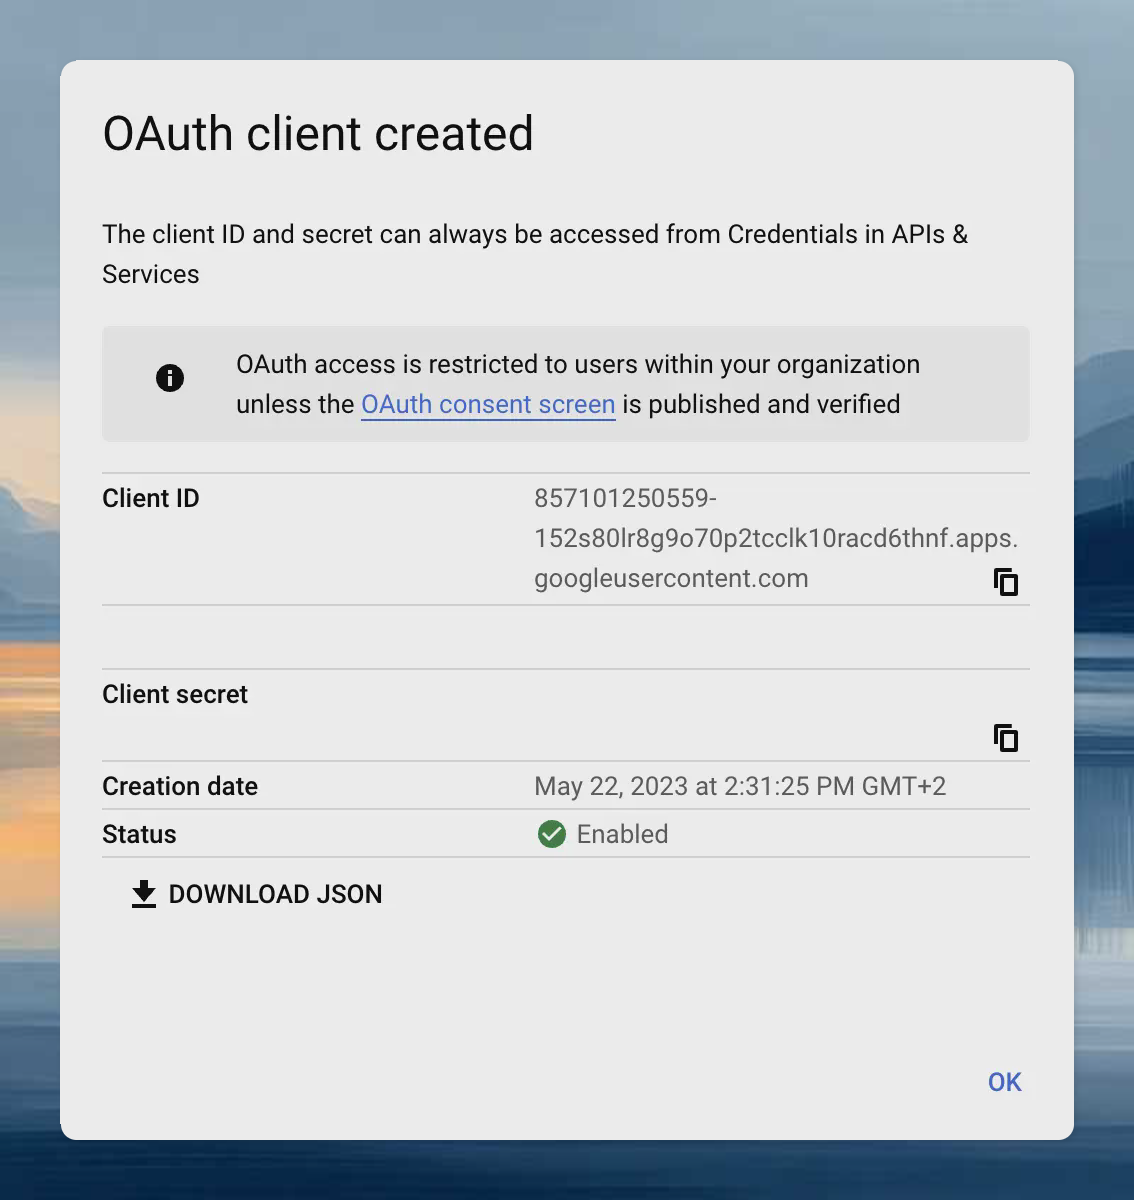 5. Set Provider's Issuer URL to `https://accounts.google.com`
6. Proceed to verify the integration on the Gitpod setup page: [Clicking “Verify SSO Configuration”](/classic/admin/getting-started/overview#:~:text=or%20Azure%20AD.-,General%20instructions,-You%20will%20need)
*As* *prerequisites* you will need the following:
* Access to Azure Directory, to Register an Application
*Creating a Gitpod SSO Integration*
1. Navigate to your Azure portal > App Registrations
2. Select New Registration
5. Set Provider's Issuer URL to `https://accounts.google.com`
6. Proceed to verify the integration on the Gitpod setup page: [Clicking “Verify SSO Configuration”](/classic/admin/getting-started/overview#:~:text=or%20Azure%20AD.-,General%20instructions,-You%20will%20need)
*As* *prerequisites* you will need the following:
* Access to Azure Directory, to Register an Application
*Creating a Gitpod SSO Integration*
1. Navigate to your Azure portal > App Registrations
2. Select New Registration
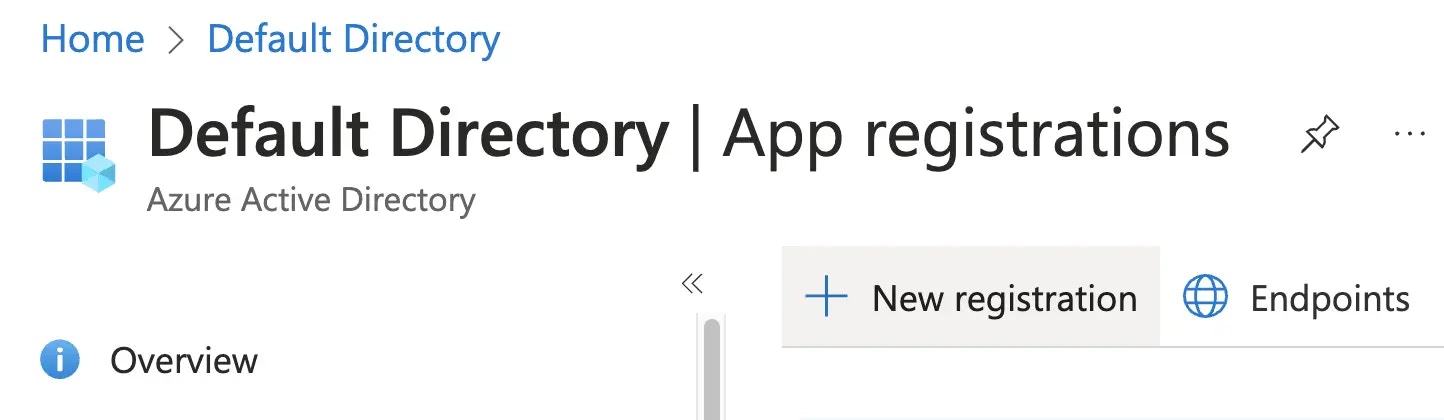 3. Name your application - e.g. Gitpod
4. Select supported account types depending on your organizational needs. Most likely you want *Accounts in this organizational directory only*
5. Copy the redirect URL from the Gitpod SSO setup page and set it as the Redirect URI, selecting Web as the application type
3. Name your application - e.g. Gitpod
4. Select supported account types depending on your organizational needs. Most likely you want *Accounts in this organizational directory only*
5. Copy the redirect URL from the Gitpod SSO setup page and set it as the Redirect URI, selecting Web as the application type
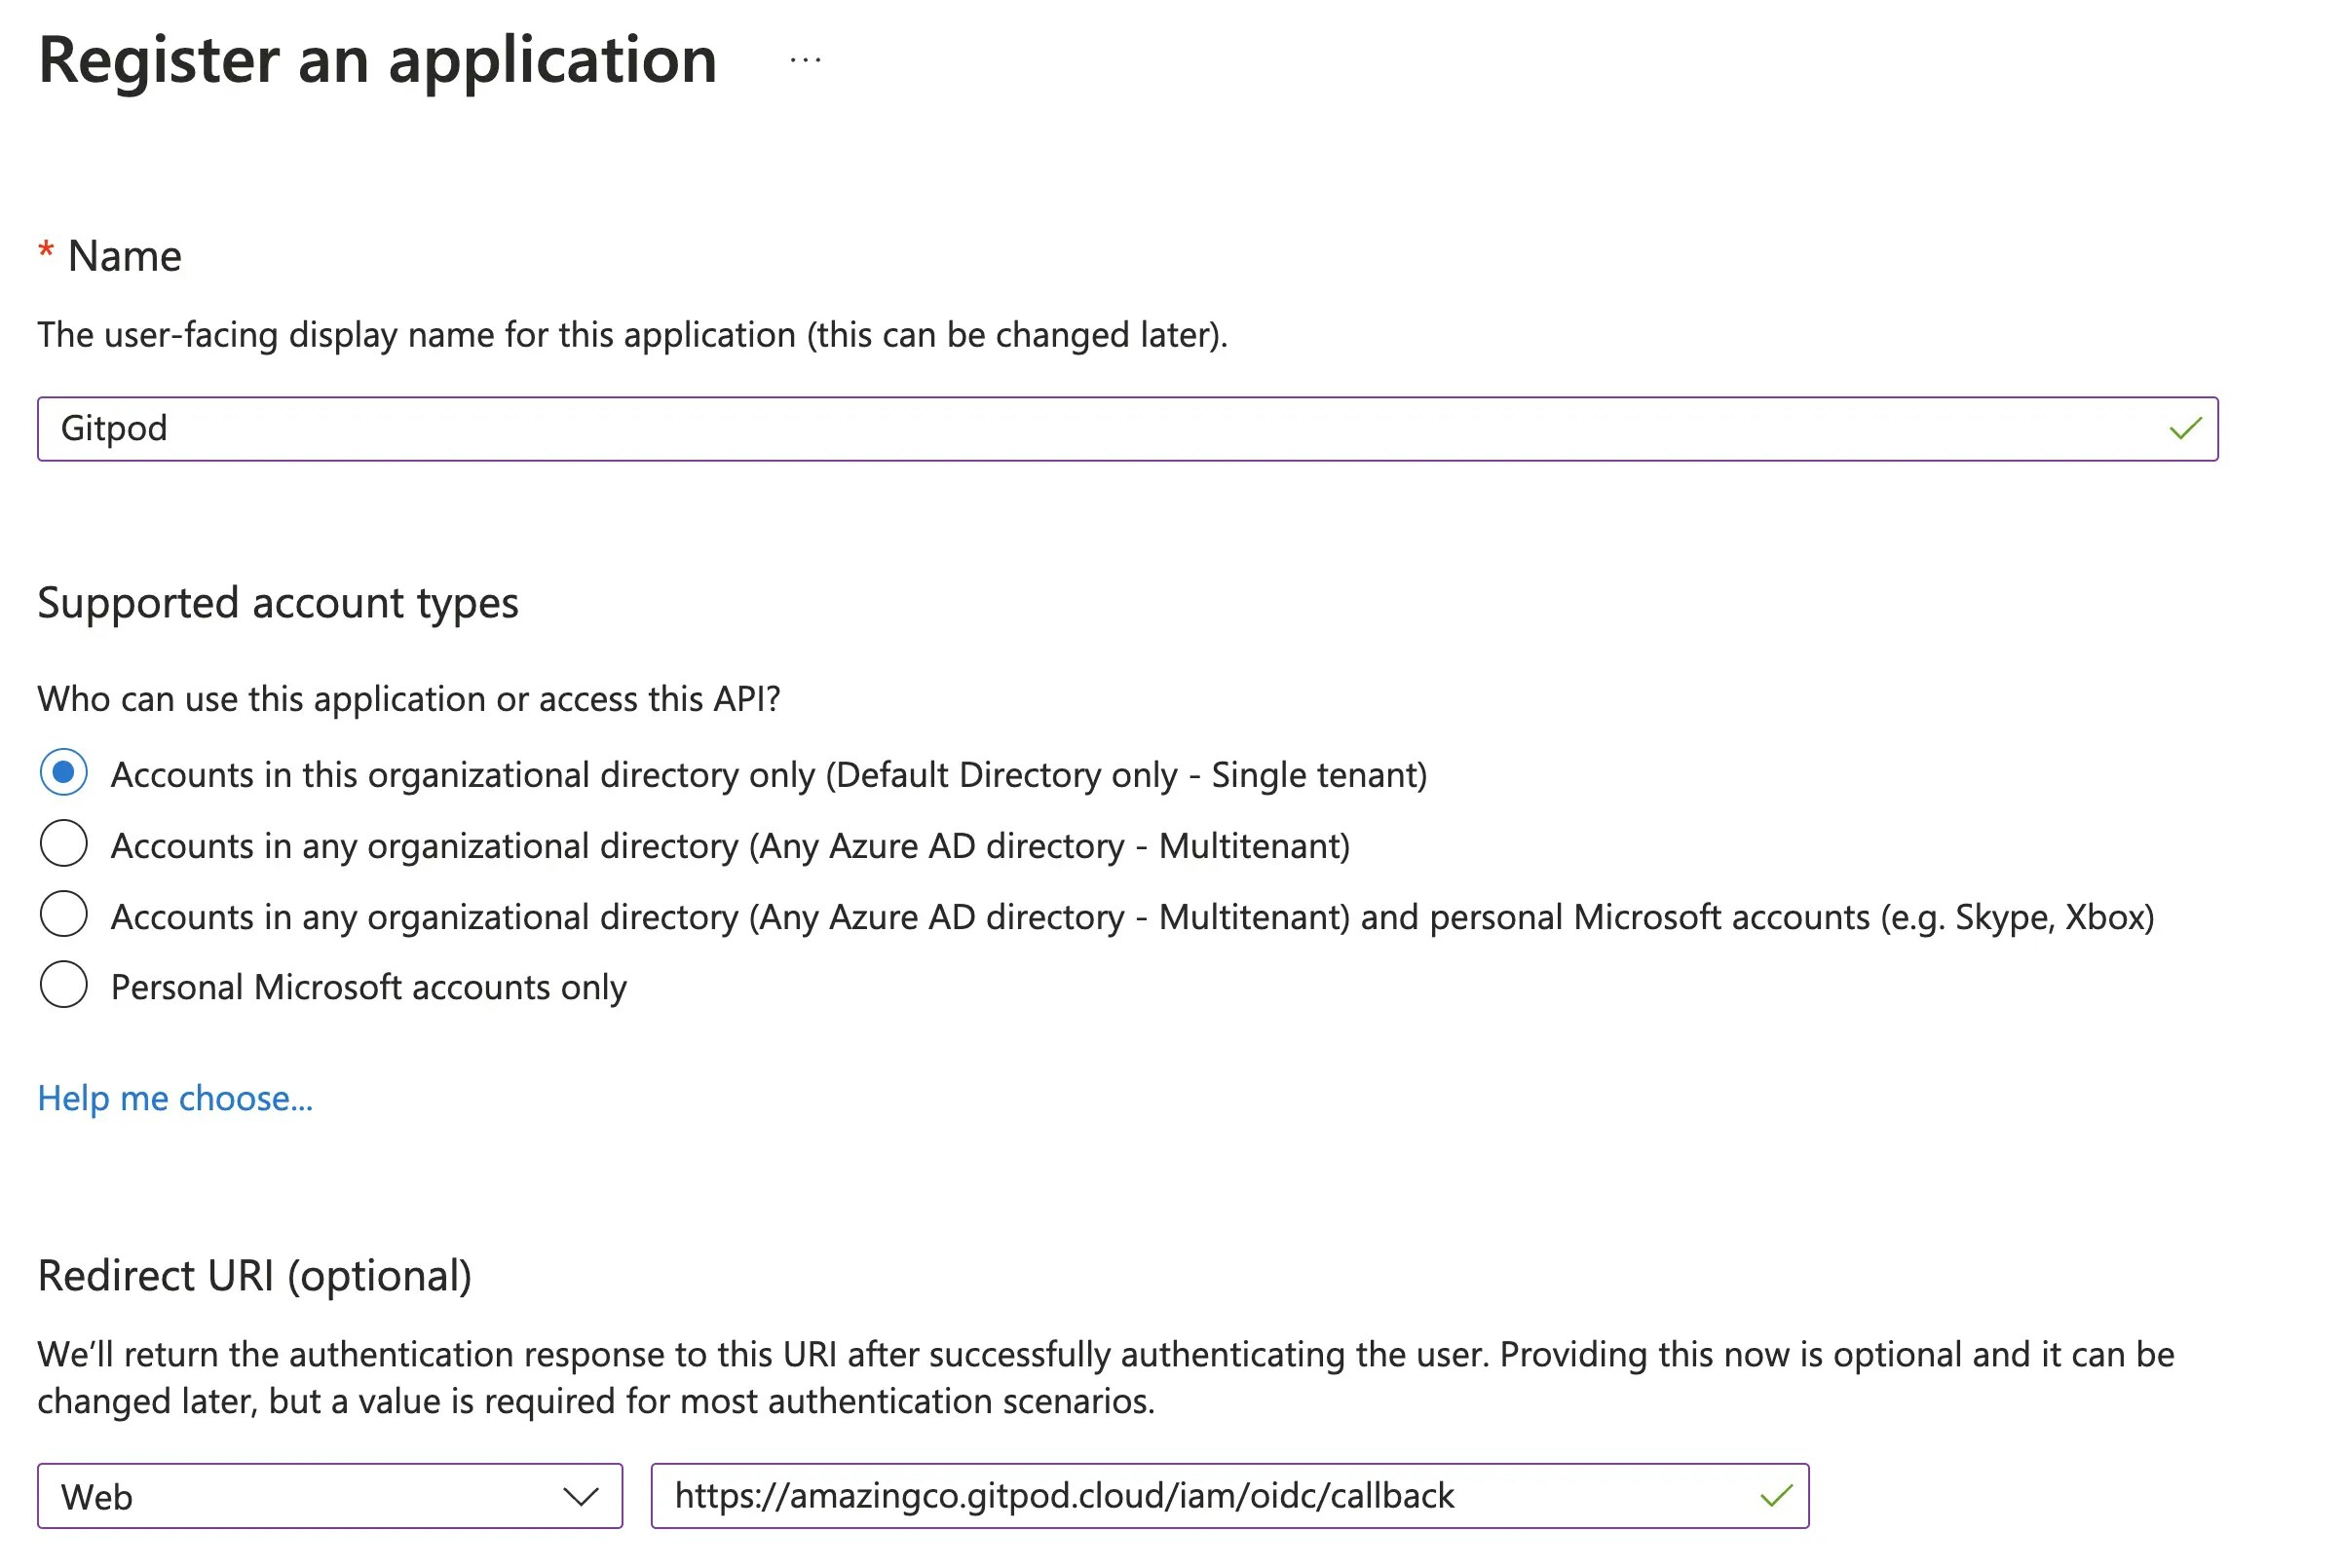 6. From the App Registration Overview, you should obtain the Application (client) ID and copy it into your Gitpod SSO setup page
7. Create a client secret - navigate to Certificates & Secrets, click New client secret
6. From the App Registration Overview, you should obtain the Application (client) ID and copy it into your Gitpod SSO setup page
7. Create a client secret - navigate to Certificates & Secrets, click New client secret
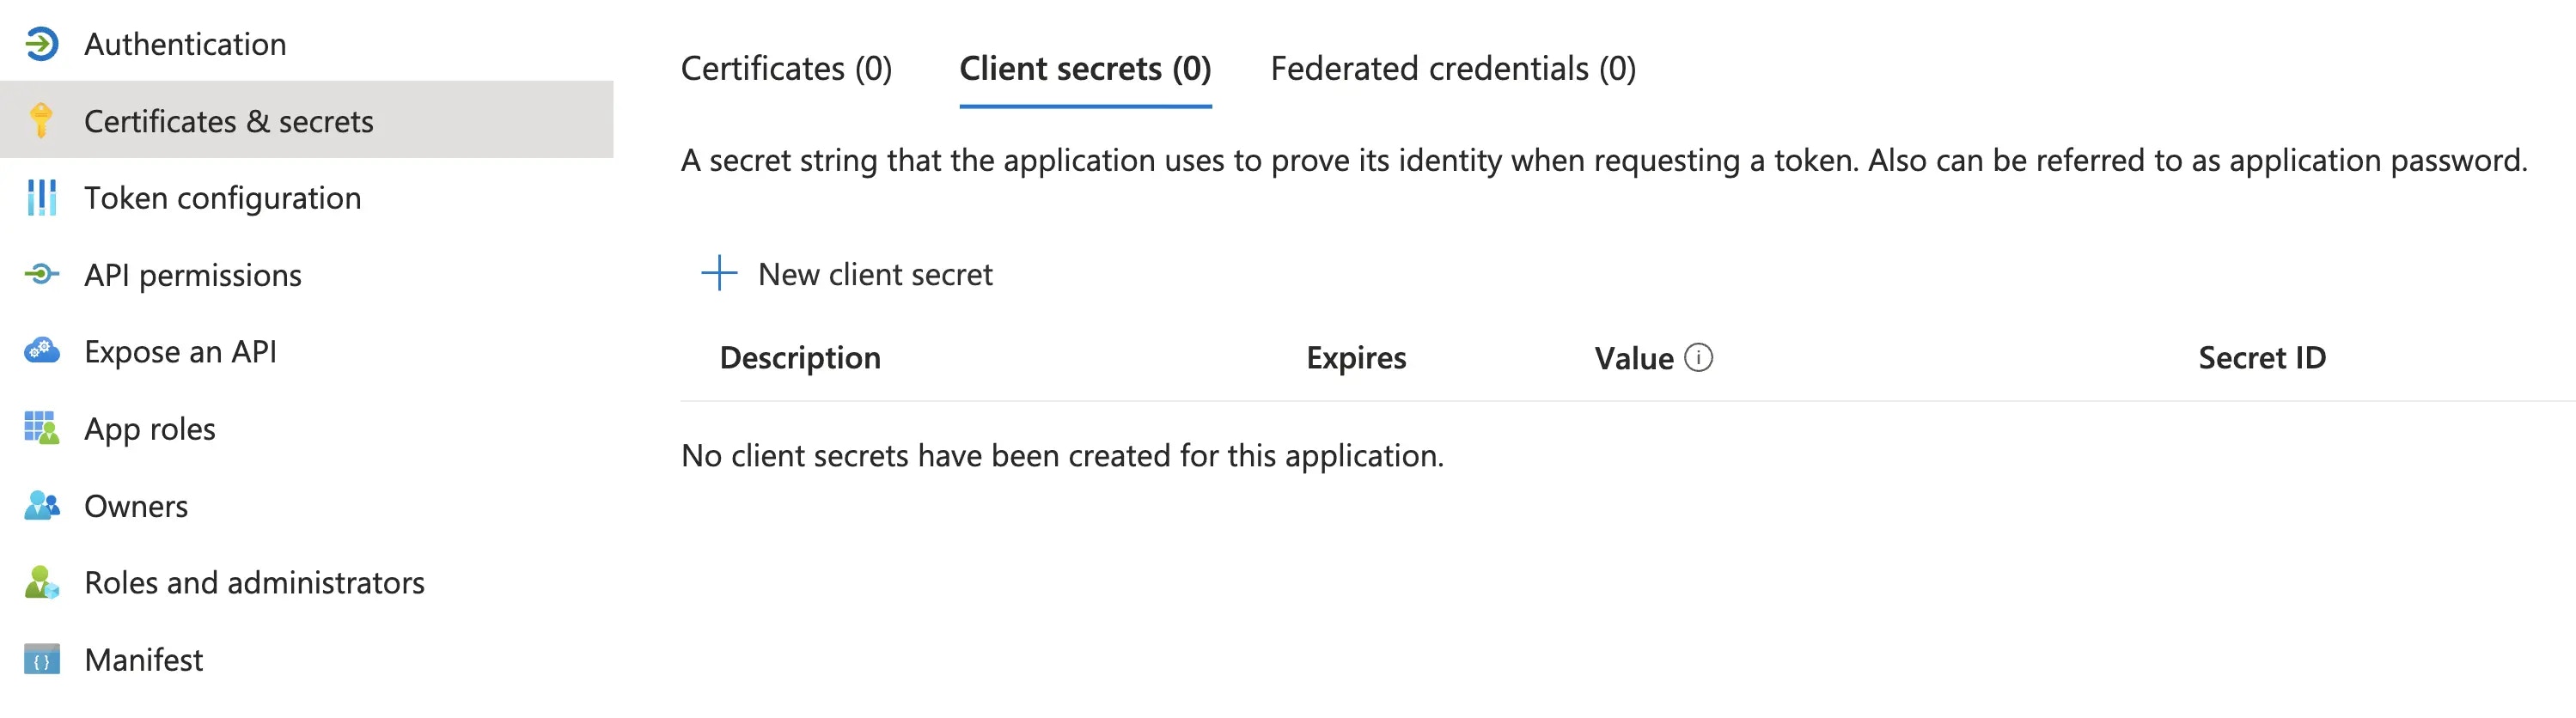 8. Name the secret, and set expiry according to your needs.
> 📌 Once the client secret expires, you (nor anyone else in your organization) will be able to log in to Gitpod. You will need to update the SSO configuration (secret) to continue using SSO.
9. Obtain the *Secret Value* and copy into into the Gitpod SSO Client Secret input field
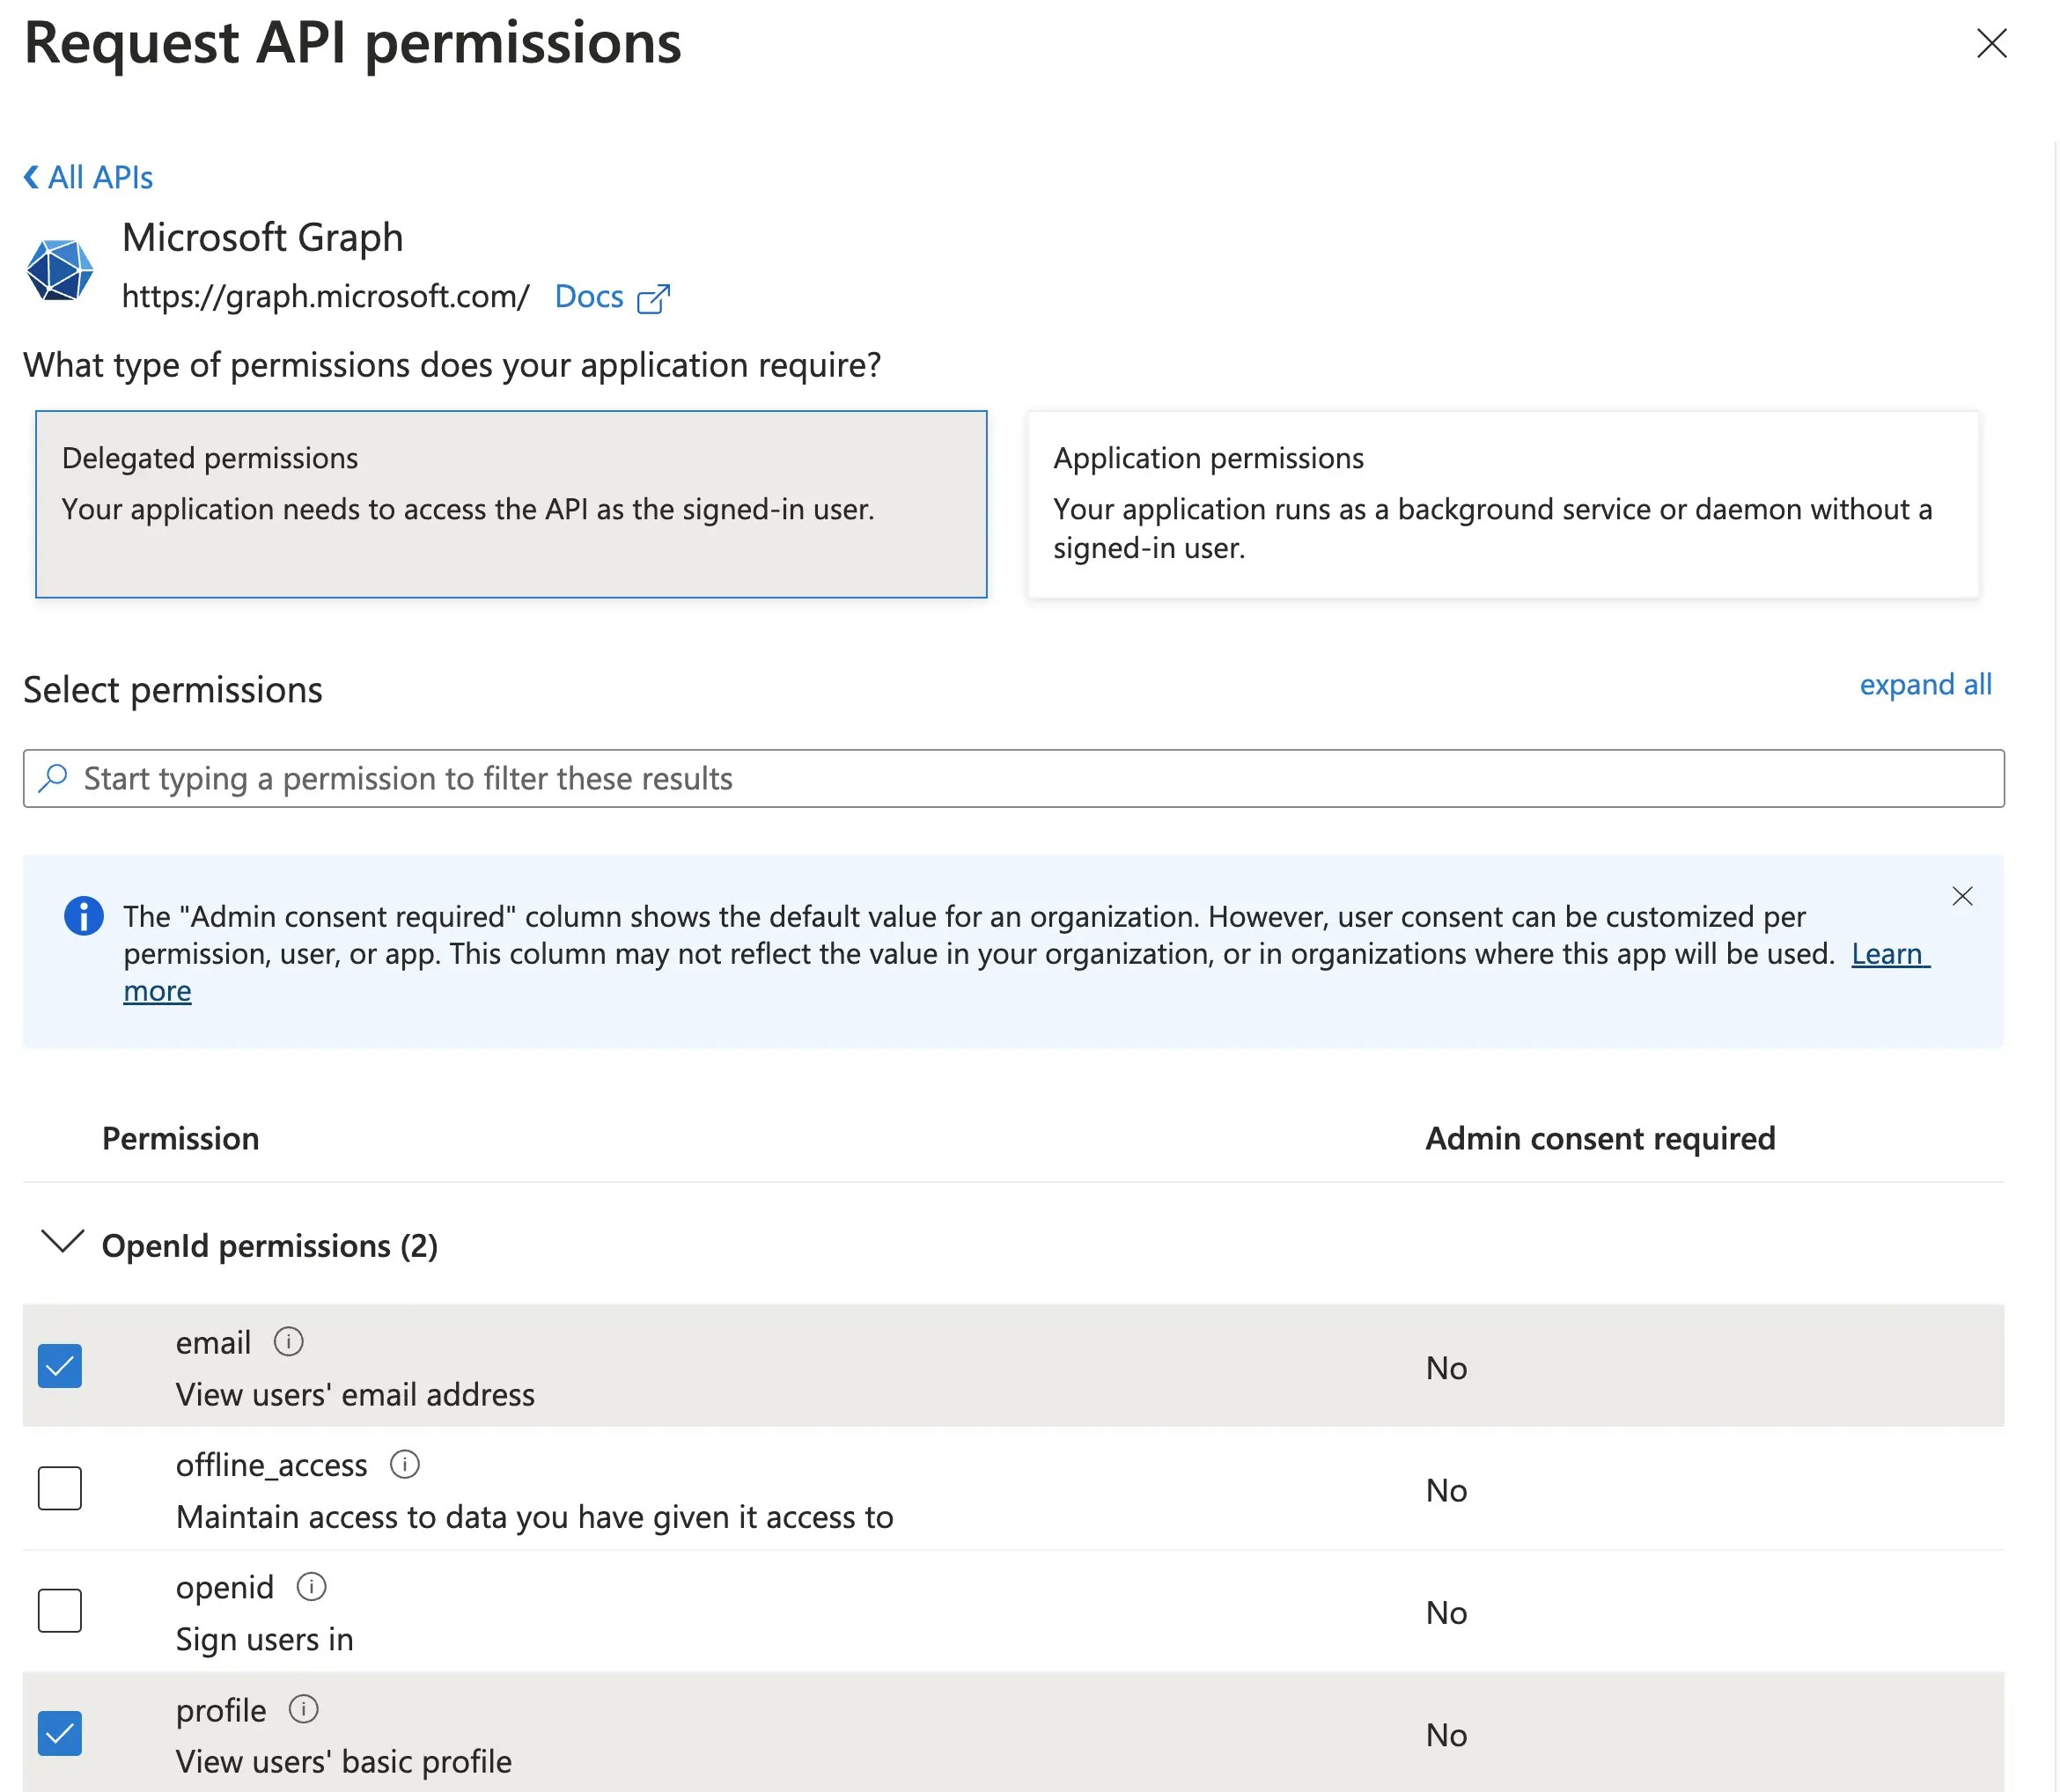
10. Grant the application access to OpenId `email` , `openid`and `profile` information
* Navigate to API Permissions
* Select Microsoft Graph
* Enable `OpenId.email`, `OpenId.openid` and `Openid.profile`
8. Name the secret, and set expiry according to your needs.
> 📌 Once the client secret expires, you (nor anyone else in your organization) will be able to log in to Gitpod. You will need to update the SSO configuration (secret) to continue using SSO.
9. Obtain the *Secret Value* and copy into into the Gitpod SSO Client Secret input field
10. Grant the application access to OpenId `email` , `openid`and `profile` information
* Navigate to API Permissions
* Select Microsoft Graph
* Enable `OpenId.email`, `OpenId.openid` and `Openid.profile`
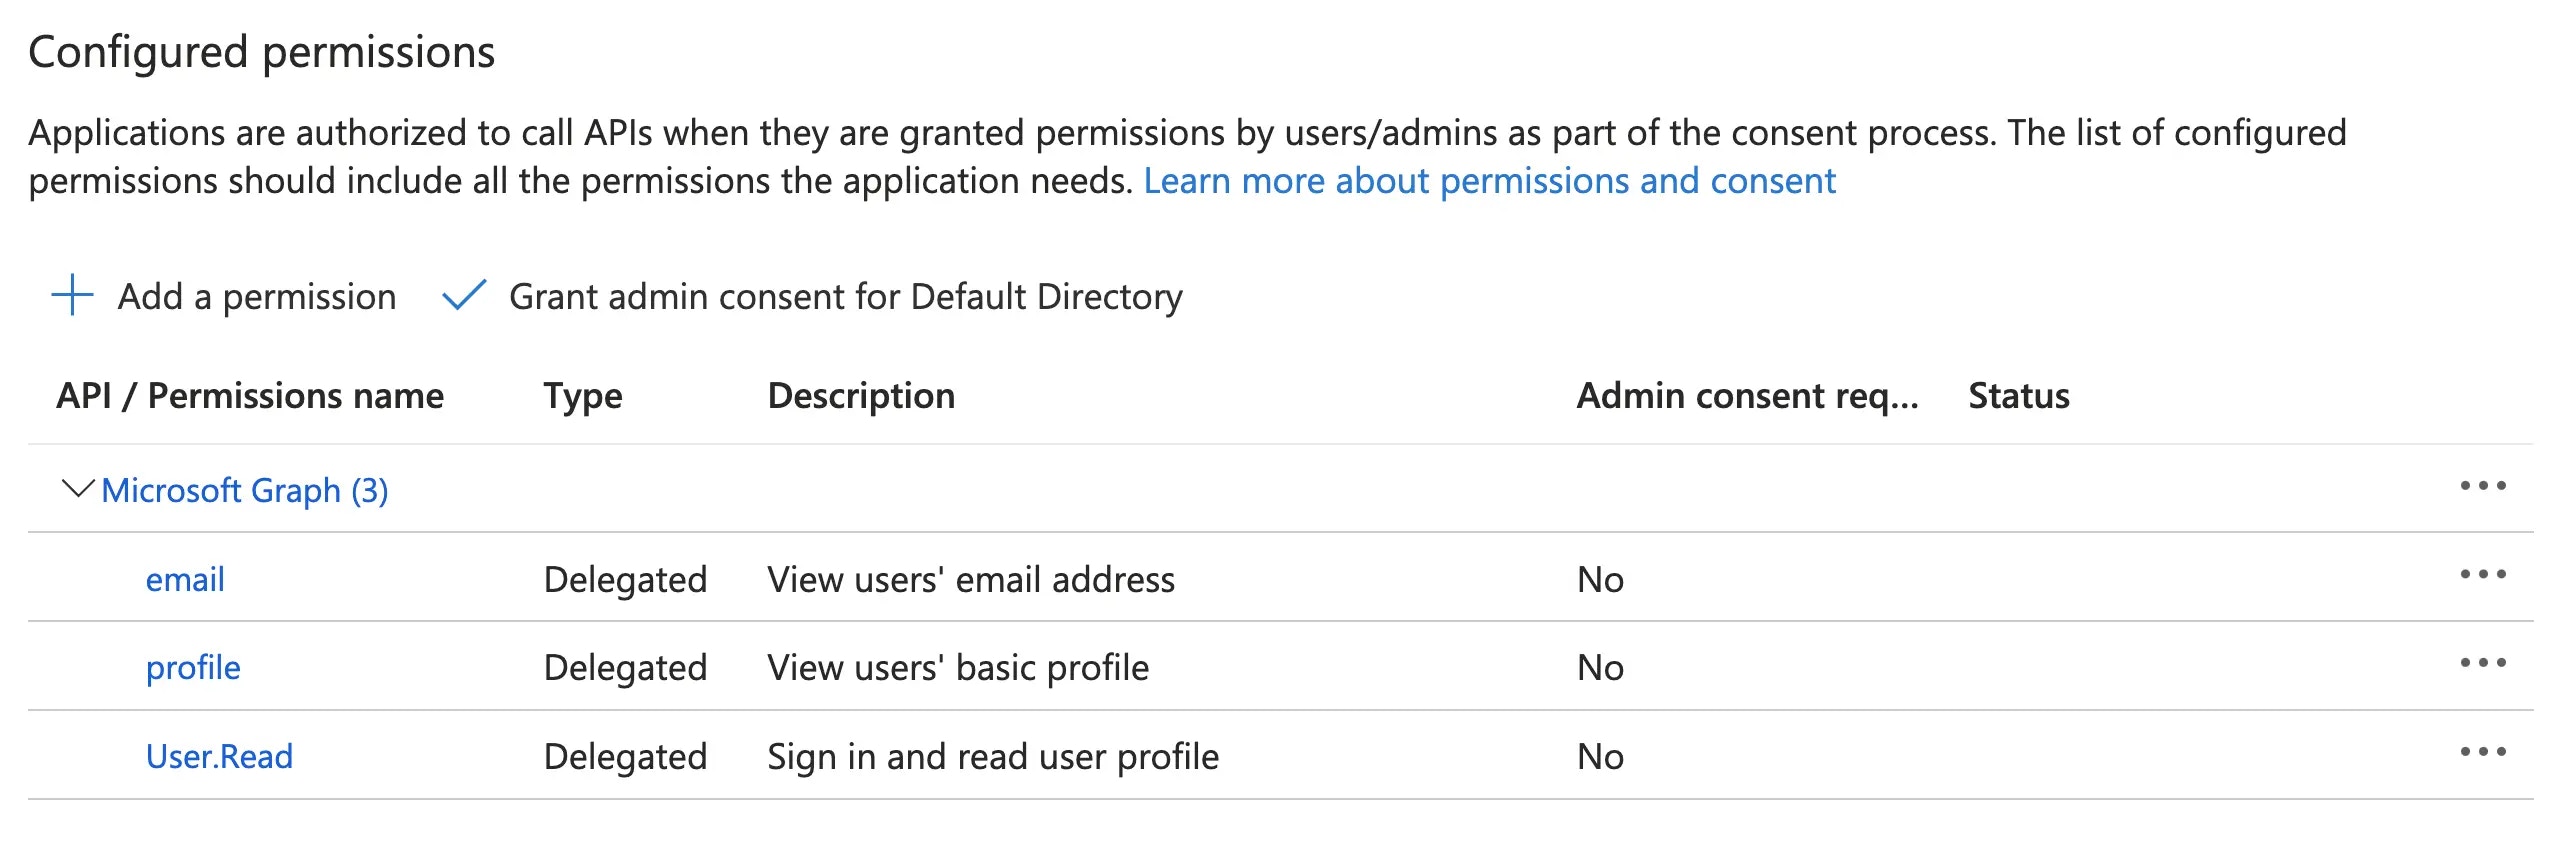
 * Once saved, your configured permissions should look as follows:
 11. Obtain the Provider URL
* Navigate to your App Registration > Overview
* Click endpoints
11. Obtain the Provider URL
* Navigate to your App Registration > Overview
* Click endpoints
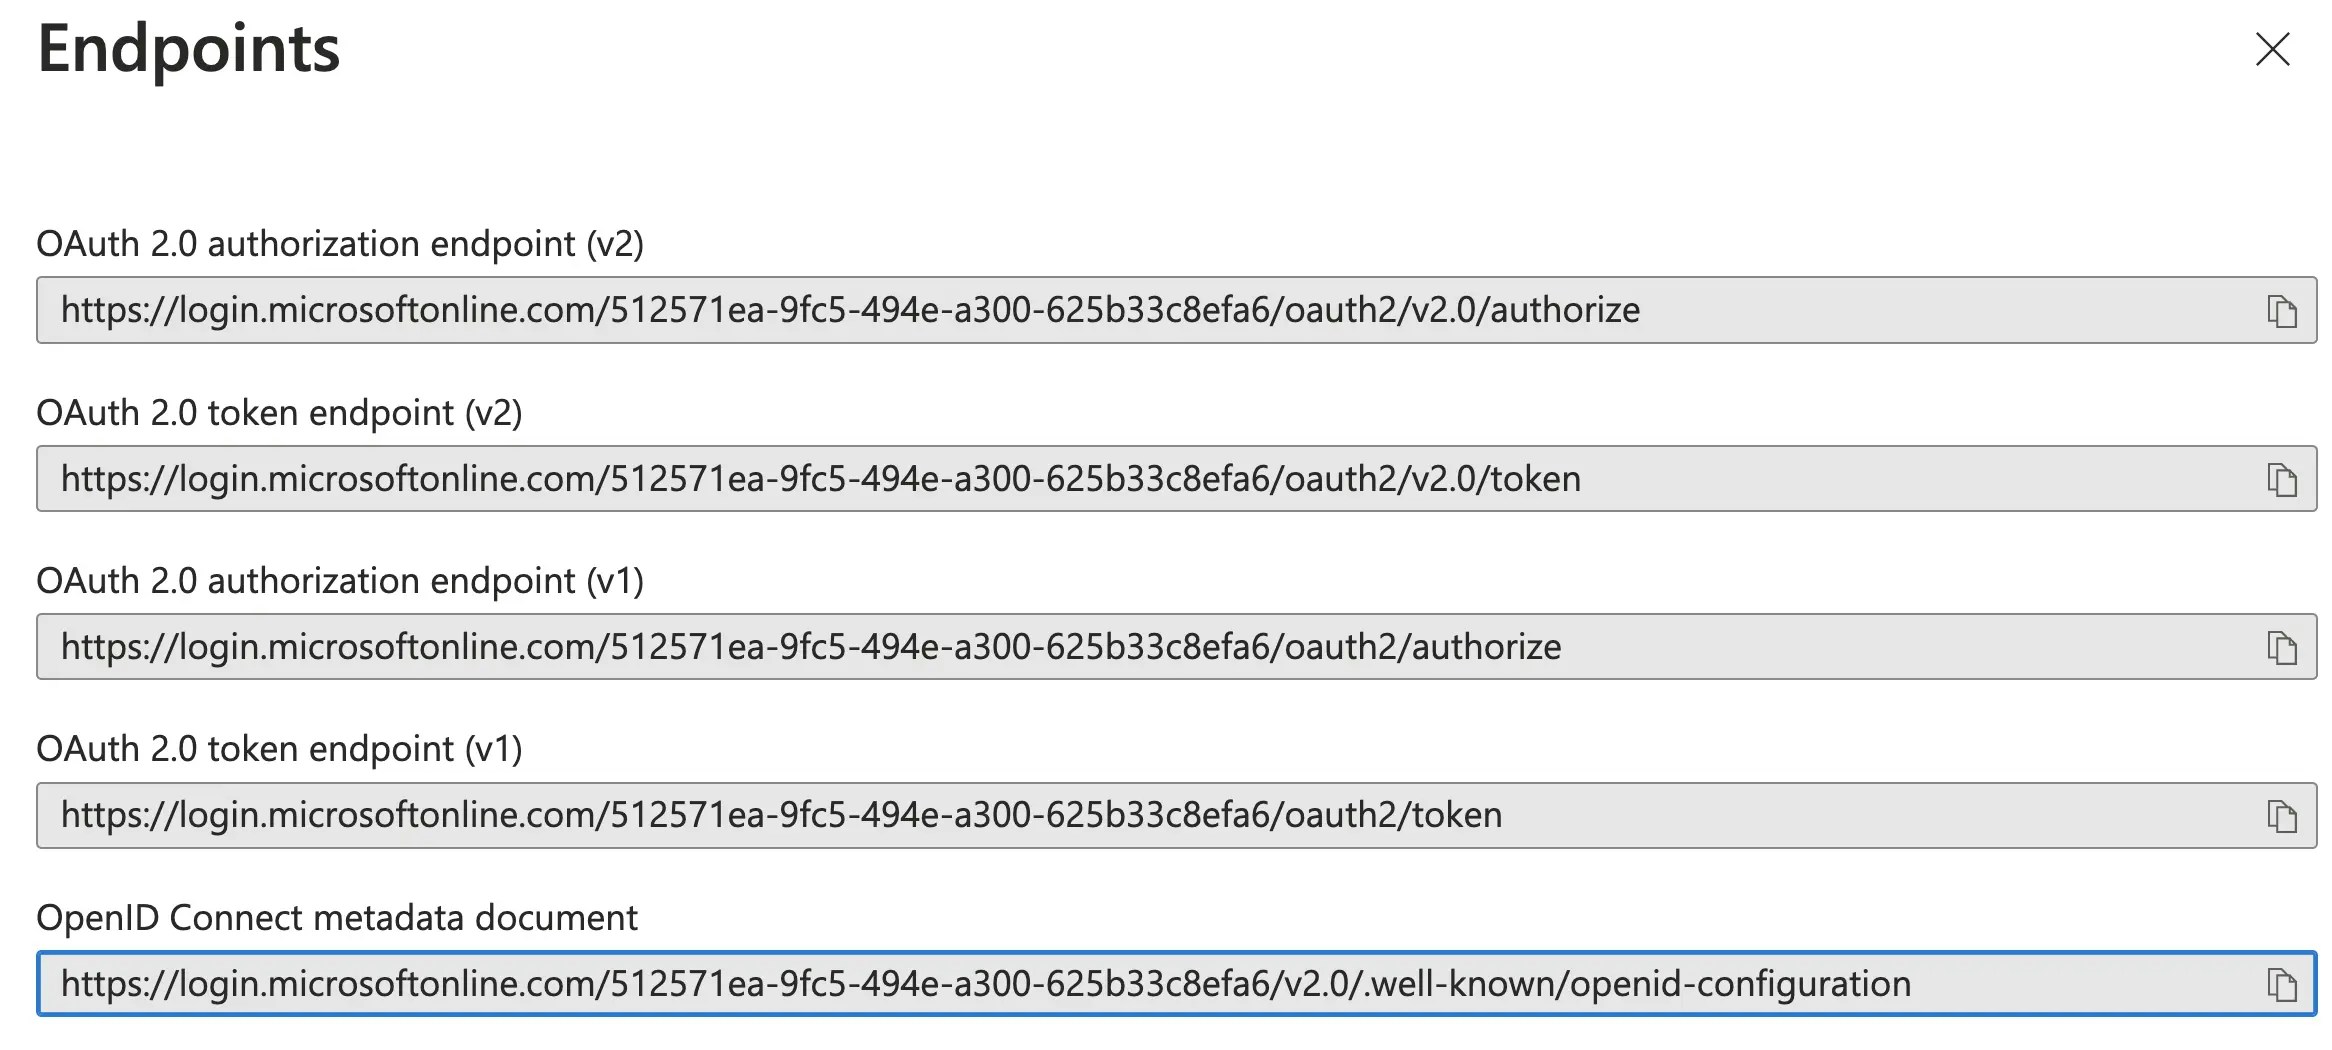 * Find the entry for `OpenID Connect metadata document`
* Use the URL before the `.well-known/openid-configuration` segment,
* For example: `https://login.microsoftonline.com/512571ea-9fc5-494e-a300-625b33c8efa6/v2.0/`
12. Proceed to Verify the SSO configuration on the GitHub SSO setup page: : [Clicking “Verify SSO Configuration”](/classic/admin/getting-started/overview#:~:text=or%20Azure%20AD.-,General%20instructions,-You%20will%20need)
Choose this option if you already use AWS Cognito. AWS Cognito is also a
good option in a testing or Proof of Value (PoV) scenario where you don't
have an IDP you can easily integrate with. In this scenario, most settings
should be left at their defaults.
*Follow the [Cognito User Pool setup process](https://eu-central-1.console.aws.amazon.com/cognito/v2/home), then copy the necessary values into the Gitpod SSO Configuration UI*
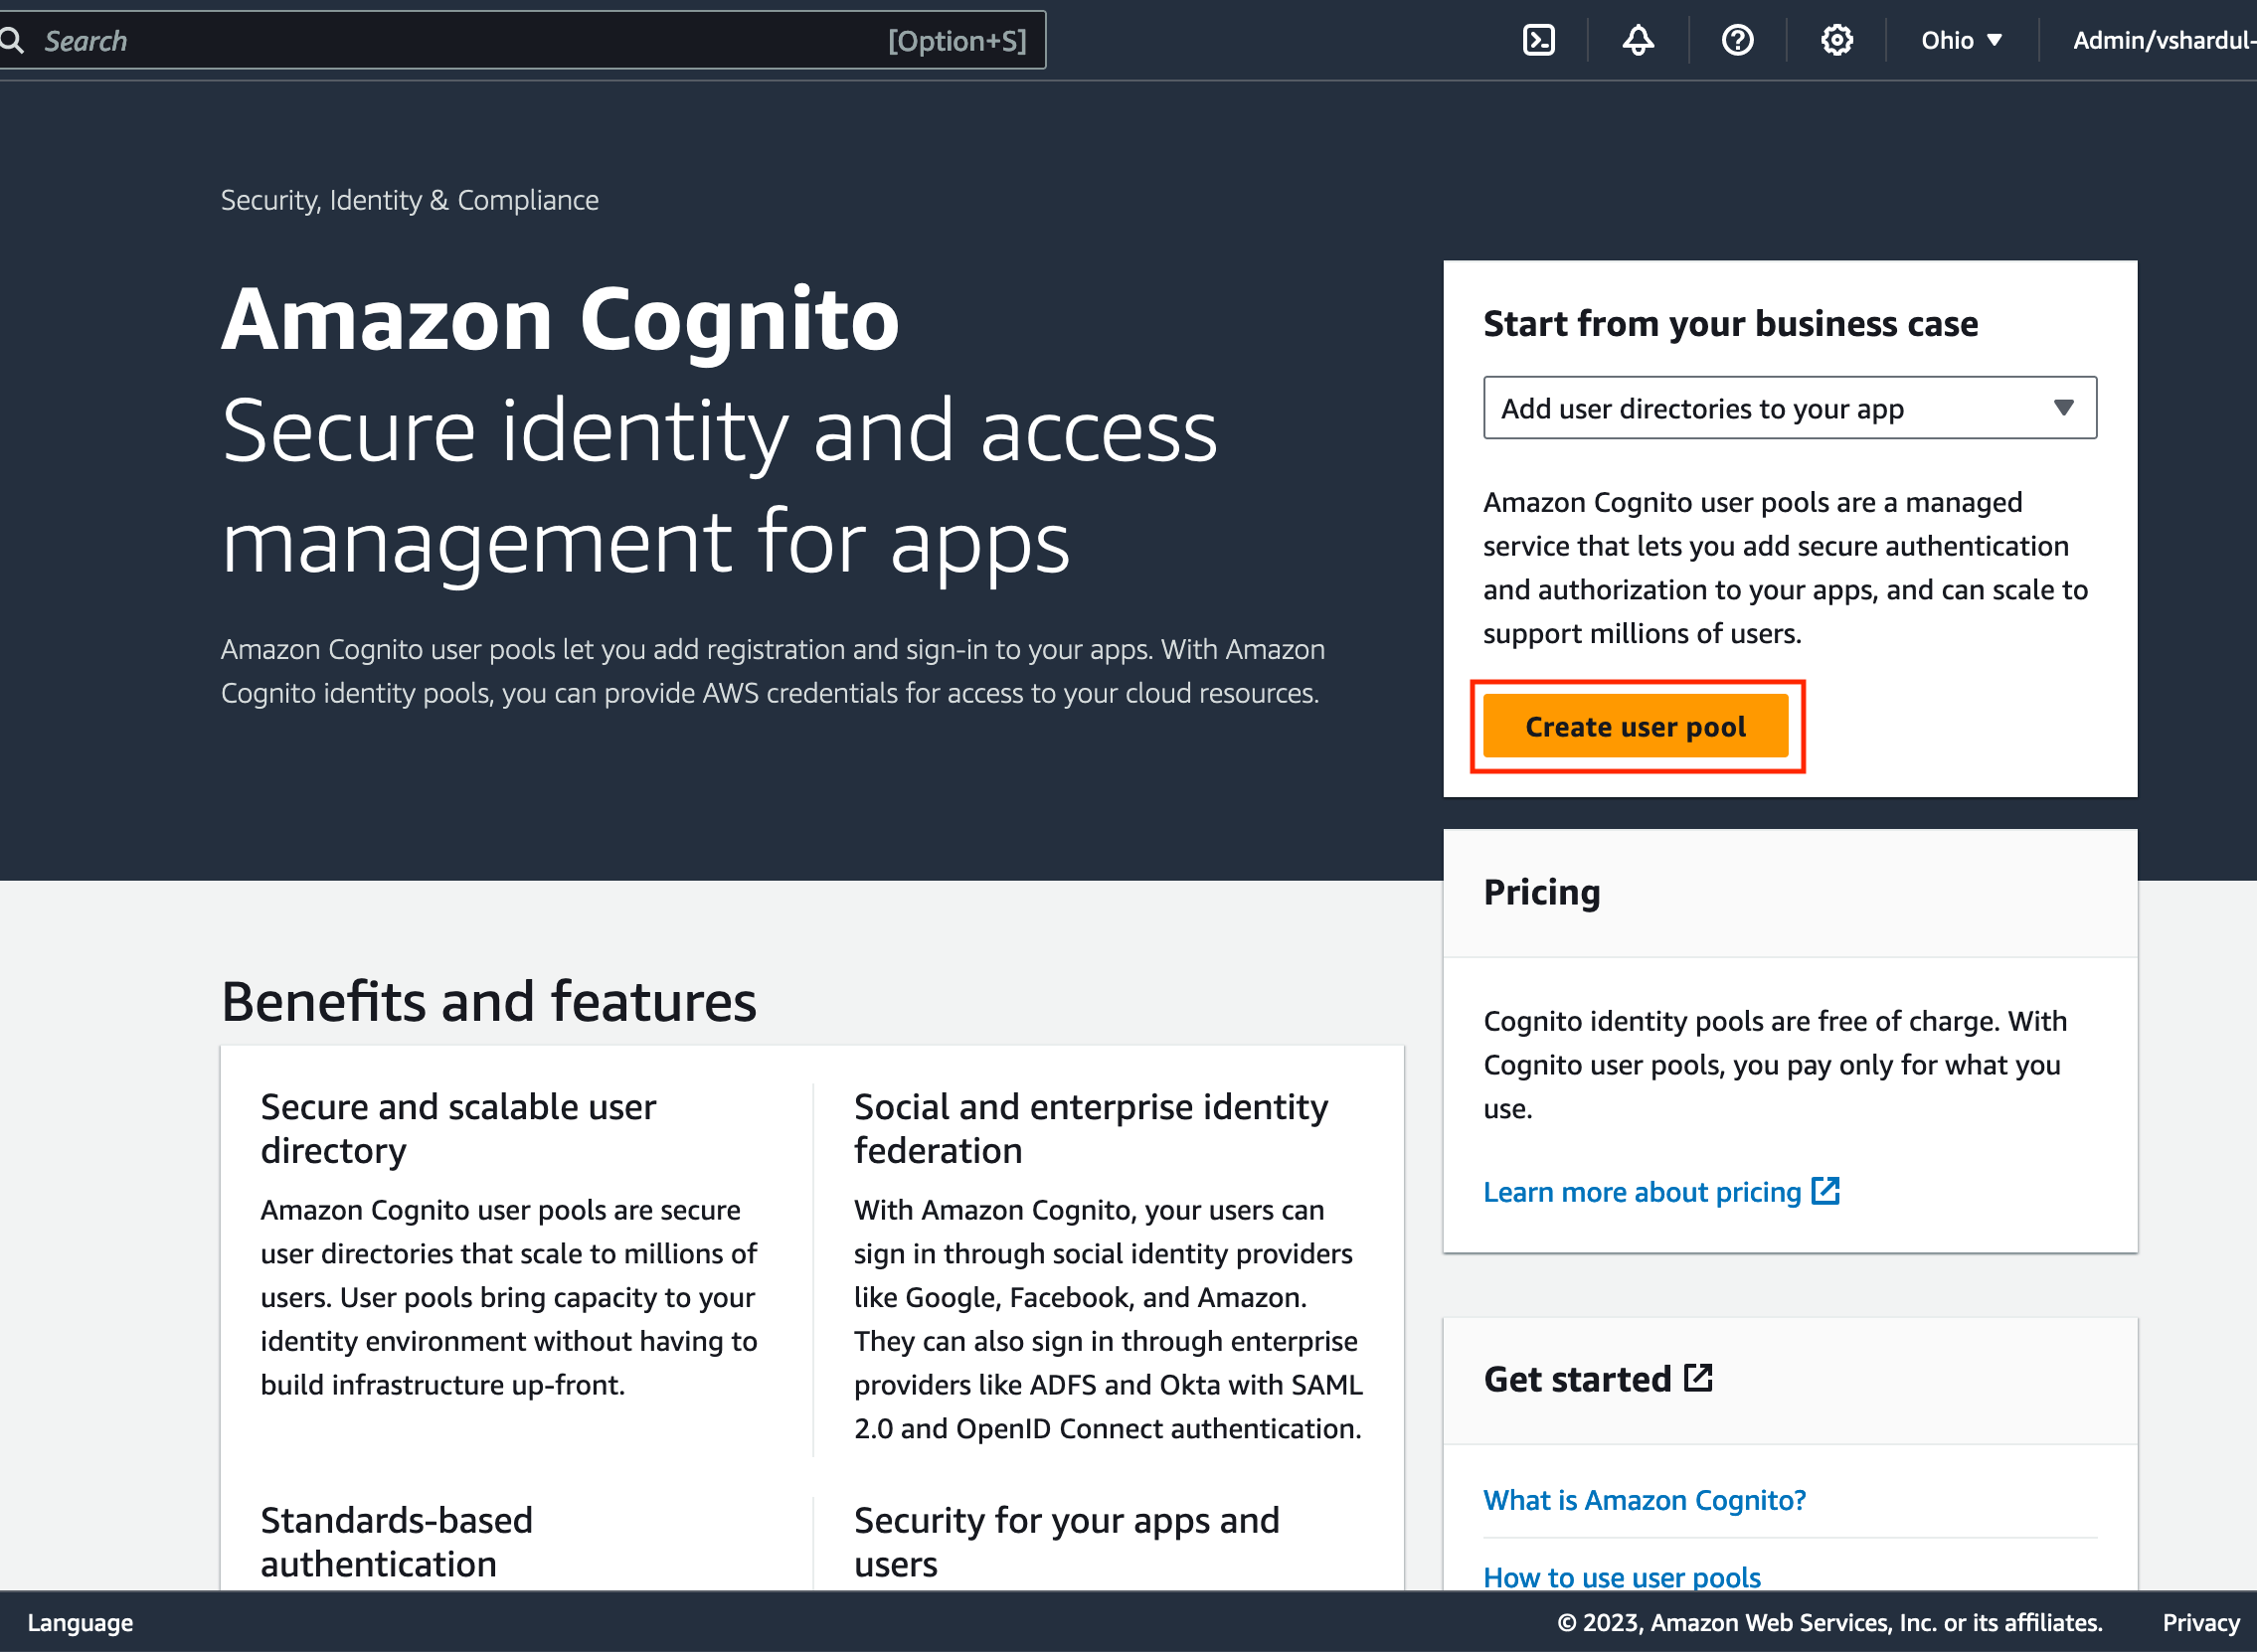
1. Navigate to the Cognito page in the AWS console. Select create user pool:
{' '}
* Find the entry for `OpenID Connect metadata document`
* Use the URL before the `.well-known/openid-configuration` segment,
* For example: `https://login.microsoftonline.com/512571ea-9fc5-494e-a300-625b33c8efa6/v2.0/`
12. Proceed to Verify the SSO configuration on the GitHub SSO setup page: : [Clicking “Verify SSO Configuration”](/classic/admin/getting-started/overview#:~:text=or%20Azure%20AD.-,General%20instructions,-You%20will%20need)
Choose this option if you already use AWS Cognito. AWS Cognito is also a
good option in a testing or Proof of Value (PoV) scenario where you don't
have an IDP you can easily integrate with. In this scenario, most settings
should be left at their defaults.
*Follow the [Cognito User Pool setup process](https://eu-central-1.console.aws.amazon.com/cognito/v2/home), then copy the necessary values into the Gitpod SSO Configuration UI*
1. Navigate to the Cognito page in the AWS console. Select create user pool:
{' '}
 2. Configure sign-in experience:
{' '}
2. Configure sign-in experience:
{' '}
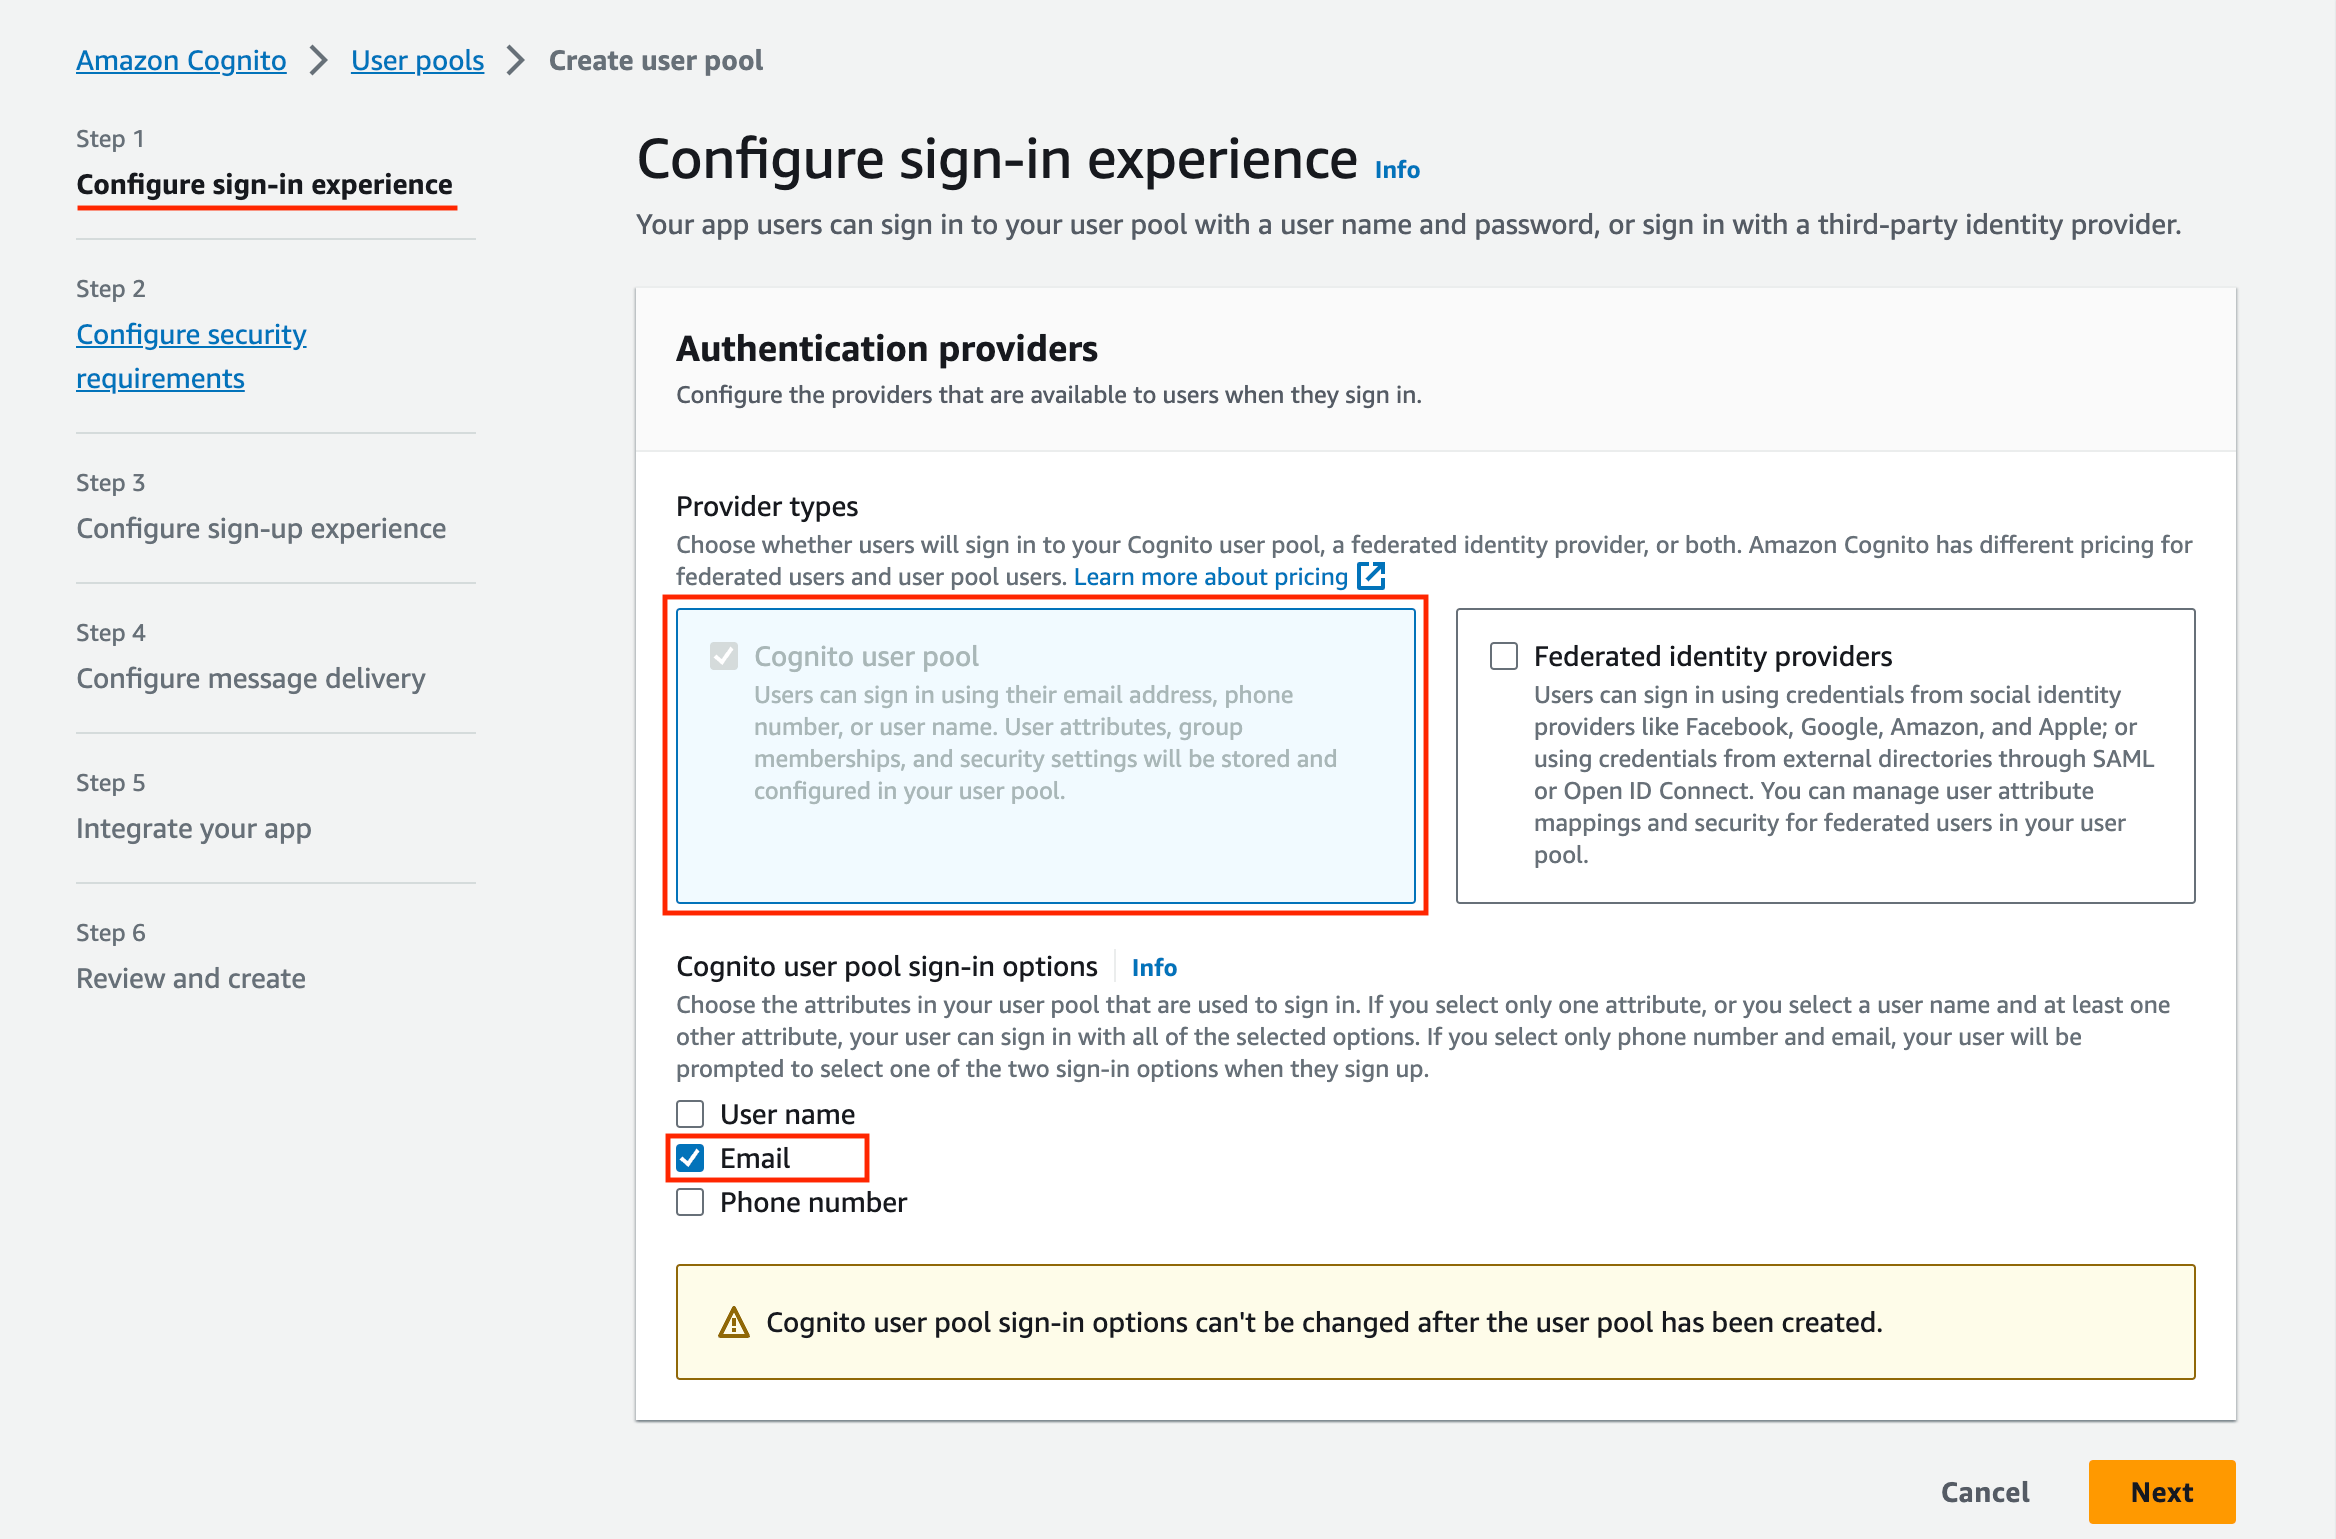 * Select `Cognito user pool` as provider type
* Select email as the Cognito user pool signin option
3. Configure Security requirements:
{' '}
* Select `Cognito user pool` as provider type
* Select email as the Cognito user pool signin option
3. Configure Security requirements:
{' '}
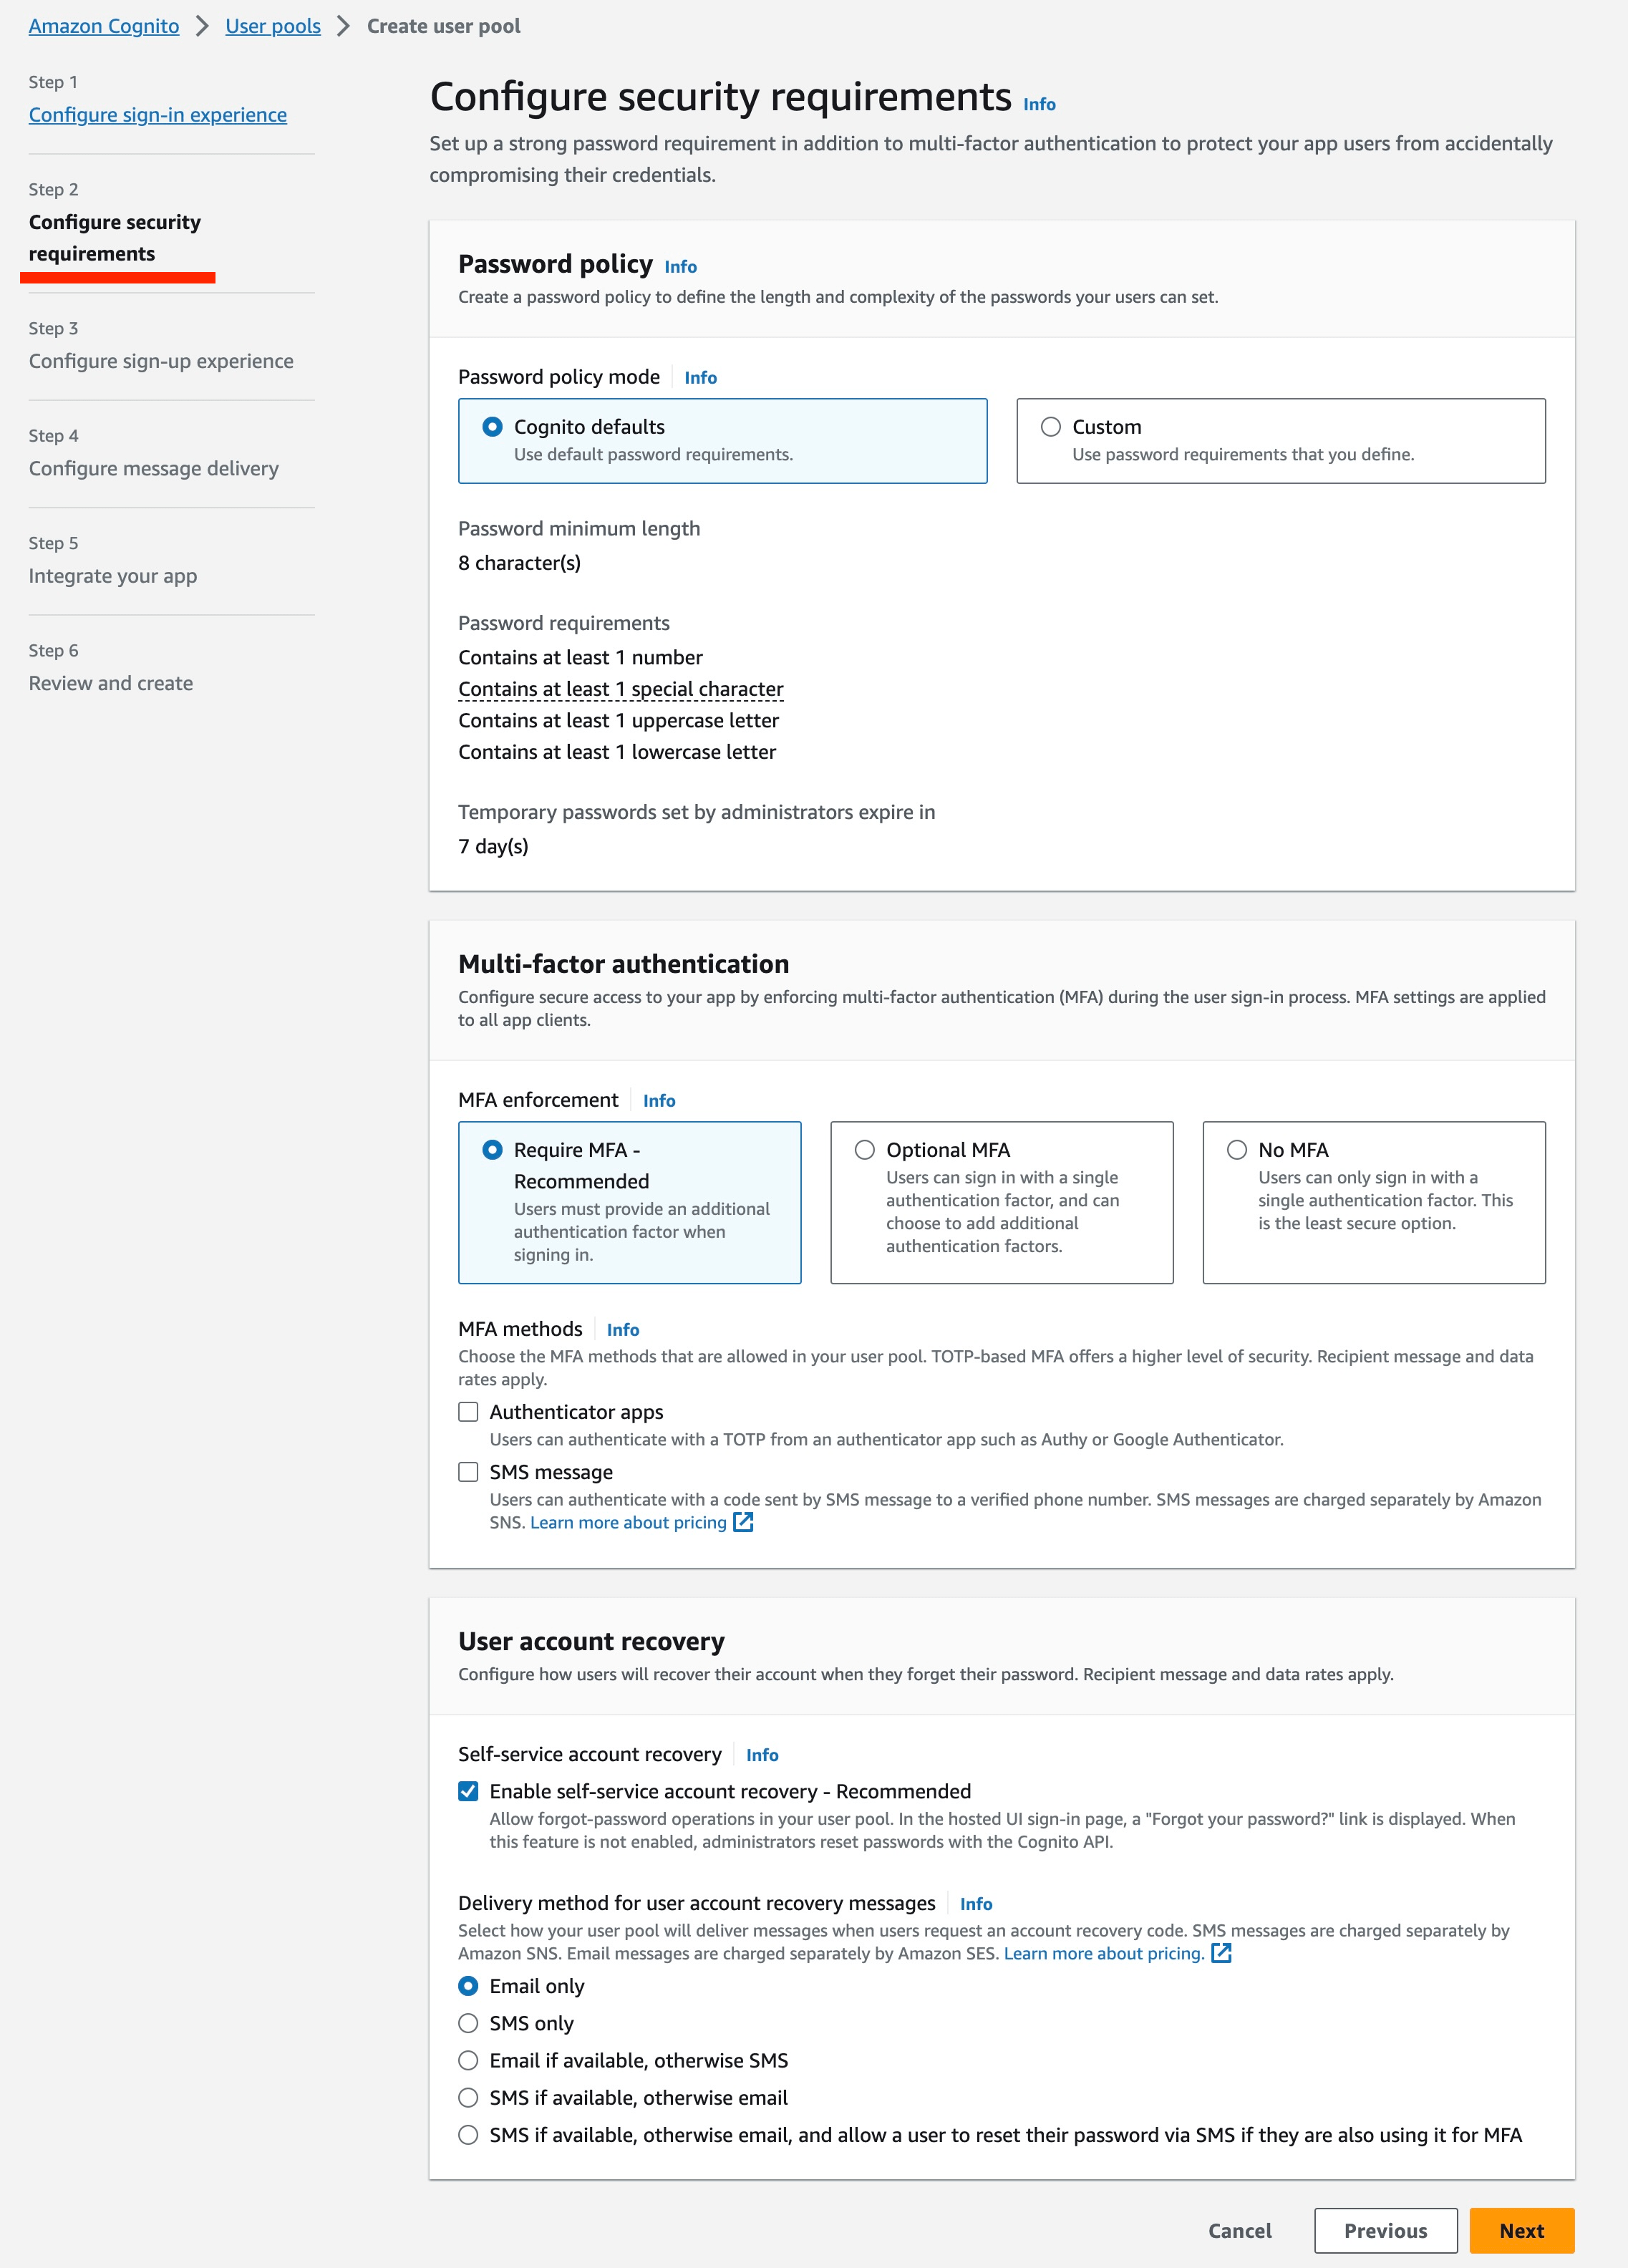 * For development purposes, consider modifying the MFA enforcment policy to
not require MFA. For all production use cases, configure the MFA and user
account recovery sections according to organizational guidelines
4. Configure sign-up experience:
{' '}
* For development purposes, consider modifying the MFA enforcment policy to
not require MFA. For all production use cases, configure the MFA and user
account recovery sections according to organizational guidelines
4. Configure sign-up experience:
{' '}
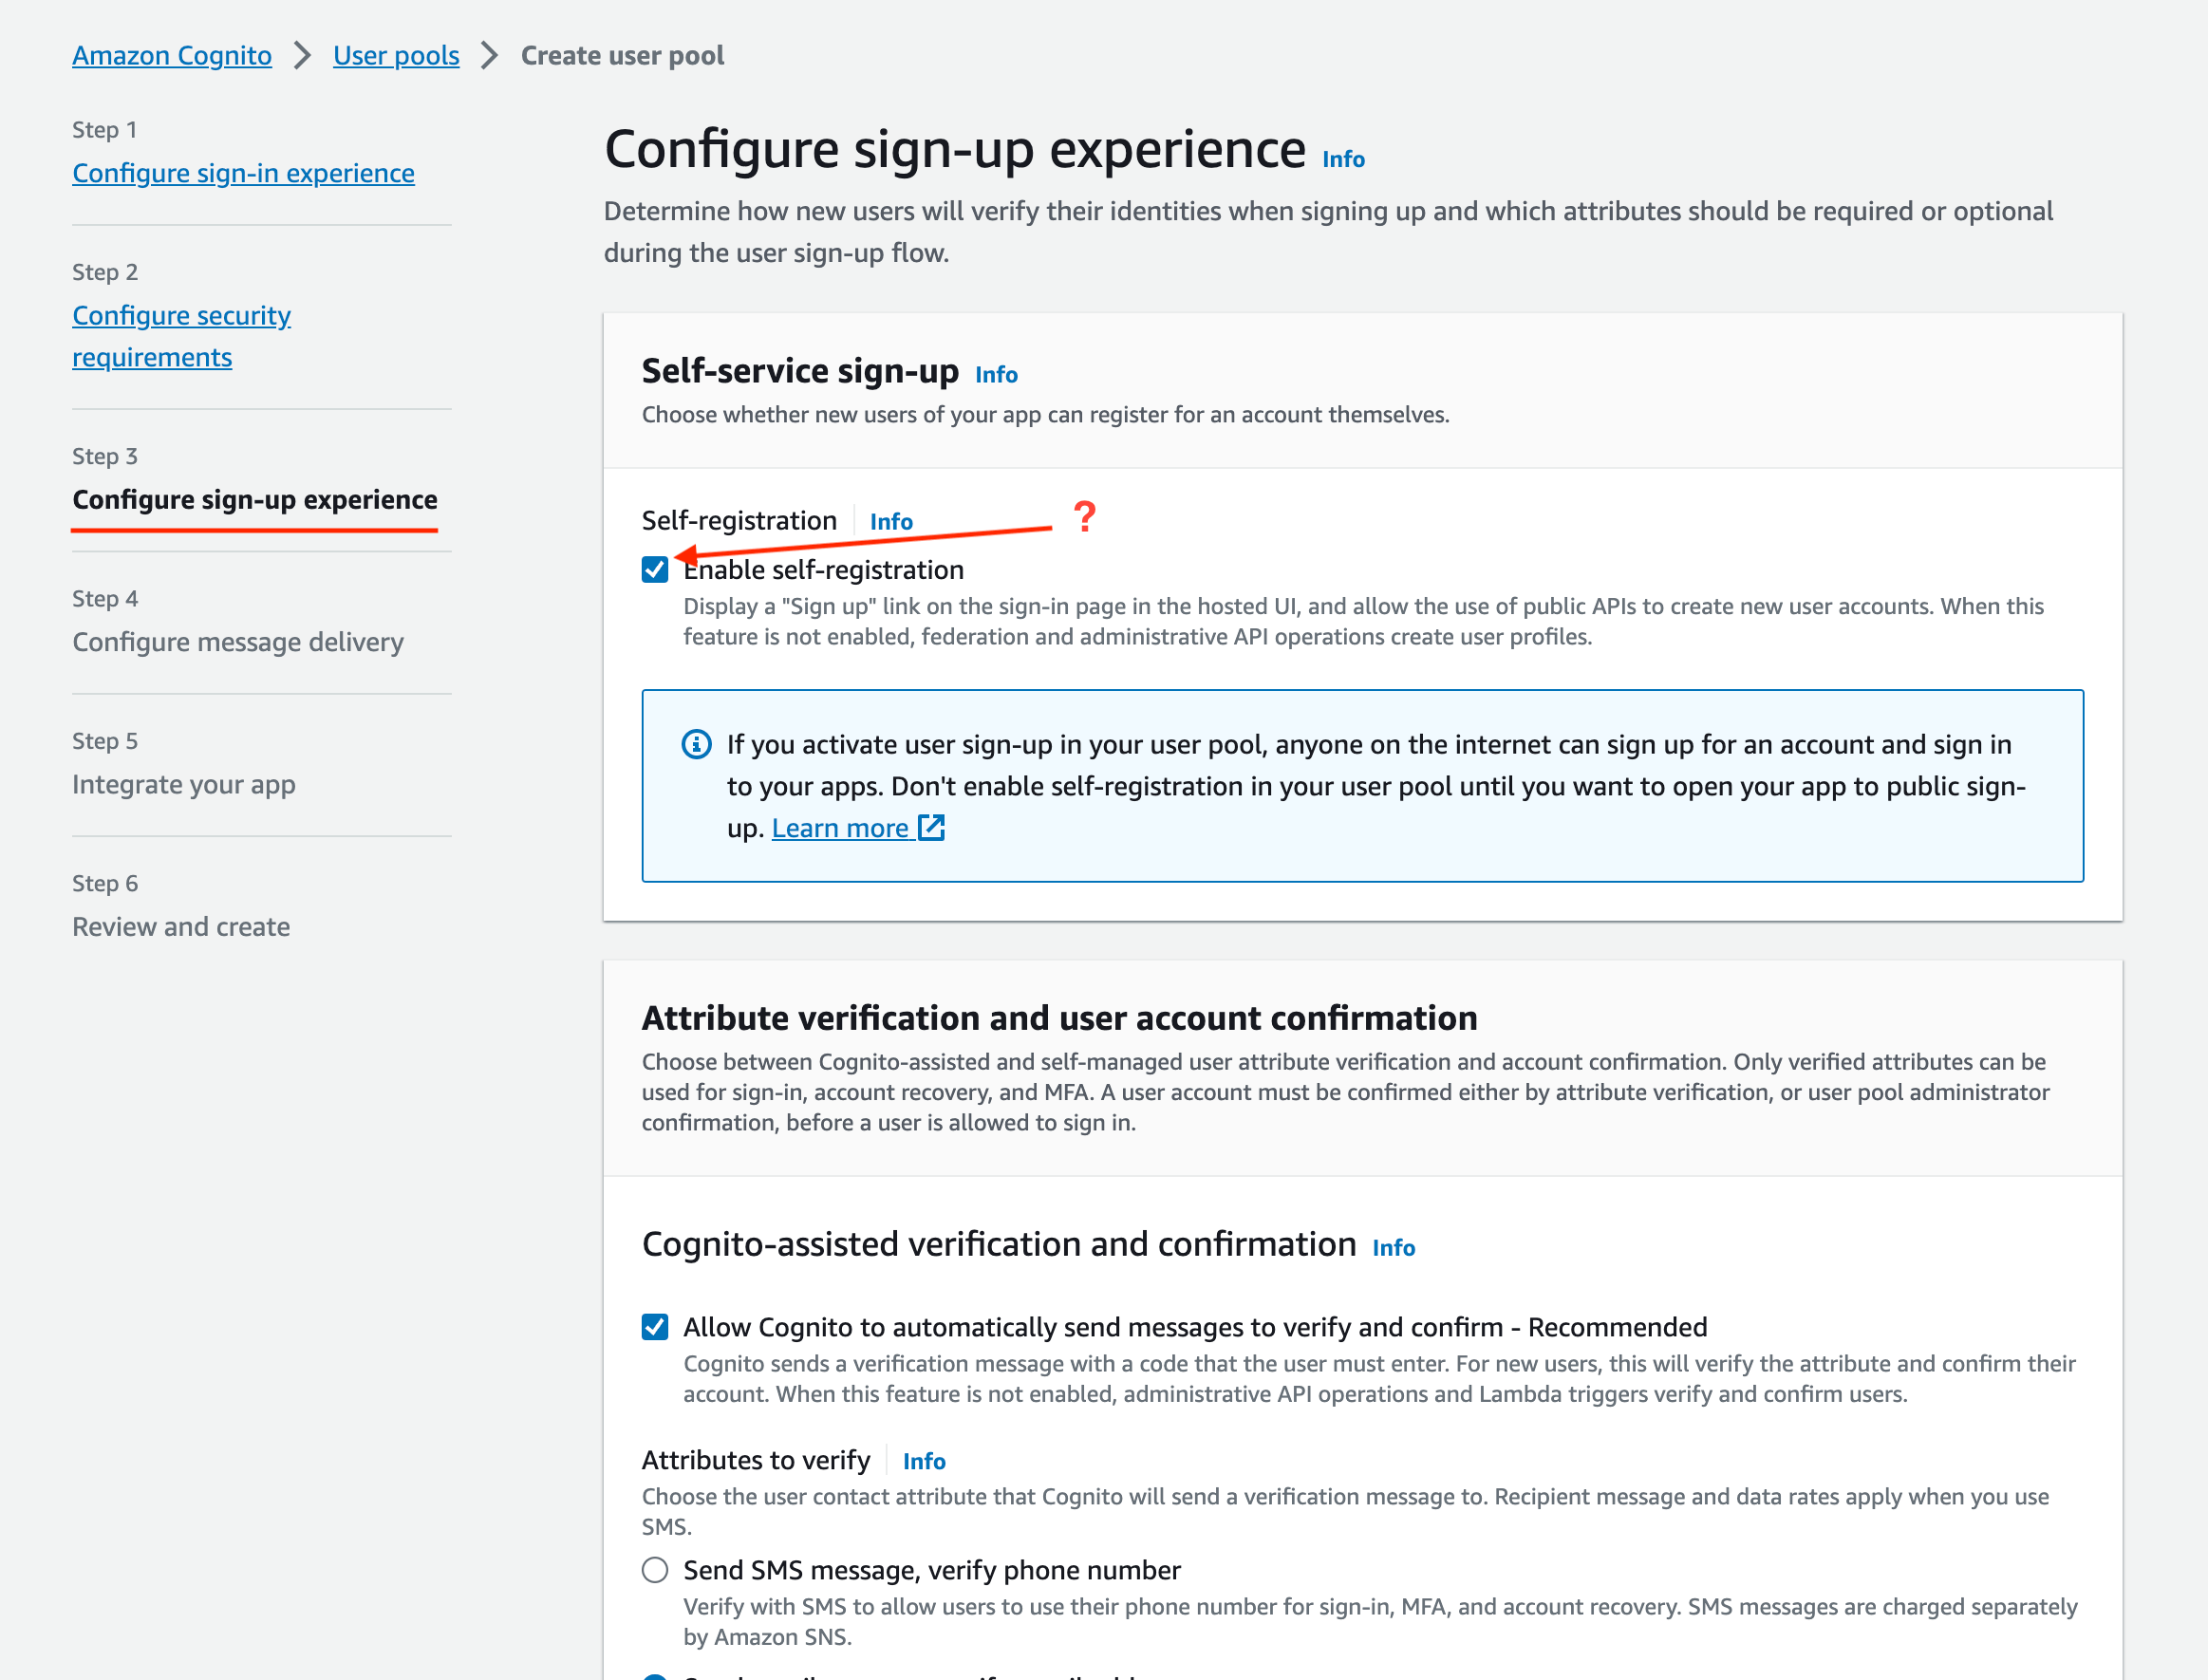 * Disable Self Registration if you want to limit access. For example, if
your instance is accessible on the public internet, you may not want anyone
to be able to self-register.
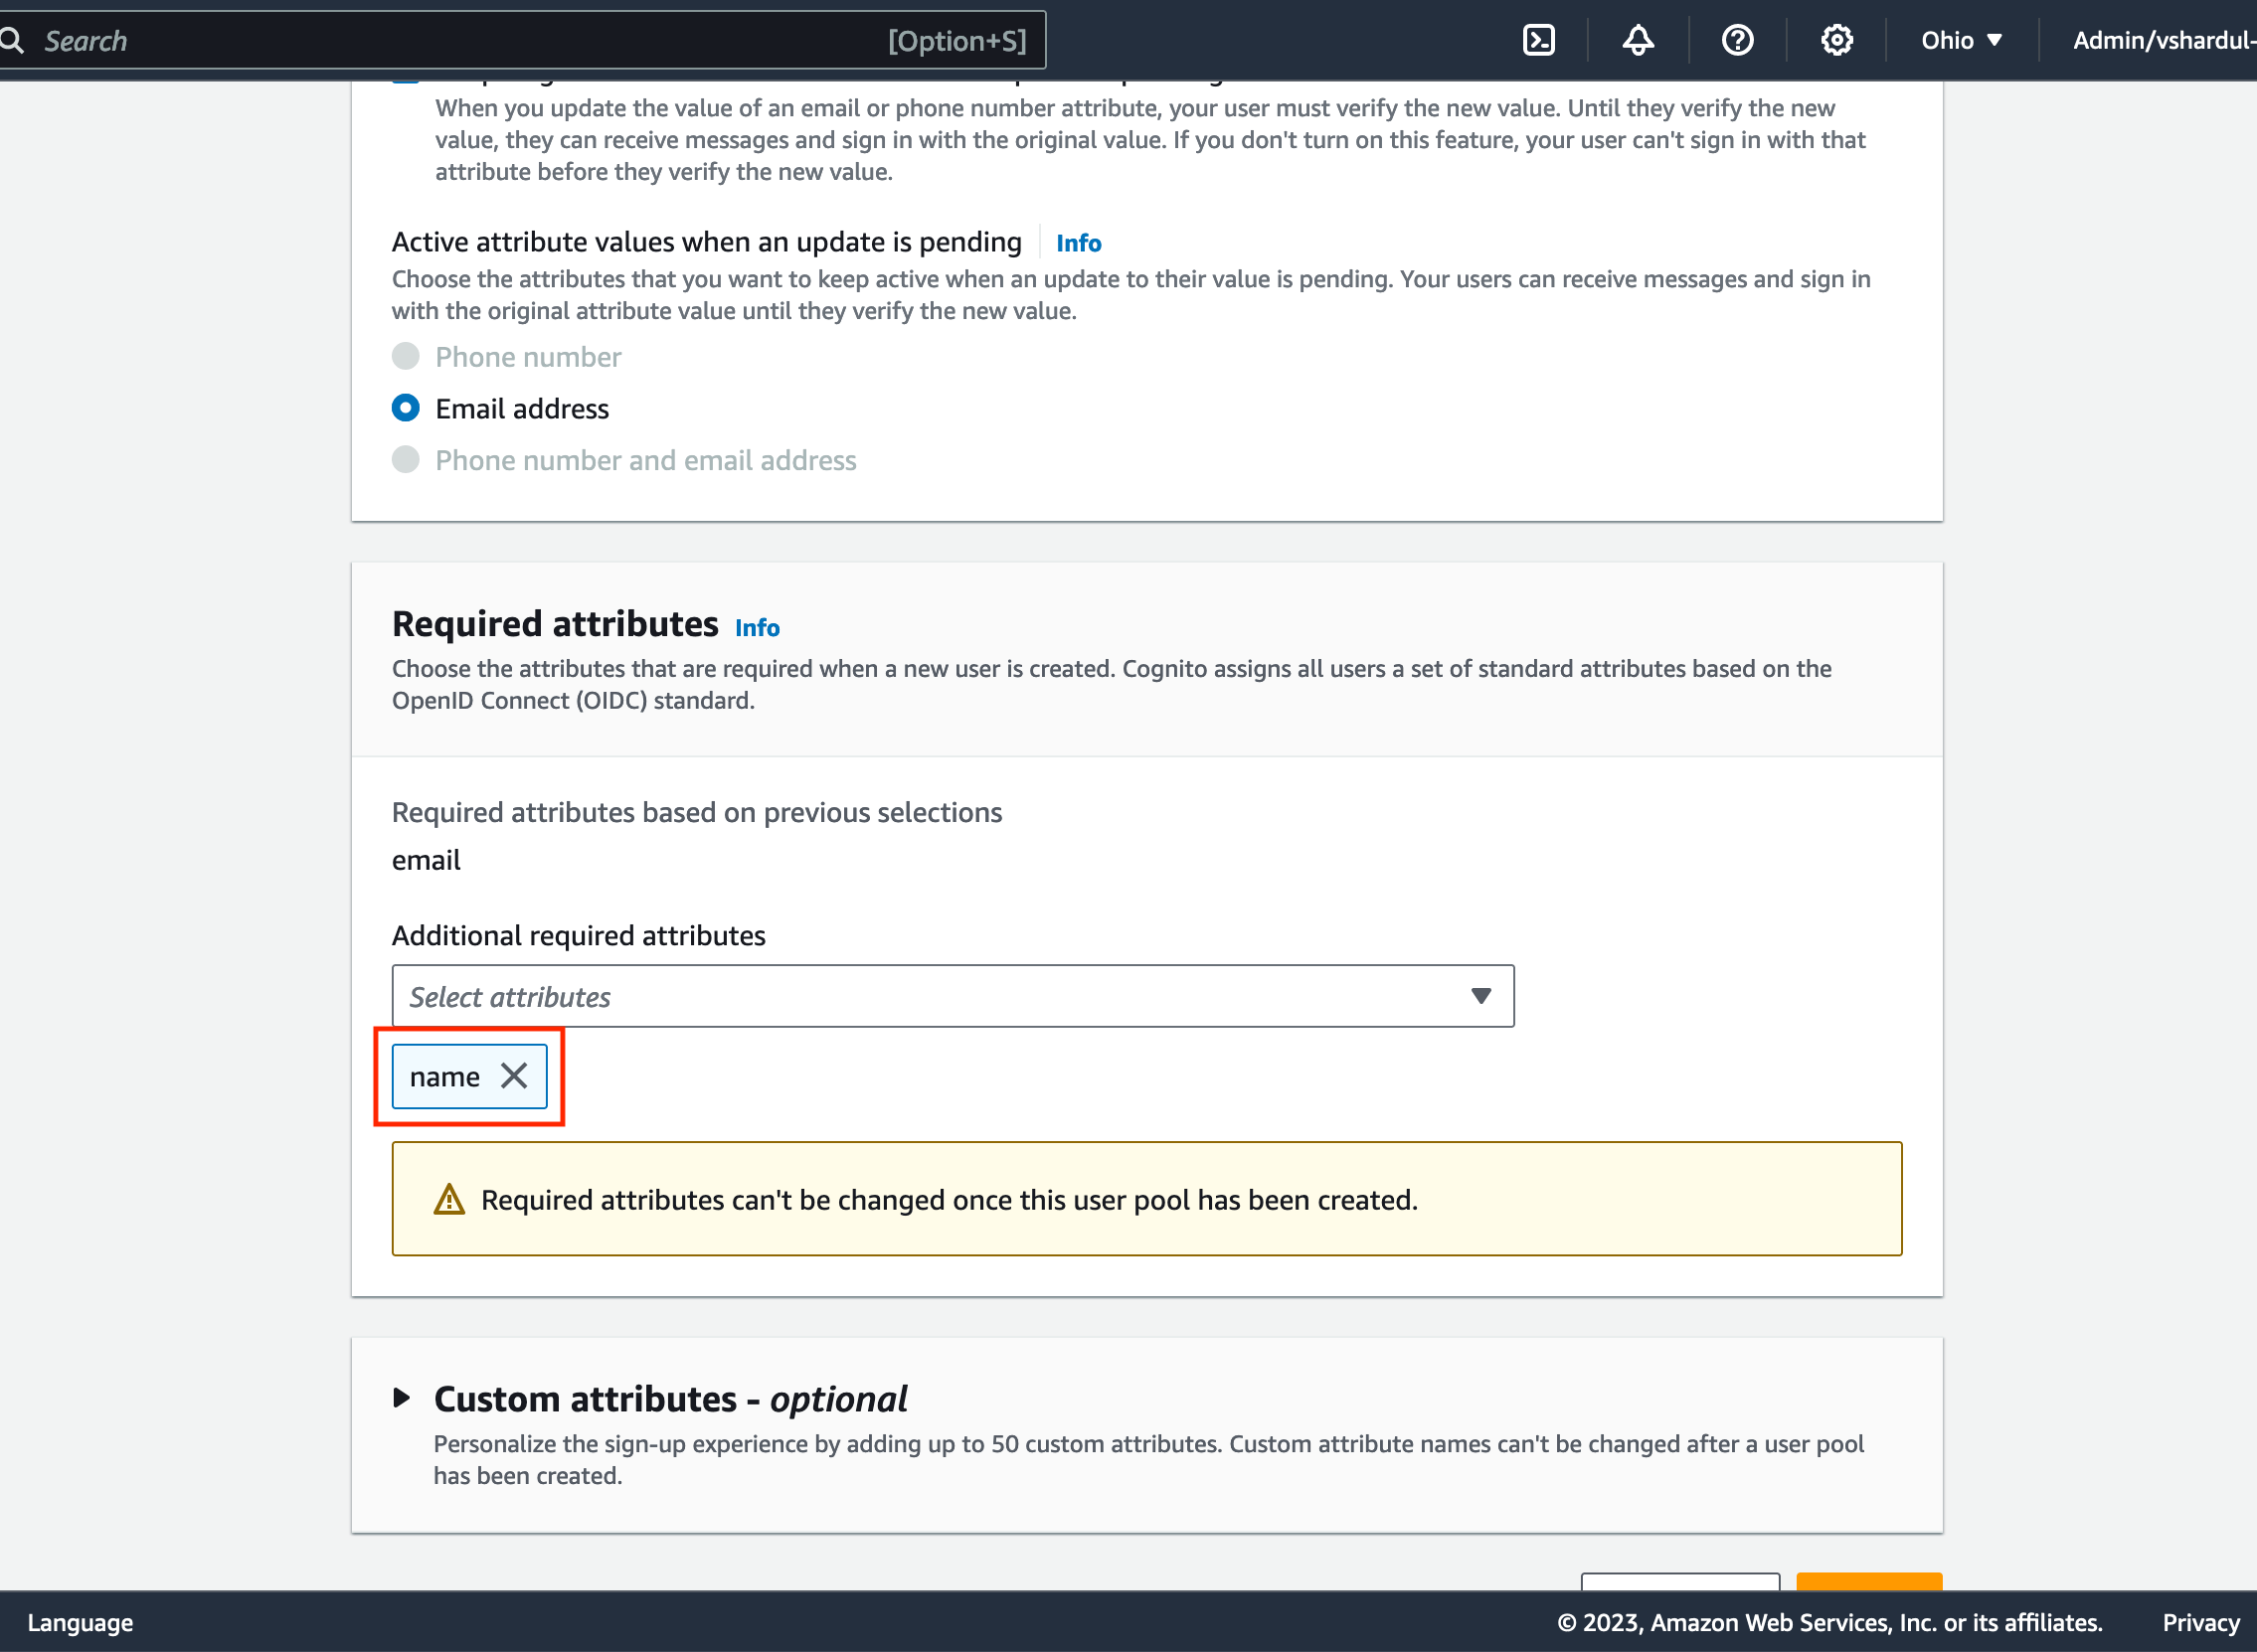
In the `Required Attributes` section, ensure that name is selected:
* Disable Self Registration if you want to limit access. For example, if
your instance is accessible on the public internet, you may not want anyone
to be able to self-register.
In the `Required Attributes` section, ensure that name is selected:
 5. Configure Message Delivery:
{' '}
5. Configure Message Delivery:
{' '}
 * For dev Setups, use Cognito as the email provider; for production setups,
use company SES setup
6. Integrate your app:
{' '}
* For dev Setups, use Cognito as the email provider; for production setups,
use company SES setup
6. Integrate your app:
{' '}
 * Follow company best practice for most settings - Ensure to select
`Generate a client secret` in the Client secret section:
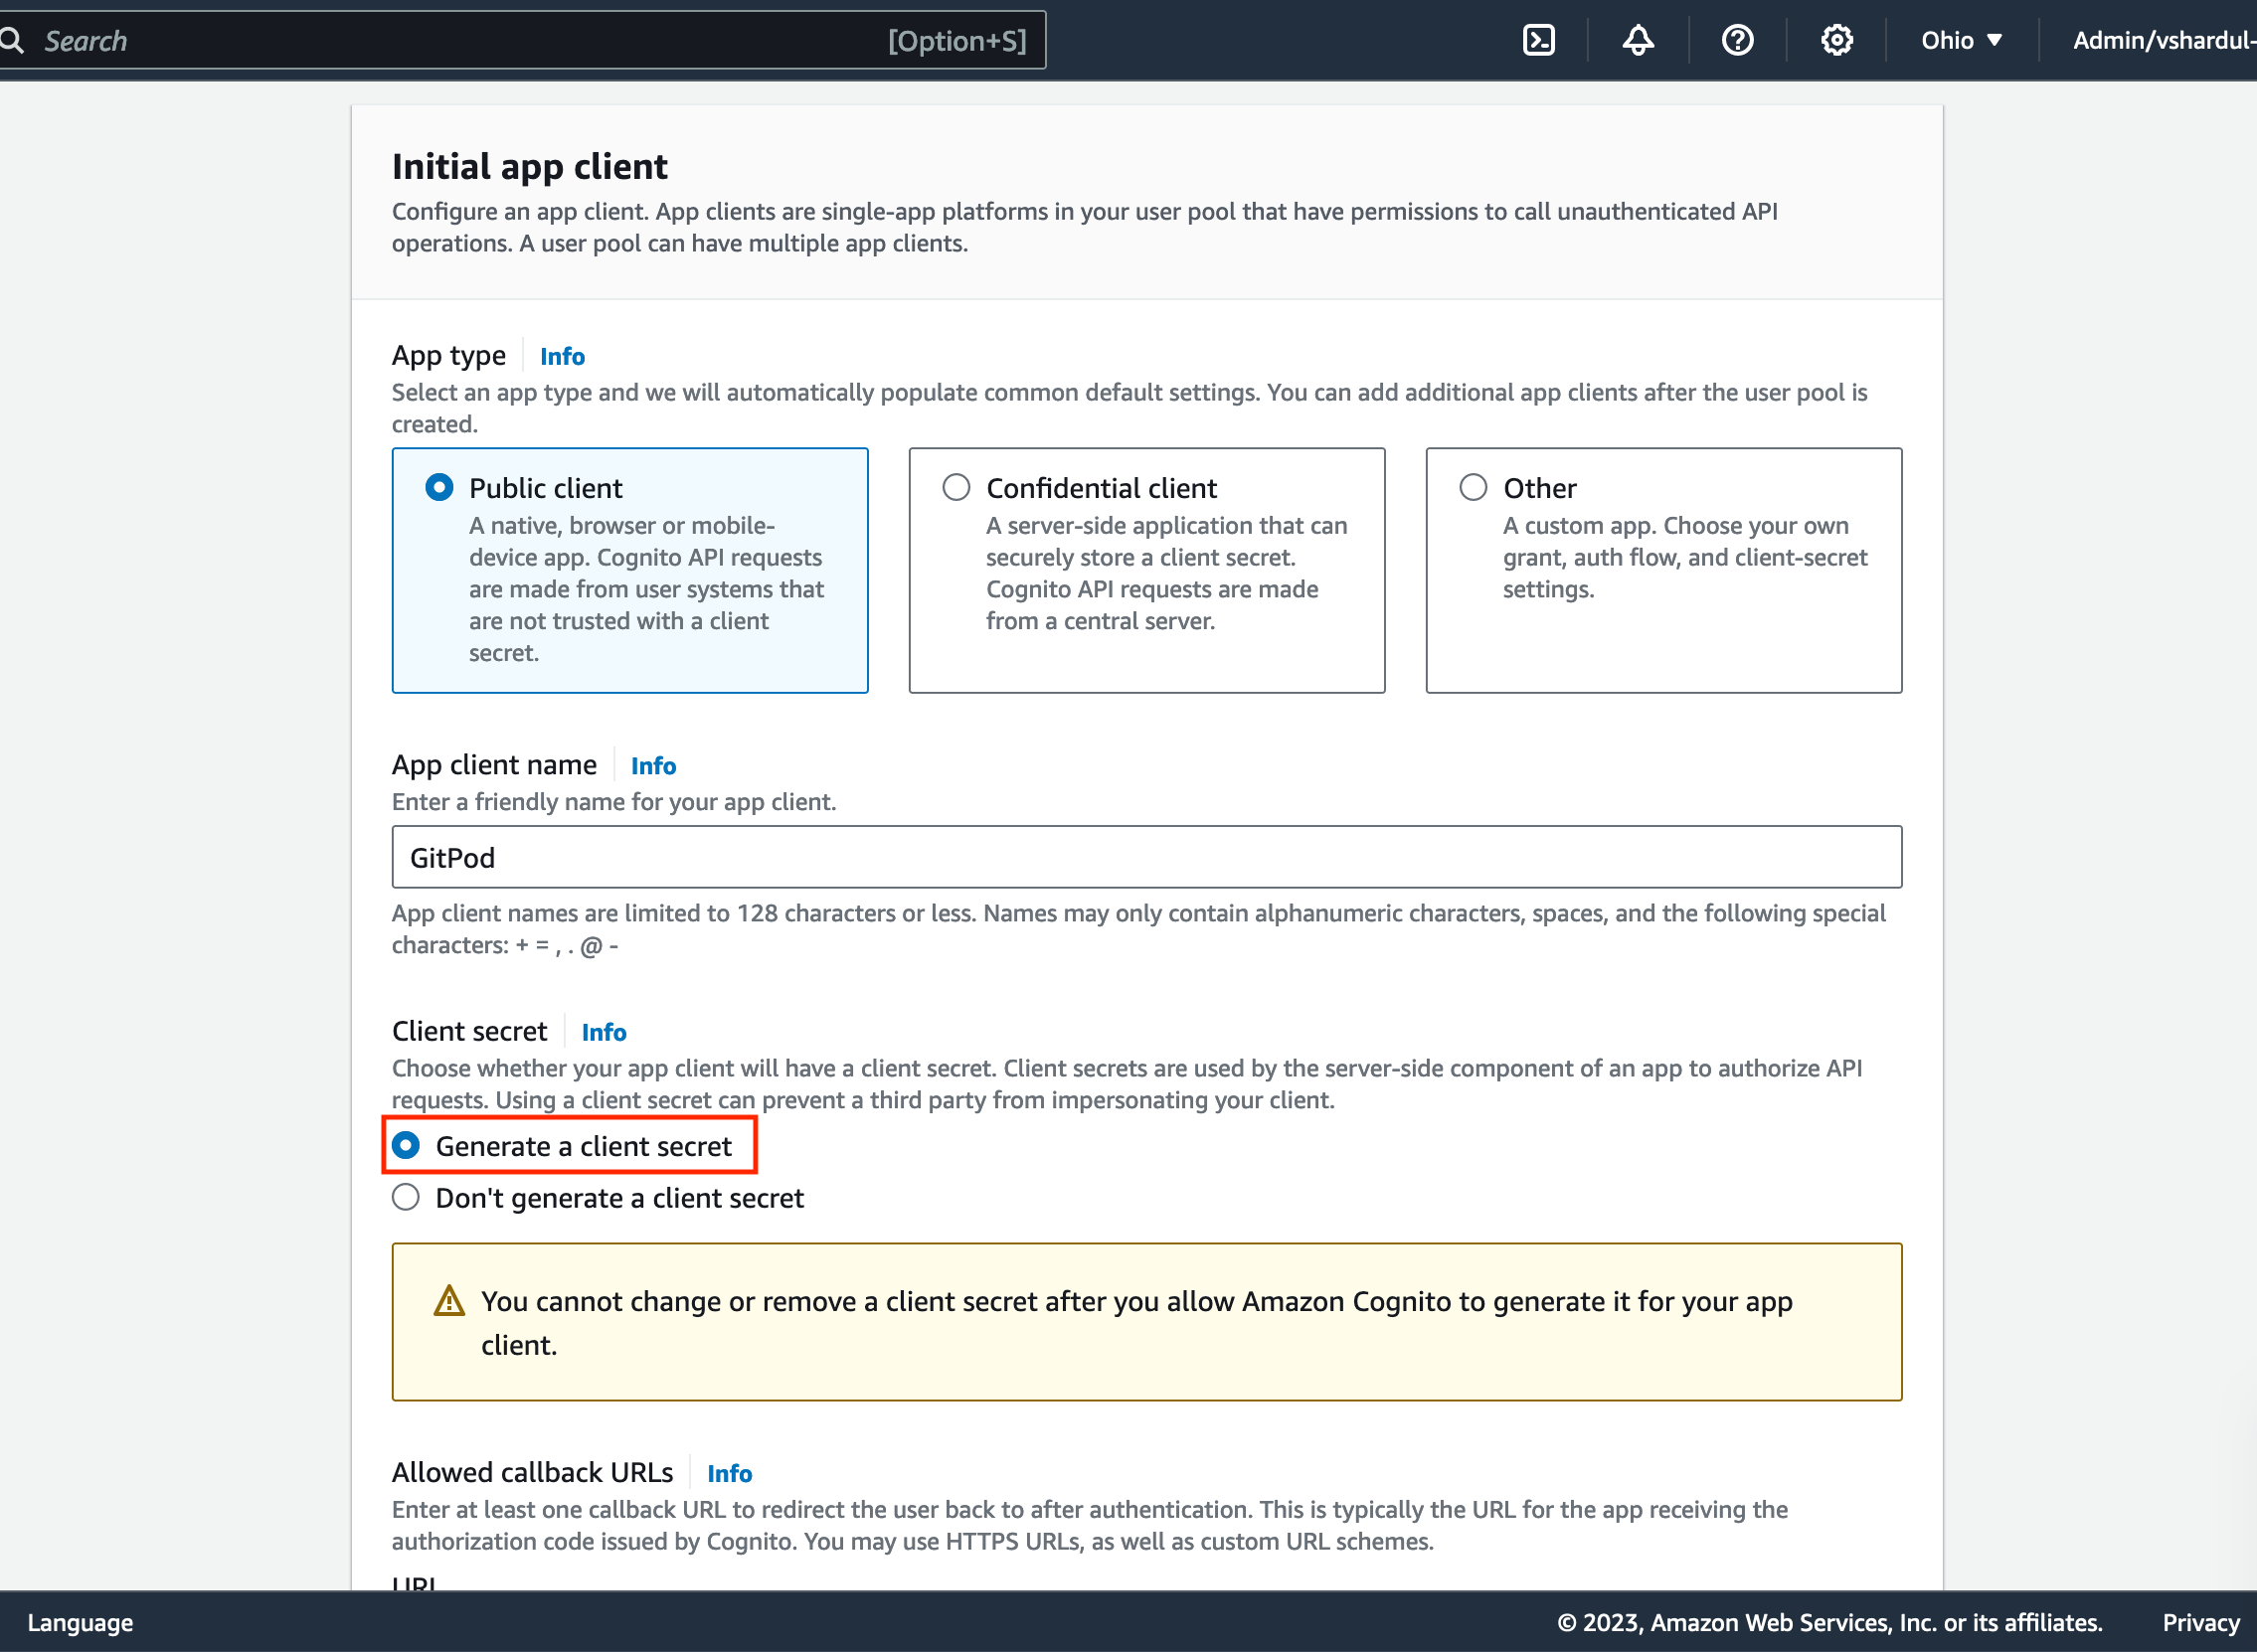
* Follow company best practice for most settings - Ensure to select
`Generate a client secret` in the Client secret section:
 * Define the call back url as provided by the Enterprise instance in
the Configure single sign-on setup page (see [above](#3-set-up-gitpod)):
* Define the call back url as provided by the Enterprise instance in
the Configure single sign-on setup page (see [above](#3-set-up-gitpod)):
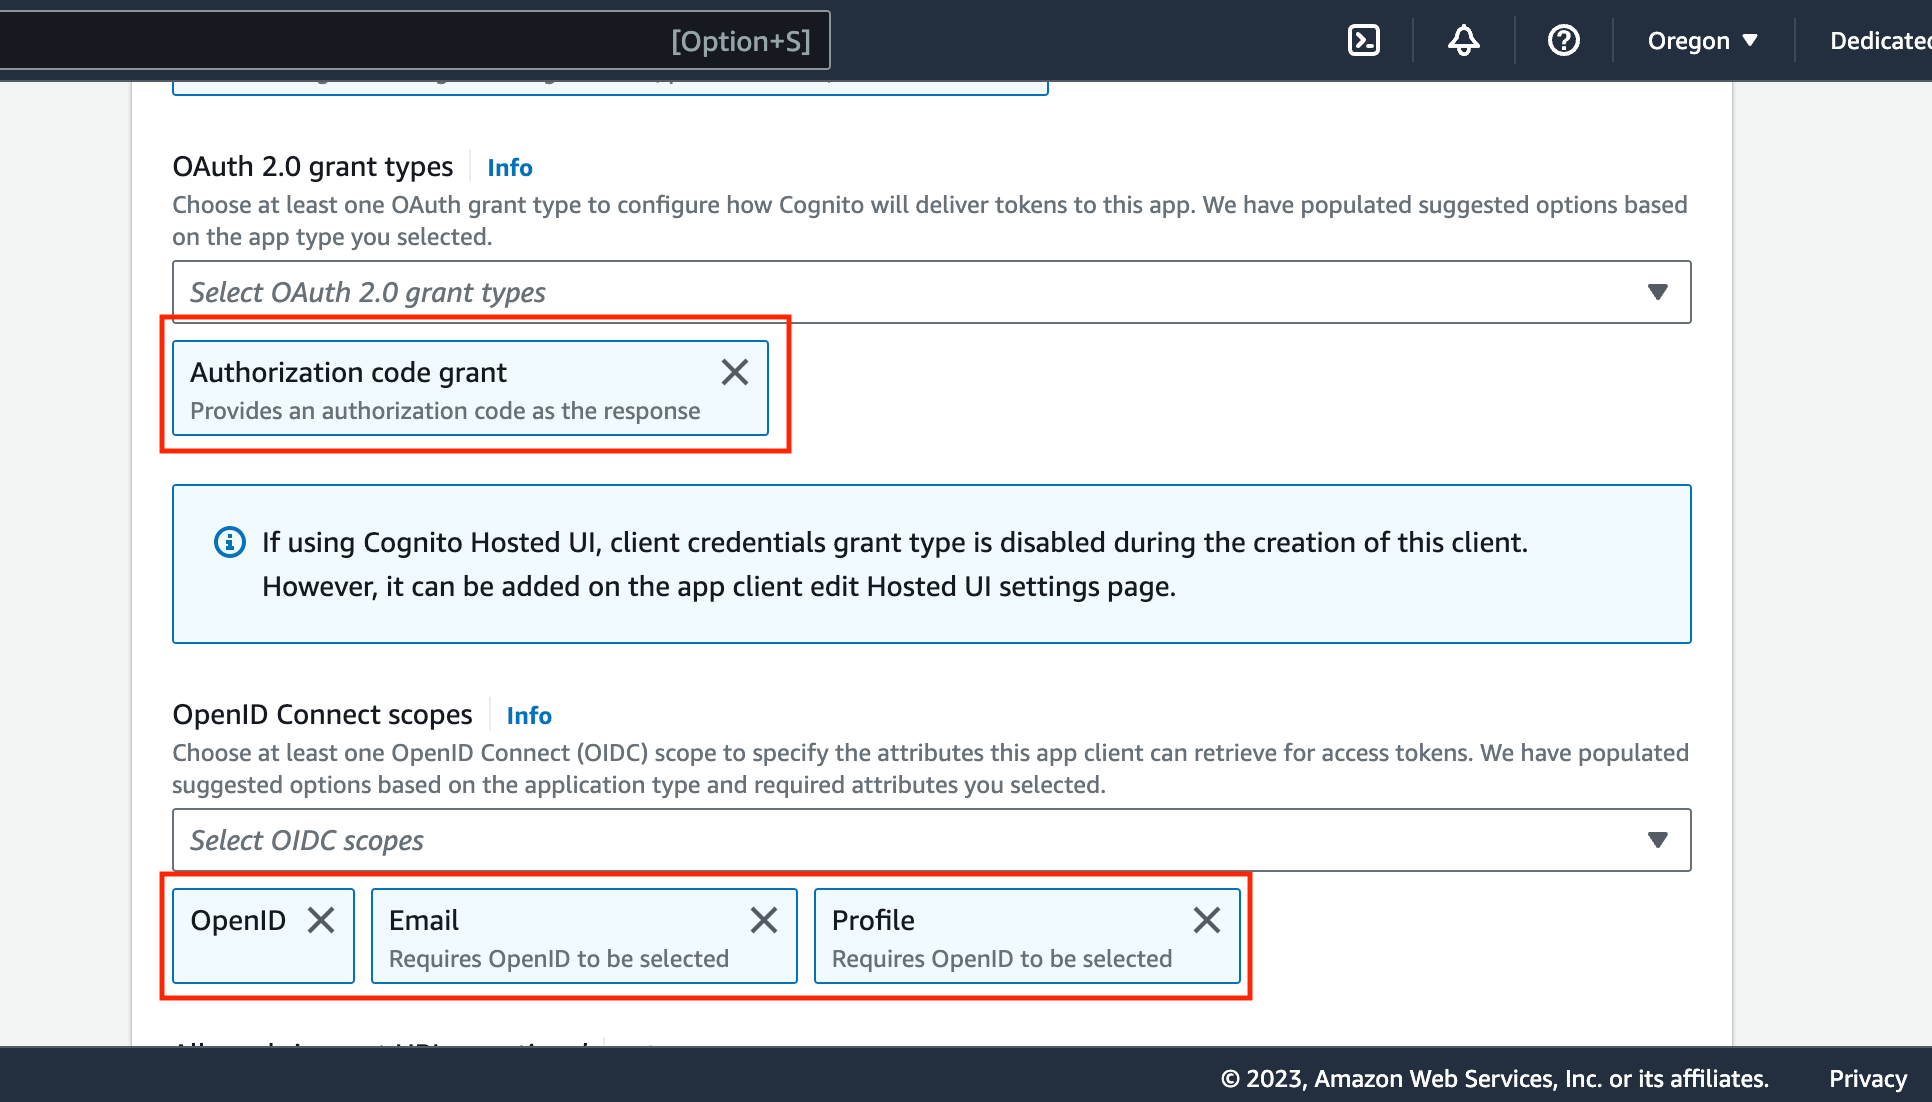
 * As the identity provider, select `Cognito` (under Advanced app client
settings) - OAuth 2.0 grant types, select `Auth Code Grant` - Under OpenID
Connect Scopes, select `OpenID`, `Email`, `Profile`:
* As the identity provider, select `Cognito` (under Advanced app client
settings) - OAuth 2.0 grant types, select `Auth Code Grant` - Under OpenID
Connect Scopes, select `OpenID`, `Email`, `Profile`:
 7. Now create the cognito user pool. The review page should look similar to this:
8. Start pasting the necessary values into the Gitpod SSO setup page. Navigate to:
```text theme={null}
https://cognito-idp..amazonaws.com//.well-known/openid-configuration
```
This will return a web page with raw json data:
7. Now create the cognito user pool. The review page should look similar to this:
8. Start pasting the necessary values into the Gitpod SSO setup page. Navigate to:
```text theme={null}
https://cognito-idp..amazonaws.com//.well-known/openid-configuration
```
This will return a web page with raw json data:
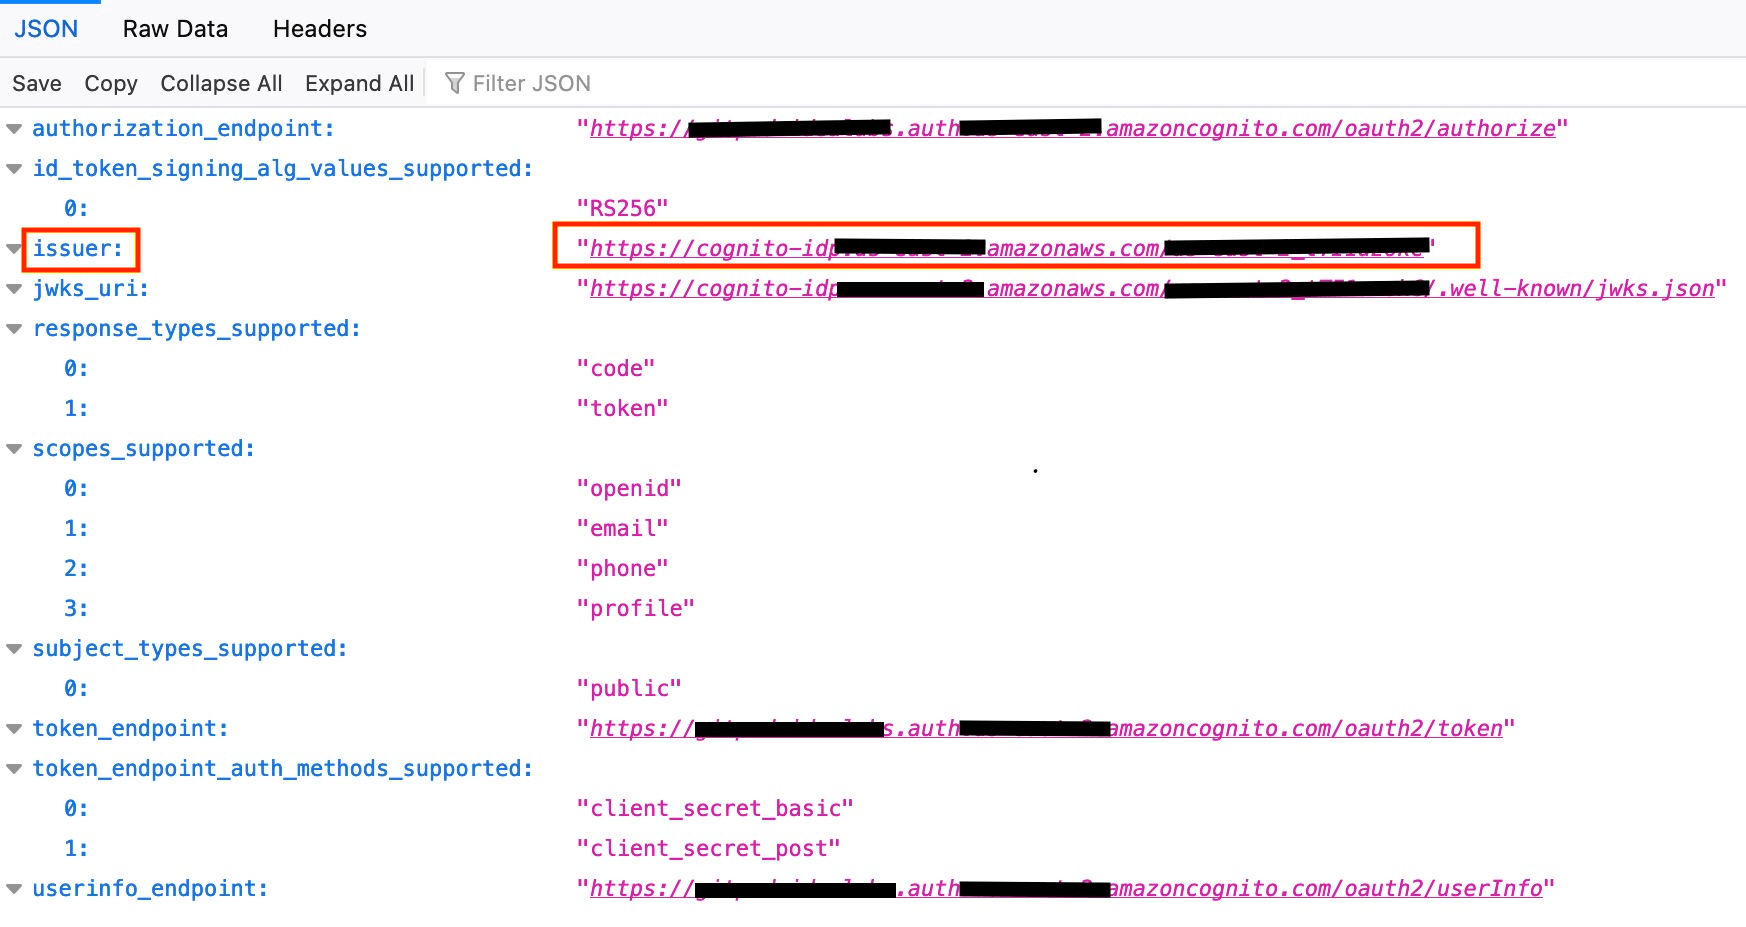 * Copy the `issuer URL` highlighted above into the respective field on the Gitpod SSO setup page
9. Navigate to the Cognito console, and find the User pool created above. Navigate to the App client meta data as below:
{' '}
* Copy the `issuer URL` highlighted above into the respective field on the Gitpod SSO setup page
9. Navigate to the Cognito console, and find the User pool created above. Navigate to the App client meta data as below:
{' '}
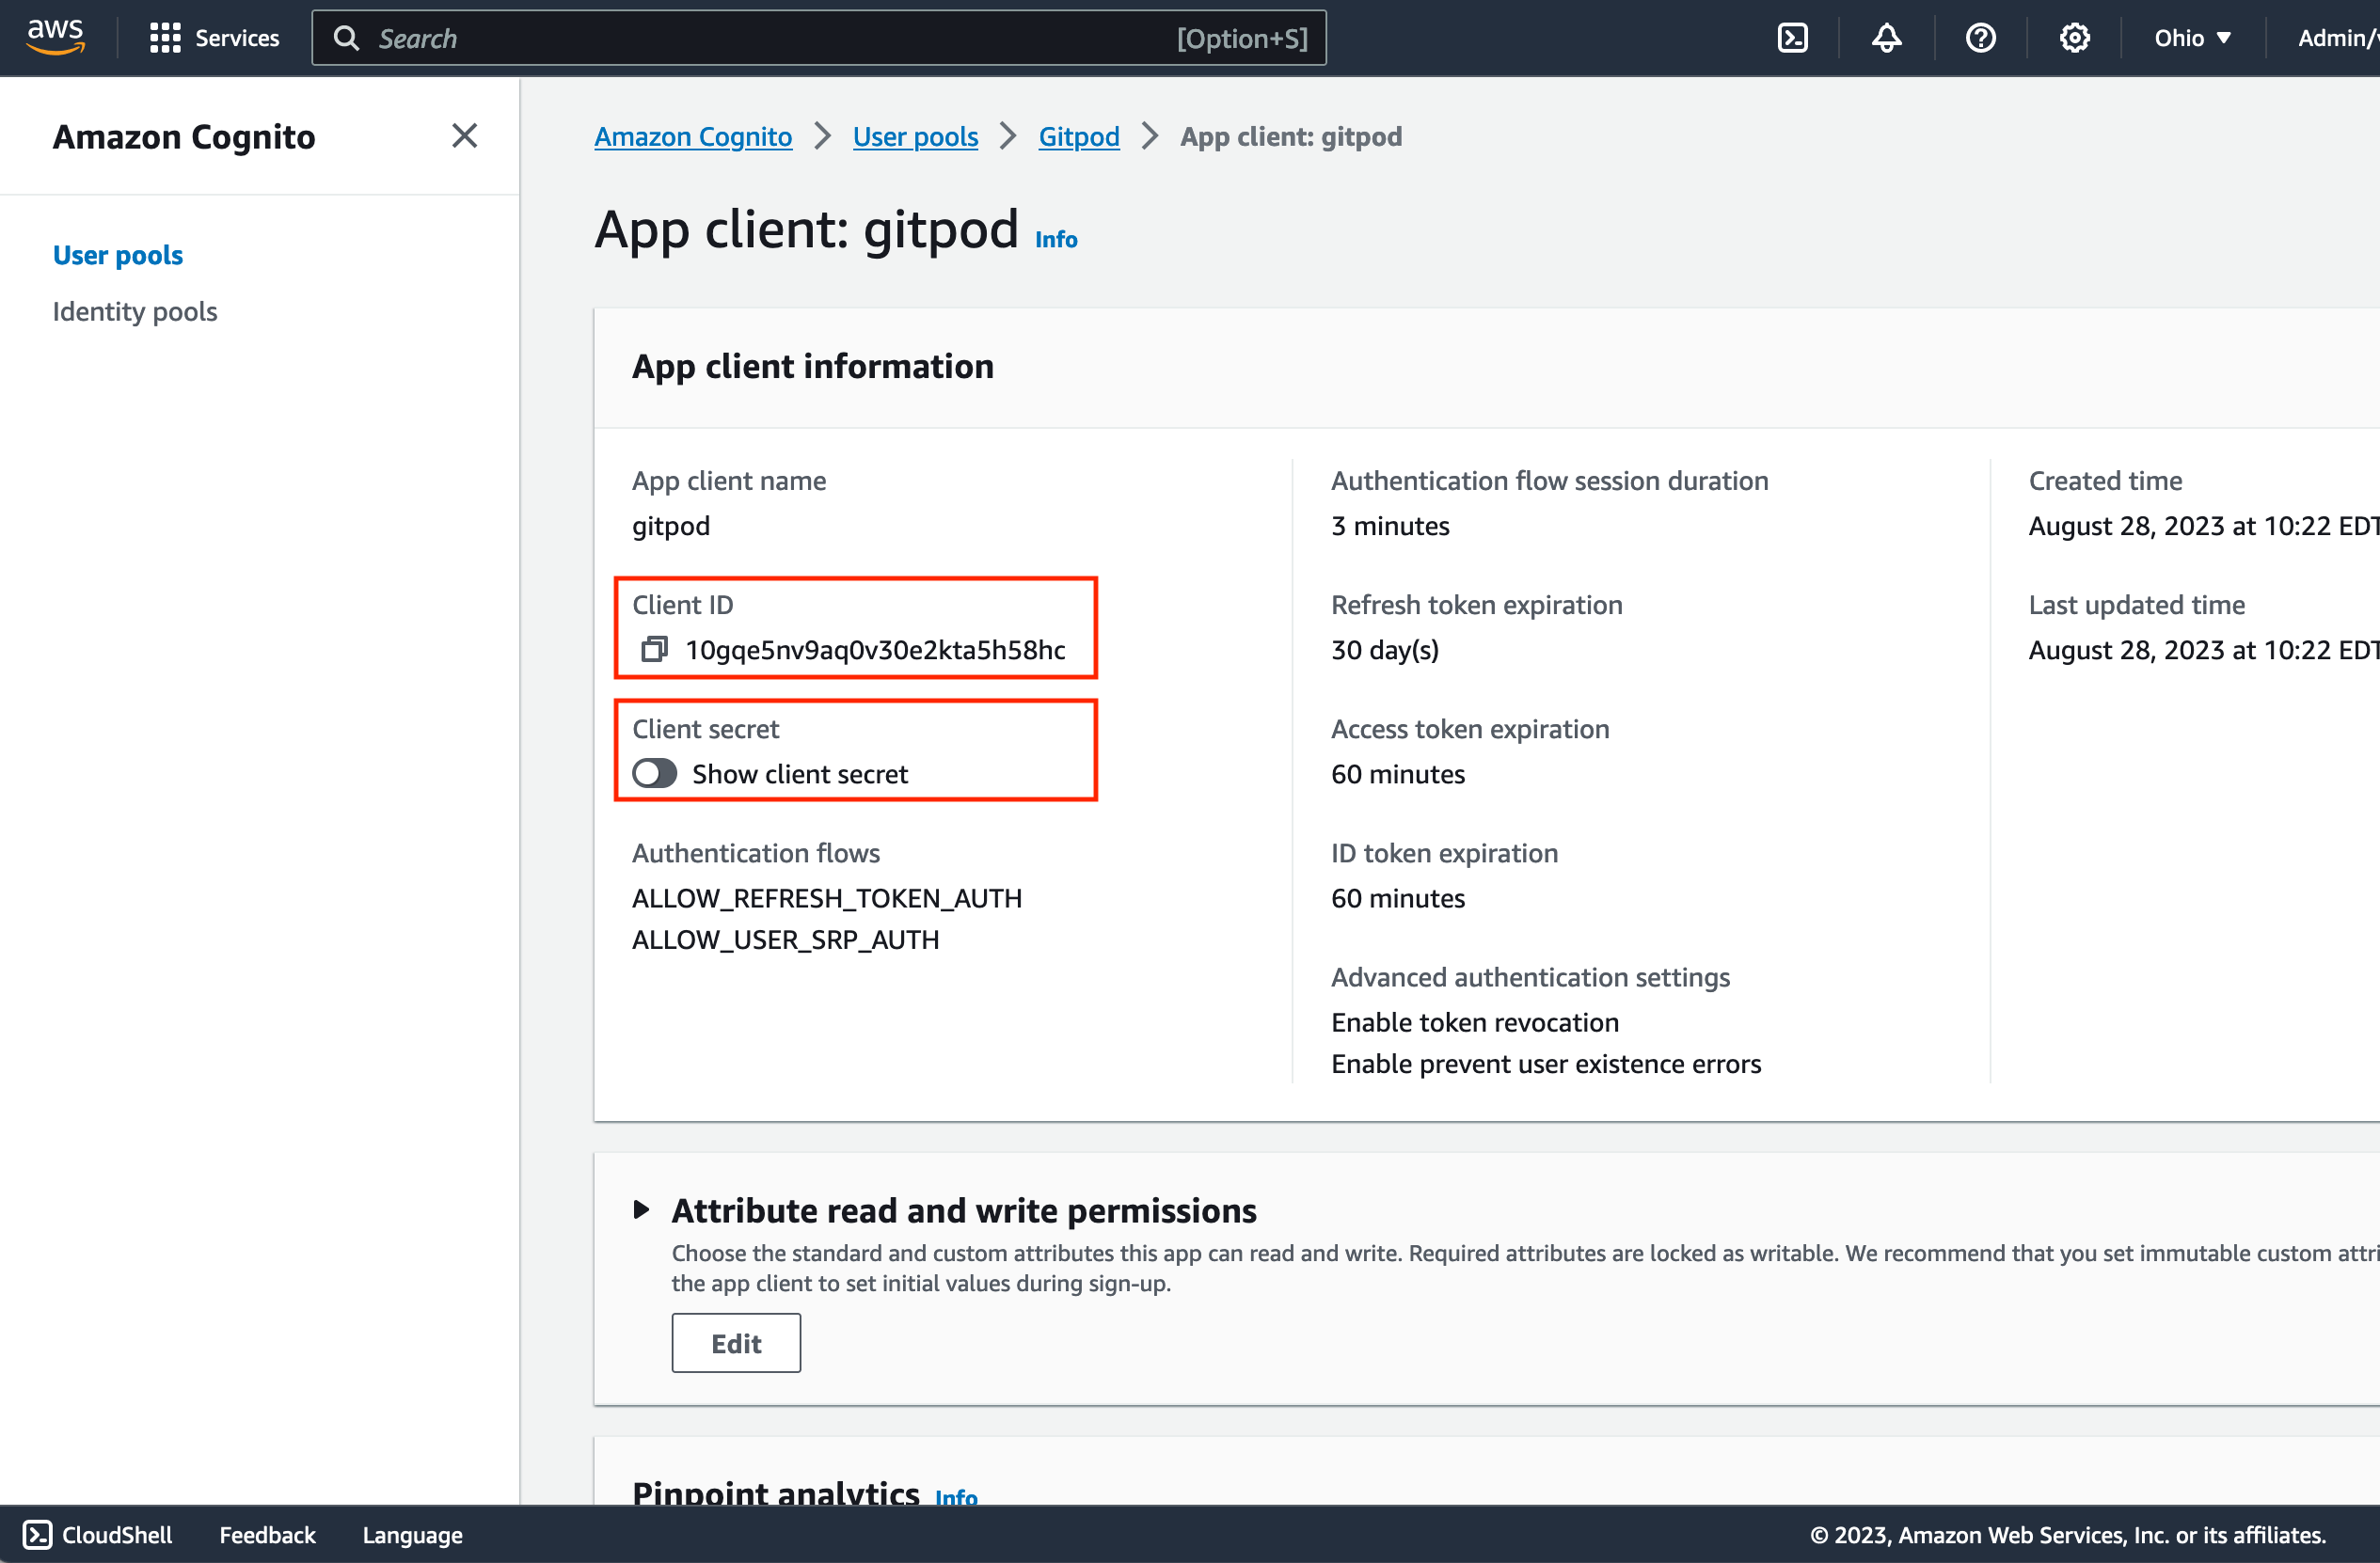 * Copy the `Client ID` from the Cognito app client page into the respective field on the Gitpod SSO setup page
* Copy the `Client Secret` into the respective field on the Gitpod SSO setup page
10. Proceed to Verify the SSO configuration on the GitHub SSO setup page [by clicking “Verify SSO Configuration”](/classic/admin/getting-started/overview#:~:text=or%20Azure%20AD.-,General%20instructions,-You%20will%20need)
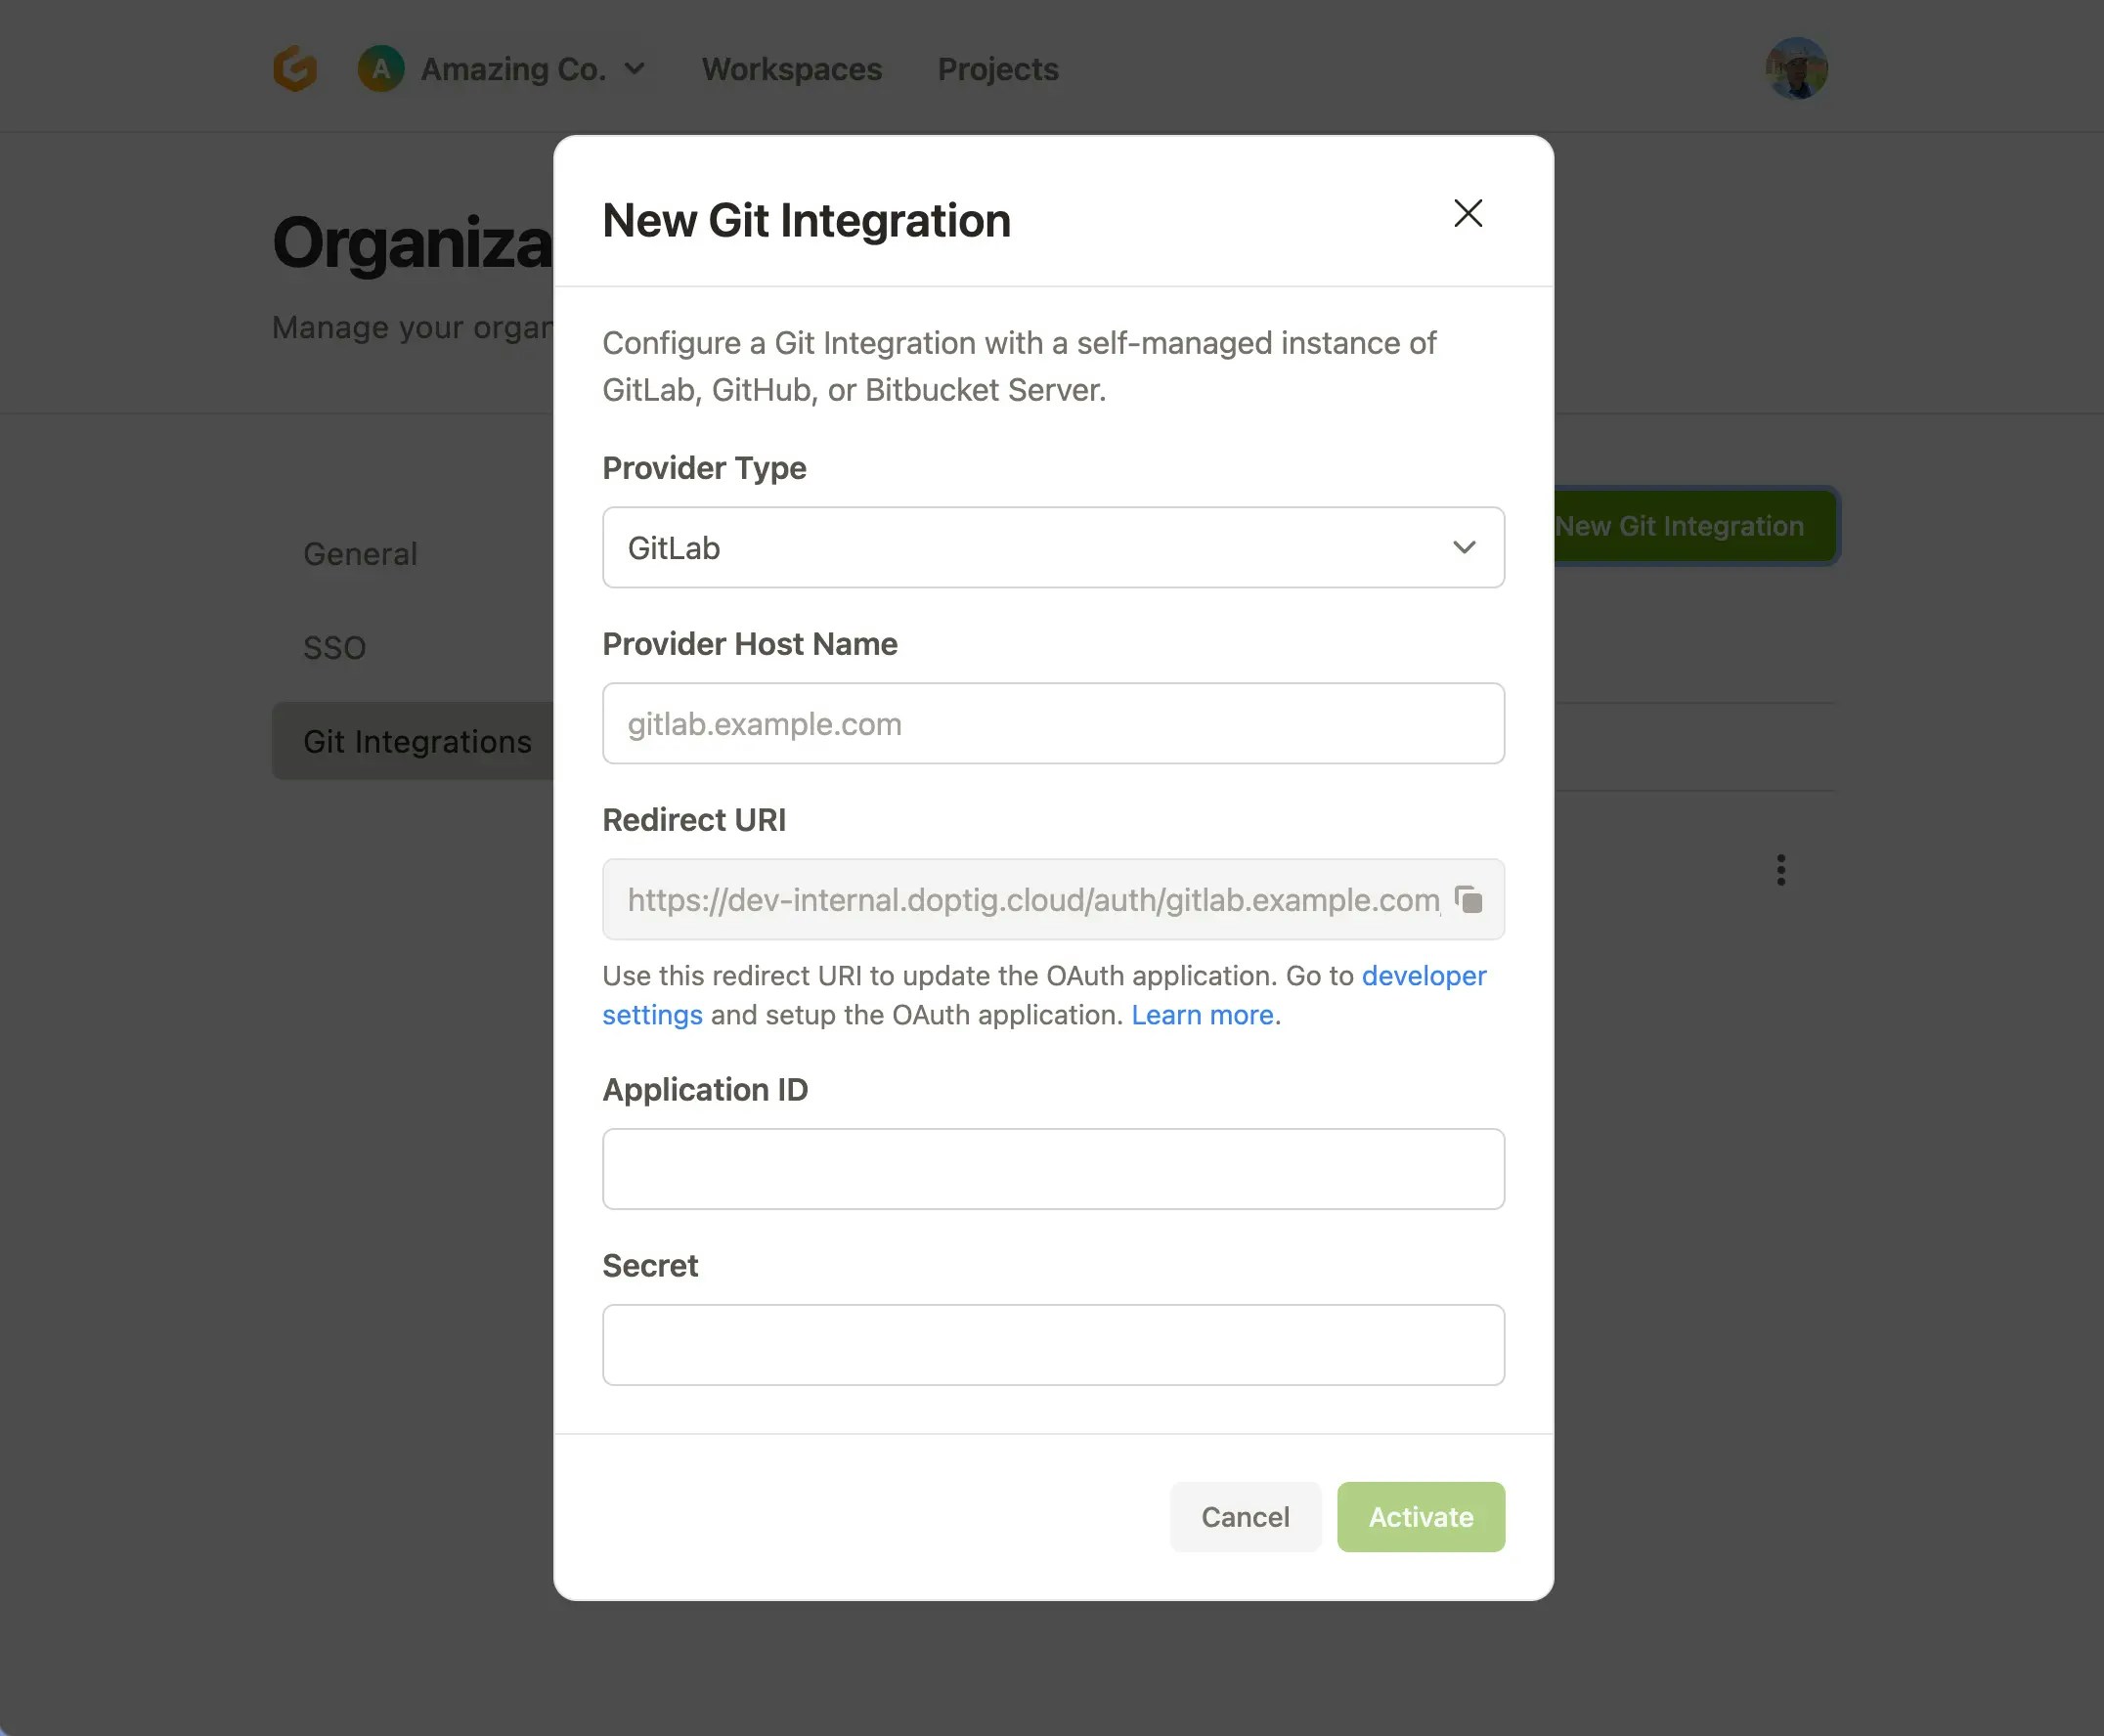
Integrate it with your SCM as per the steps shown in the UI or below. You can now create your first workspace and start using Gitpod! For more information on how to use Gitpod, please see the [Getting Started guide of Gitpod](/classic/user/introduction/getting-started/overview).
* Look at [these steps](/classic/payg/authentication/gitlab#registering-a-self-hosted-gitlab-installation) for information on how to integrate [`GitLab.com`](https://gitlab.com/) with your Gitpod instance. You will need to enter `gitlab.com` as the `Provider Host Name` in the New Git Integration Modal if you want to use gitlab.com, contrary to what is described.
* Look at these [these steps](/classic/payg/authentication/github-enterprise) for information on how to integrate [`GitHub.com`](https://github.com/) with your Gitpod instance. You will need to enter `github.com` as the `Provider Host Name` in the New Git Integration Modal if you want to use github.com, contrary to what is described.
* Look at [these steps](/classic/payg/authentication/bitbucket-server) for information on how to integrate [`Bitbucket Server`](https://www.atlassian.com/de/software/bitbucket/enterprise) with your Gitpod instance. Select `Bitbucket Server` as the `Provider Type` in the New Git Integration Modal. For bitbucket.org this requires configuring an “OAuth consumer” on a “workspace”. This is slightly different from the documented Bitbucket Server integration. See [gitpod PR #9894](https://github.com/gitpod-io/gitpod/pull/9894#pullrequestreview-969013833) for an example.
* Copy the `Client ID` from the Cognito app client page into the respective field on the Gitpod SSO setup page
* Copy the `Client Secret` into the respective field on the Gitpod SSO setup page
10. Proceed to Verify the SSO configuration on the GitHub SSO setup page [by clicking “Verify SSO Configuration”](/classic/admin/getting-started/overview#:~:text=or%20Azure%20AD.-,General%20instructions,-You%20will%20need)
Integrate it with your SCM as per the steps shown in the UI or below. You can now create your first workspace and start using Gitpod! For more information on how to use Gitpod, please see the [Getting Started guide of Gitpod](/classic/user/introduction/getting-started/overview).
* Look at [these steps](/classic/payg/authentication/gitlab#registering-a-self-hosted-gitlab-installation) for information on how to integrate [`GitLab.com`](https://gitlab.com/) with your Gitpod instance. You will need to enter `gitlab.com` as the `Provider Host Name` in the New Git Integration Modal if you want to use gitlab.com, contrary to what is described.
* Look at these [these steps](/classic/payg/authentication/github-enterprise) for information on how to integrate [`GitHub.com`](https://github.com/) with your Gitpod instance. You will need to enter `github.com` as the `Provider Host Name` in the New Git Integration Modal if you want to use github.com, contrary to what is described.
* Look at [these steps](/classic/payg/authentication/bitbucket-server) for information on how to integrate [`Bitbucket Server`](https://www.atlassian.com/de/software/bitbucket/enterprise) with your Gitpod instance. Select `Bitbucket Server` as the `Provider Type` in the New Git Integration Modal. For bitbucket.org this requires configuring an “OAuth consumer” on a “workspace”. This is slightly different from the documented Bitbucket Server integration. See [gitpod PR #9894](https://github.com/gitpod-io/gitpod/pull/9894#pullrequestreview-969013833) for an example.
 {' '}
The first workspace start(s) will take longer than usual, sometimes exceeding
10 minutes depending on the workspace image used. This is because an image first
needs to be built, a node needs to be spun up, and that image then downloaded
to the node. However, subsequent workspace starts will be significantly faster.
## 4. Frequently Asked Questions
**Q.** Can we install our own custom resources inside the same AWS account where Enterprise is installed?
{' '}
The first workspace start(s) will take longer than usual, sometimes exceeding
10 minutes depending on the workspace image used. This is because an image first
needs to be built, a node needs to be spun up, and that image then downloaded
to the node. However, subsequent workspace starts will be significantly faster.
## 4. Frequently Asked Questions
**Q.** Can we install our own custom resources inside the same AWS account where Enterprise is installed?
**A.** No. Enterprise is installed in a dedicated AWS account. This is to ensure that Enterprise can be installed without any conflicts with existing resources in your AWS account. If you have special requirements for the account please speak with your Gitpod account manager.
**Q.** If we use the allPublic networking mode do we still need to provide a `CIDR range of our network`?
**A.** No. The `CIDR range of our network` is only required when using the mixed or private networking modes.
**Q.** If the Gitpod internal range of `100.70.0.0/16` does not need to be routable from my network, why do we need to specify the `CIDR range of our network`?
**A.** User workspaces traffic must cross this range when reaching the rest of your network. If there are common internal services and systems that developers may need to access that overlap with this range, the experience may be inconsistent and difficult to troubleshoot. To avoid this, Gitpod can adapt the internally used CIDR range for workspaces to the customer’s CIDR range.
**Q.** What if the `100.70.0.0/16` range overlaps with my network?
**A.** Please contact your Gitpod account manager for assistance. There is some flexibility to the CIDR range used internally by Gitpod.
**Q.** Why two templates?
**A.** The `gitpod-role` CloudFormation template is used to create a role with the minimum permissions required to install and update Enterprise. This role and its policies are used to install the second Cloudformation template.
**Q.** Can the stack created by `gitpod-role` be deleted after executing the `-gitpod-template.json`?
**A.** No, the stack created by `gitpod-role` should be maintained. The role created is also used when updates are provided to the `-gitpod-template.json` template. For more details on infrastructure updates, please see [Deployment and Updates](/classic/admin/background/deployment-updates).
**Q.** What happens if my Cloudformation stack fails to install?
**A.** If the stack fails to install, you should delete the stack and try again. There are a few resources that need to be cleaned up manually before you attempt another installation. See [Deleting your Gitpod installation](/classic/admin/manage-gitpod/deleting-your-gitpod-installation) for details.
**Q.** What if we want to use a custom domain name?
**A.** Please see Using Custom Domains for more information about using a custom domain.
**Q.** Can we grant public access to webhooks and IDP services without exposing the entire Gitpod application to the Internet?
**A.** Yes. Enterprise can be configured to expose webhooks and IDP services on public endpoints. This can be helpful for connecting to OIDC providers such as Okta, Azure AD. This option also makes it easy for developers to connect to your instance without having to route through a VPN or transit gateway. See [Networking and Data flows](/classic/admin/reference/networking-data-flows) for more information.