> ## Documentation Index
> Fetch the complete documentation index at: https://ona.com/docs/llms.txt
> Use this file to discover all available pages before exploring further.
# Configure SSO
Enterprise requires OpenID Connect (OIDC) for authentication, for example with Identity Providers (IdP) such as Google, Okta, Azure AD (Microsoft Entra ID) and AWS Cognito.
## General instructions
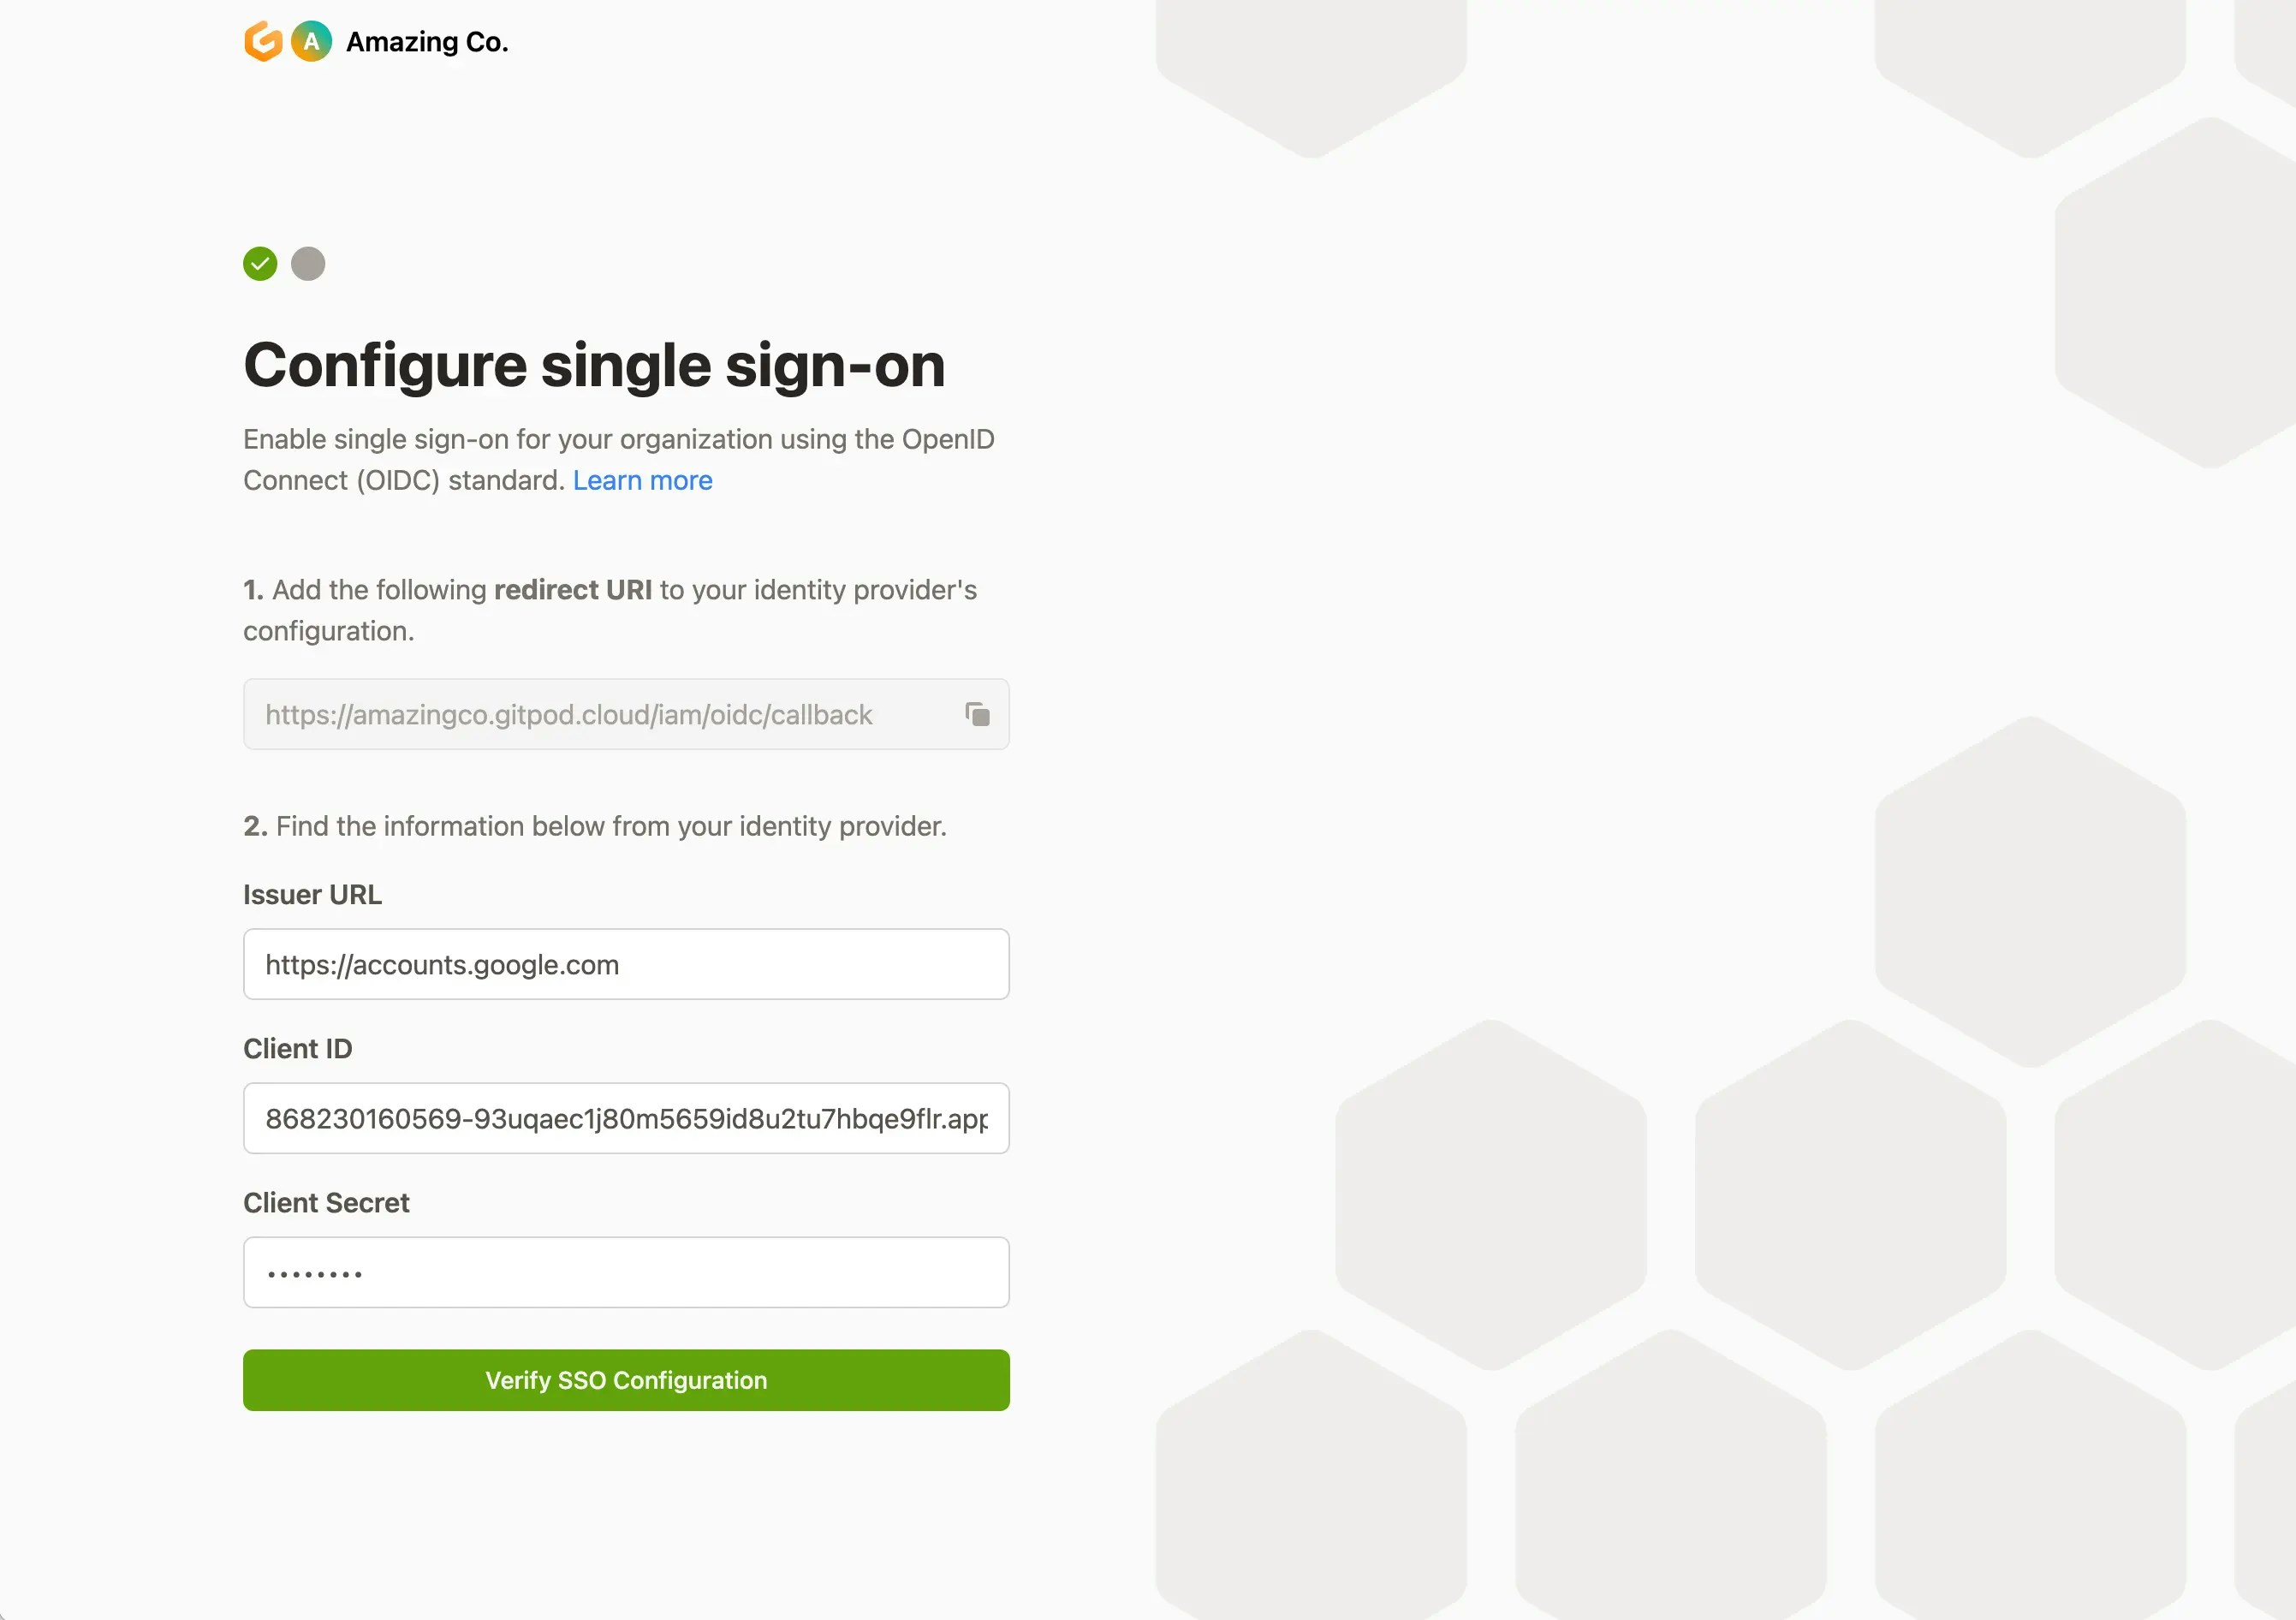
* You will need to create a configuration with your Identity Provider and provide the “redirect URI” you can copy from this screen.
* Once you’ve created your Identity Provider configuration, you should copy and paste the Issuer URL, Client ID and Client Secret values on this screen.
* Clicking “Verify SSO Configuration” will ensure that validity of the values by authenticating your account. If successful, your user will be created and configured with the “owner” role. Subsequent users that log in will be granted the default “member” role.
 ## Restrict Available Accounts in Your Identity Providers
Gitpod allows you to restrict which accounts can sign in to your Gitpod installation. This is achieved by configuring a `claims CEL expression` ([syntax of CEL](https://github.com/google/cel-spec/blob/master/doc/langdef.md#syntax)), which is evaluated when a user logs in. This feature is particularly useful for restricting access to specific teams, groups, or email domains. It can:
* **Avoid security risks** for certain SaaS Identity Providers (IdPs), such as **SaaS GitLab**, where any GitLab account can be used to verify OIDC applications under any groups or accounts.
* Restrict access to only certain members (e.g., specific teams), preventing unnecessary accounts in your Gitpod installation.
Here are examples of CEL expressions:
* (SaaS GitLab) Limit users to people who is a direct member of group, example group name `gitpod-team`
```
'gitpod-team' in claims.groups_direct
```
* (SaaS GitLab) Limit users to people who is a direct member of multiple groups, example group name `gitpod-team` and `gitpod-team-2/sub_group`
```
'gitpod-team' in claims.groups_direct && 'gitpod-team-2/sub_group' in claims.groups_direct
```
* Limit users by email ends with `@gitpod.io`
```
claims.email_verified && claims.email.endsWith('@gitpod.io')
```
## Identity Provider specific instructions
Below are detailed step-by-step instructions for configuring Single Sign-On (SSO) with various identity providers. Each section provides specific guidance for that provider's unique setup process and requirements:
* **[Okta](#okta)**
* **[Google](#google)**
* **[Azure AD (Microsoft Entra ID)](#azure-ad-microsoft-entra-id)**
* **[AWS Cognito](#aws-cognito)**
* **[Self-hosted GitLab](#self-hosted-gitlab)**
* **[SaaS GitLab](#saas-gitlab)**
***
### Okta
As *prerequisites*, you will need the following:
* Access to your Okta instance
* Permission to create an [app integration](https://help.okta.com/oie/en-us/Content/Topics/Apps/apps-overview-get-started.htm)
*Creating a Gitpod SSO Integration*
1. On the Okta Admin dashboard, navigate to Applications
2. Select `Create App Integration`
## Restrict Available Accounts in Your Identity Providers
Gitpod allows you to restrict which accounts can sign in to your Gitpod installation. This is achieved by configuring a `claims CEL expression` ([syntax of CEL](https://github.com/google/cel-spec/blob/master/doc/langdef.md#syntax)), which is evaluated when a user logs in. This feature is particularly useful for restricting access to specific teams, groups, or email domains. It can:
* **Avoid security risks** for certain SaaS Identity Providers (IdPs), such as **SaaS GitLab**, where any GitLab account can be used to verify OIDC applications under any groups or accounts.
* Restrict access to only certain members (e.g., specific teams), preventing unnecessary accounts in your Gitpod installation.
Here are examples of CEL expressions:
* (SaaS GitLab) Limit users to people who is a direct member of group, example group name `gitpod-team`
```
'gitpod-team' in claims.groups_direct
```
* (SaaS GitLab) Limit users to people who is a direct member of multiple groups, example group name `gitpod-team` and `gitpod-team-2/sub_group`
```
'gitpod-team' in claims.groups_direct && 'gitpod-team-2/sub_group' in claims.groups_direct
```
* Limit users by email ends with `@gitpod.io`
```
claims.email_verified && claims.email.endsWith('@gitpod.io')
```
## Identity Provider specific instructions
Below are detailed step-by-step instructions for configuring Single Sign-On (SSO) with various identity providers. Each section provides specific guidance for that provider's unique setup process and requirements:
* **[Okta](#okta)**
* **[Google](#google)**
* **[Azure AD (Microsoft Entra ID)](#azure-ad-microsoft-entra-id)**
* **[AWS Cognito](#aws-cognito)**
* **[Self-hosted GitLab](#self-hosted-gitlab)**
* **[SaaS GitLab](#saas-gitlab)**
***
### Okta
As *prerequisites*, you will need the following:
* Access to your Okta instance
* Permission to create an [app integration](https://help.okta.com/oie/en-us/Content/Topics/Apps/apps-overview-get-started.htm)
*Creating a Gitpod SSO Integration*
1. On the Okta Admin dashboard, navigate to Applications
2. Select `Create App Integration`
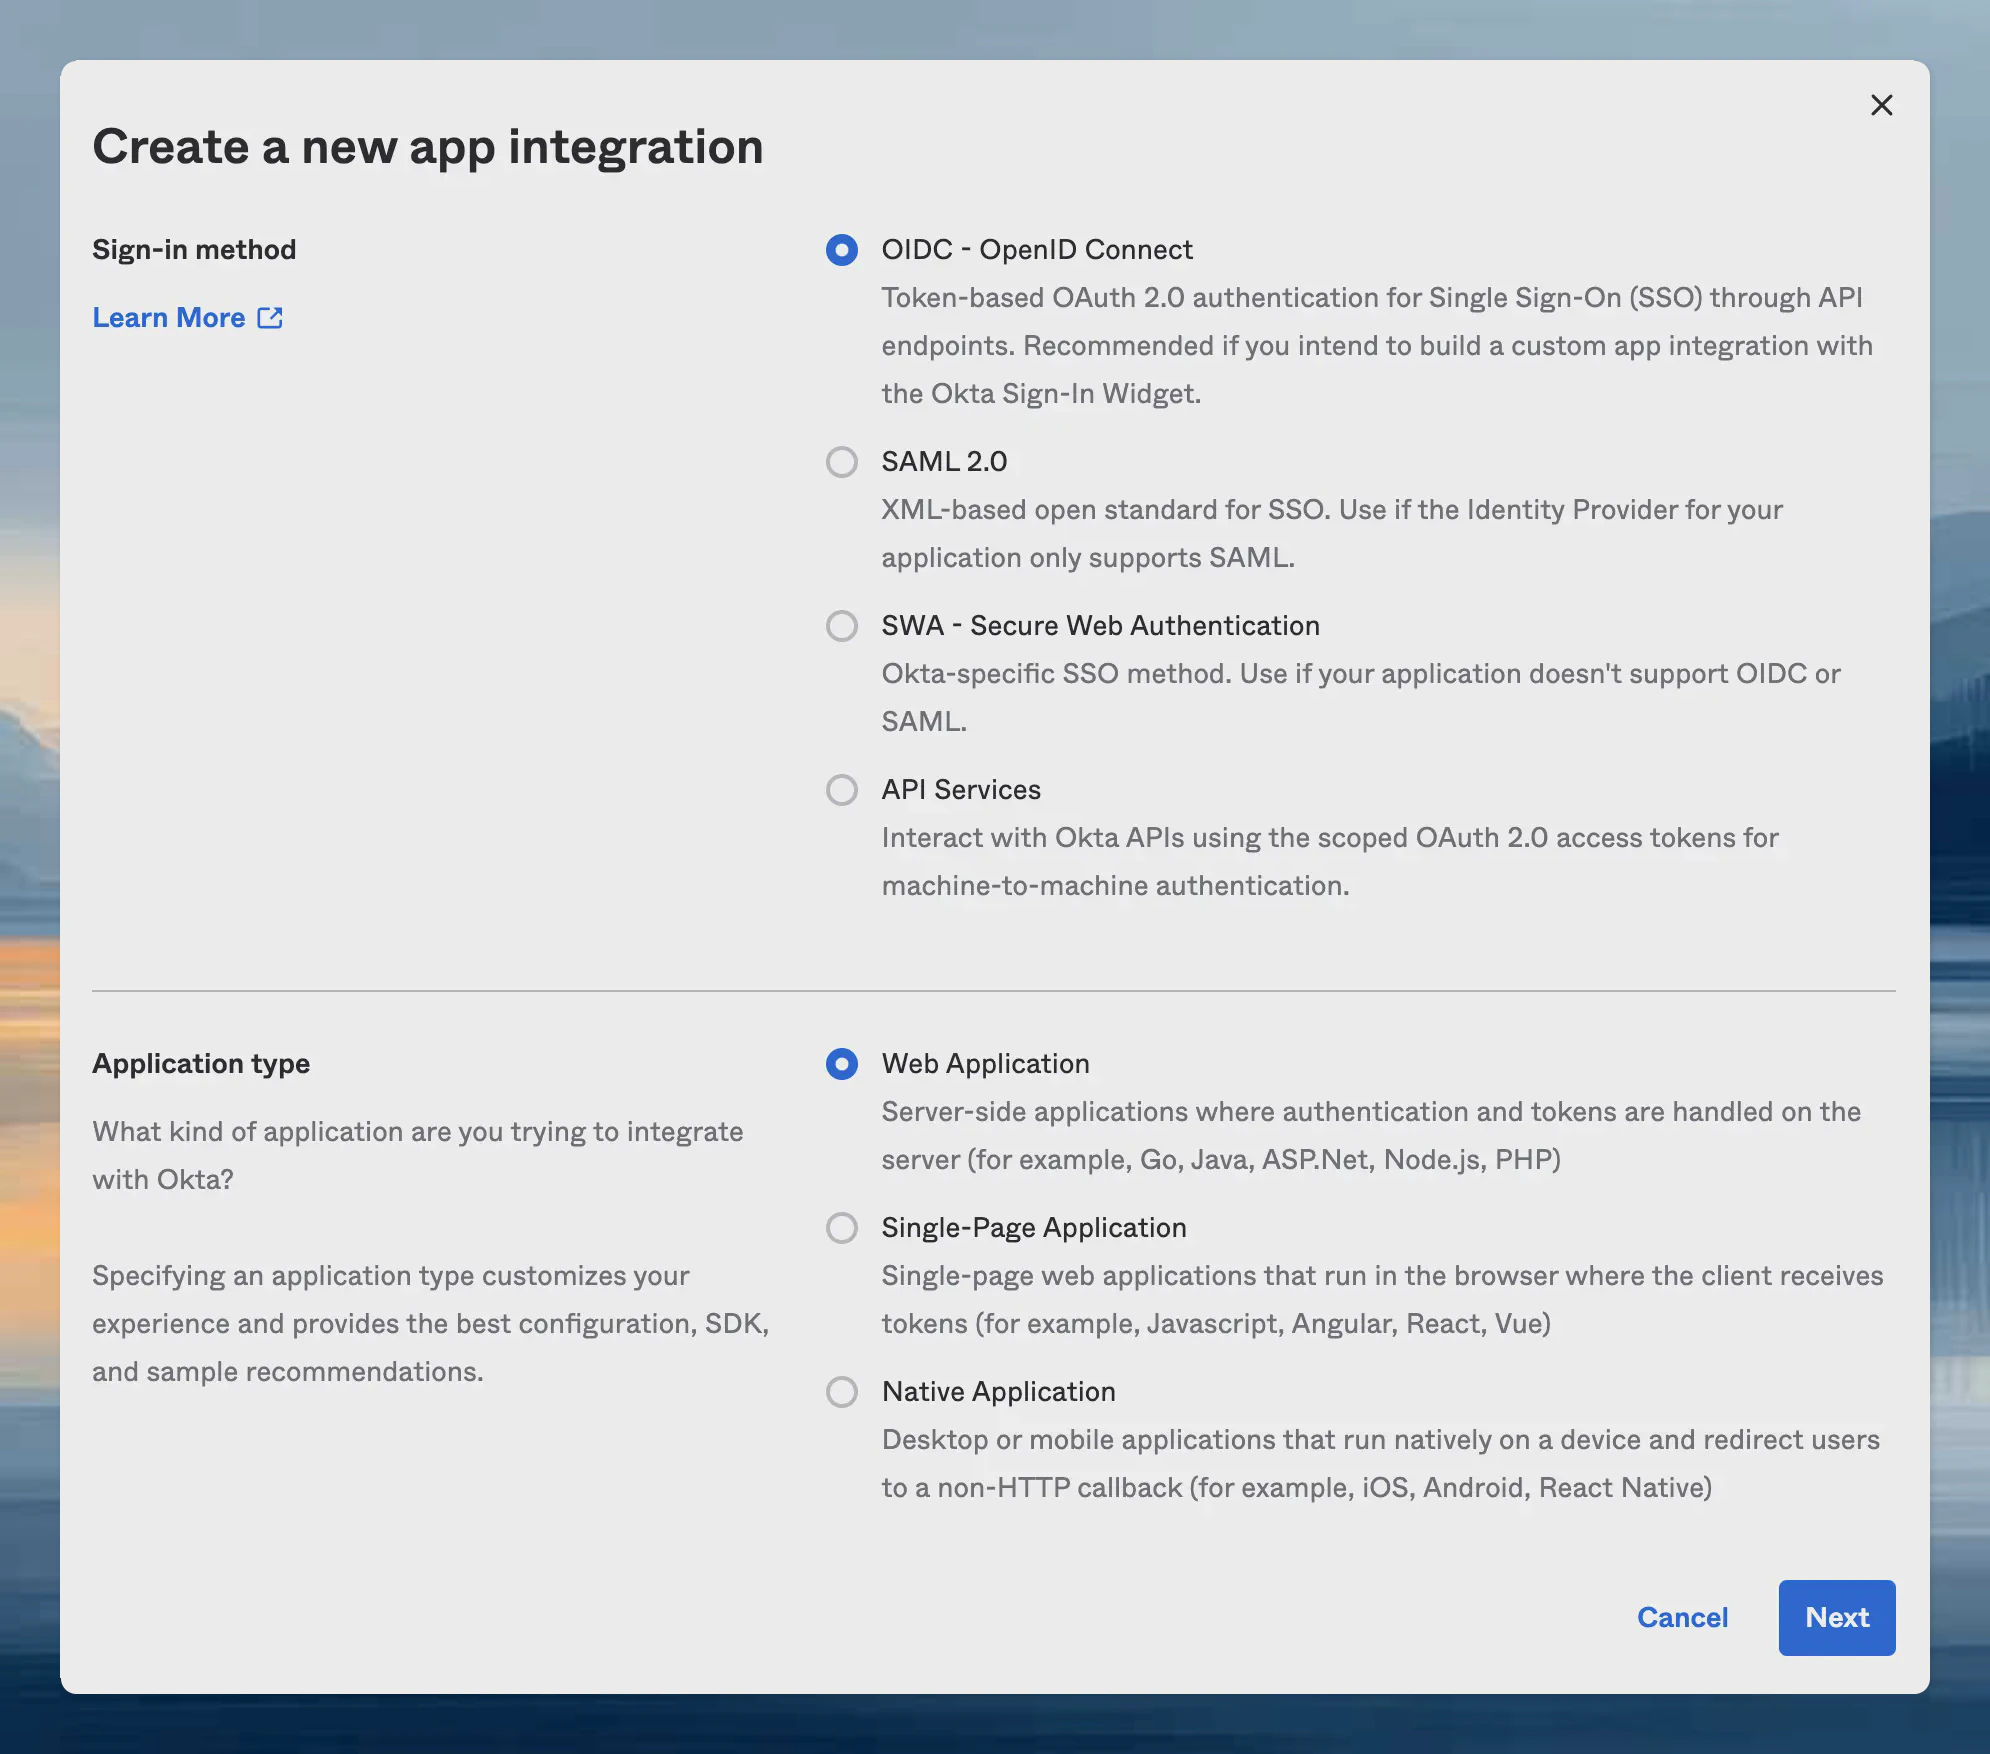
 3. Select the following options and click `Next`
* Sign-in method: `OIDC - Open ID Connect`
* Application type: `Web Application`
3. Select the following options and click `Next`
* Sign-in method: `OIDC - Open ID Connect`
* Application type: `Web Application`
 4. Specify General Settings
* App integration name: `Gitpod` (or choose your own name)
* Sign-in redirect URIs: *copy this value from your Gitpod setup screen* (see [details](/classic/admin/setup-gitpod/configure-sso#general-instructions:~:text=on%20this%20screen.-,Clicking%20%E2%80%9CVerify%20SSO%20Configuration%E2%80%9D,-will%20ensure%20that) above under "General instructions")
* Sign-out redirect URIs: `none`
* Trusted Origins: `none`
* Assignments: *choose option appropriate to your organization*
4. Specify General Settings
* App integration name: `Gitpod` (or choose your own name)
* Sign-in redirect URIs: *copy this value from your Gitpod setup screen* (see [details](/classic/admin/setup-gitpod/configure-sso#general-instructions:~:text=on%20this%20screen.-,Clicking%20%E2%80%9CVerify%20SSO%20Configuration%E2%80%9D,-will%20ensure%20that) above under "General instructions")
* Sign-out redirect URIs: `none`
* Trusted Origins: `none`
* Assignments: *choose option appropriate to your organization*
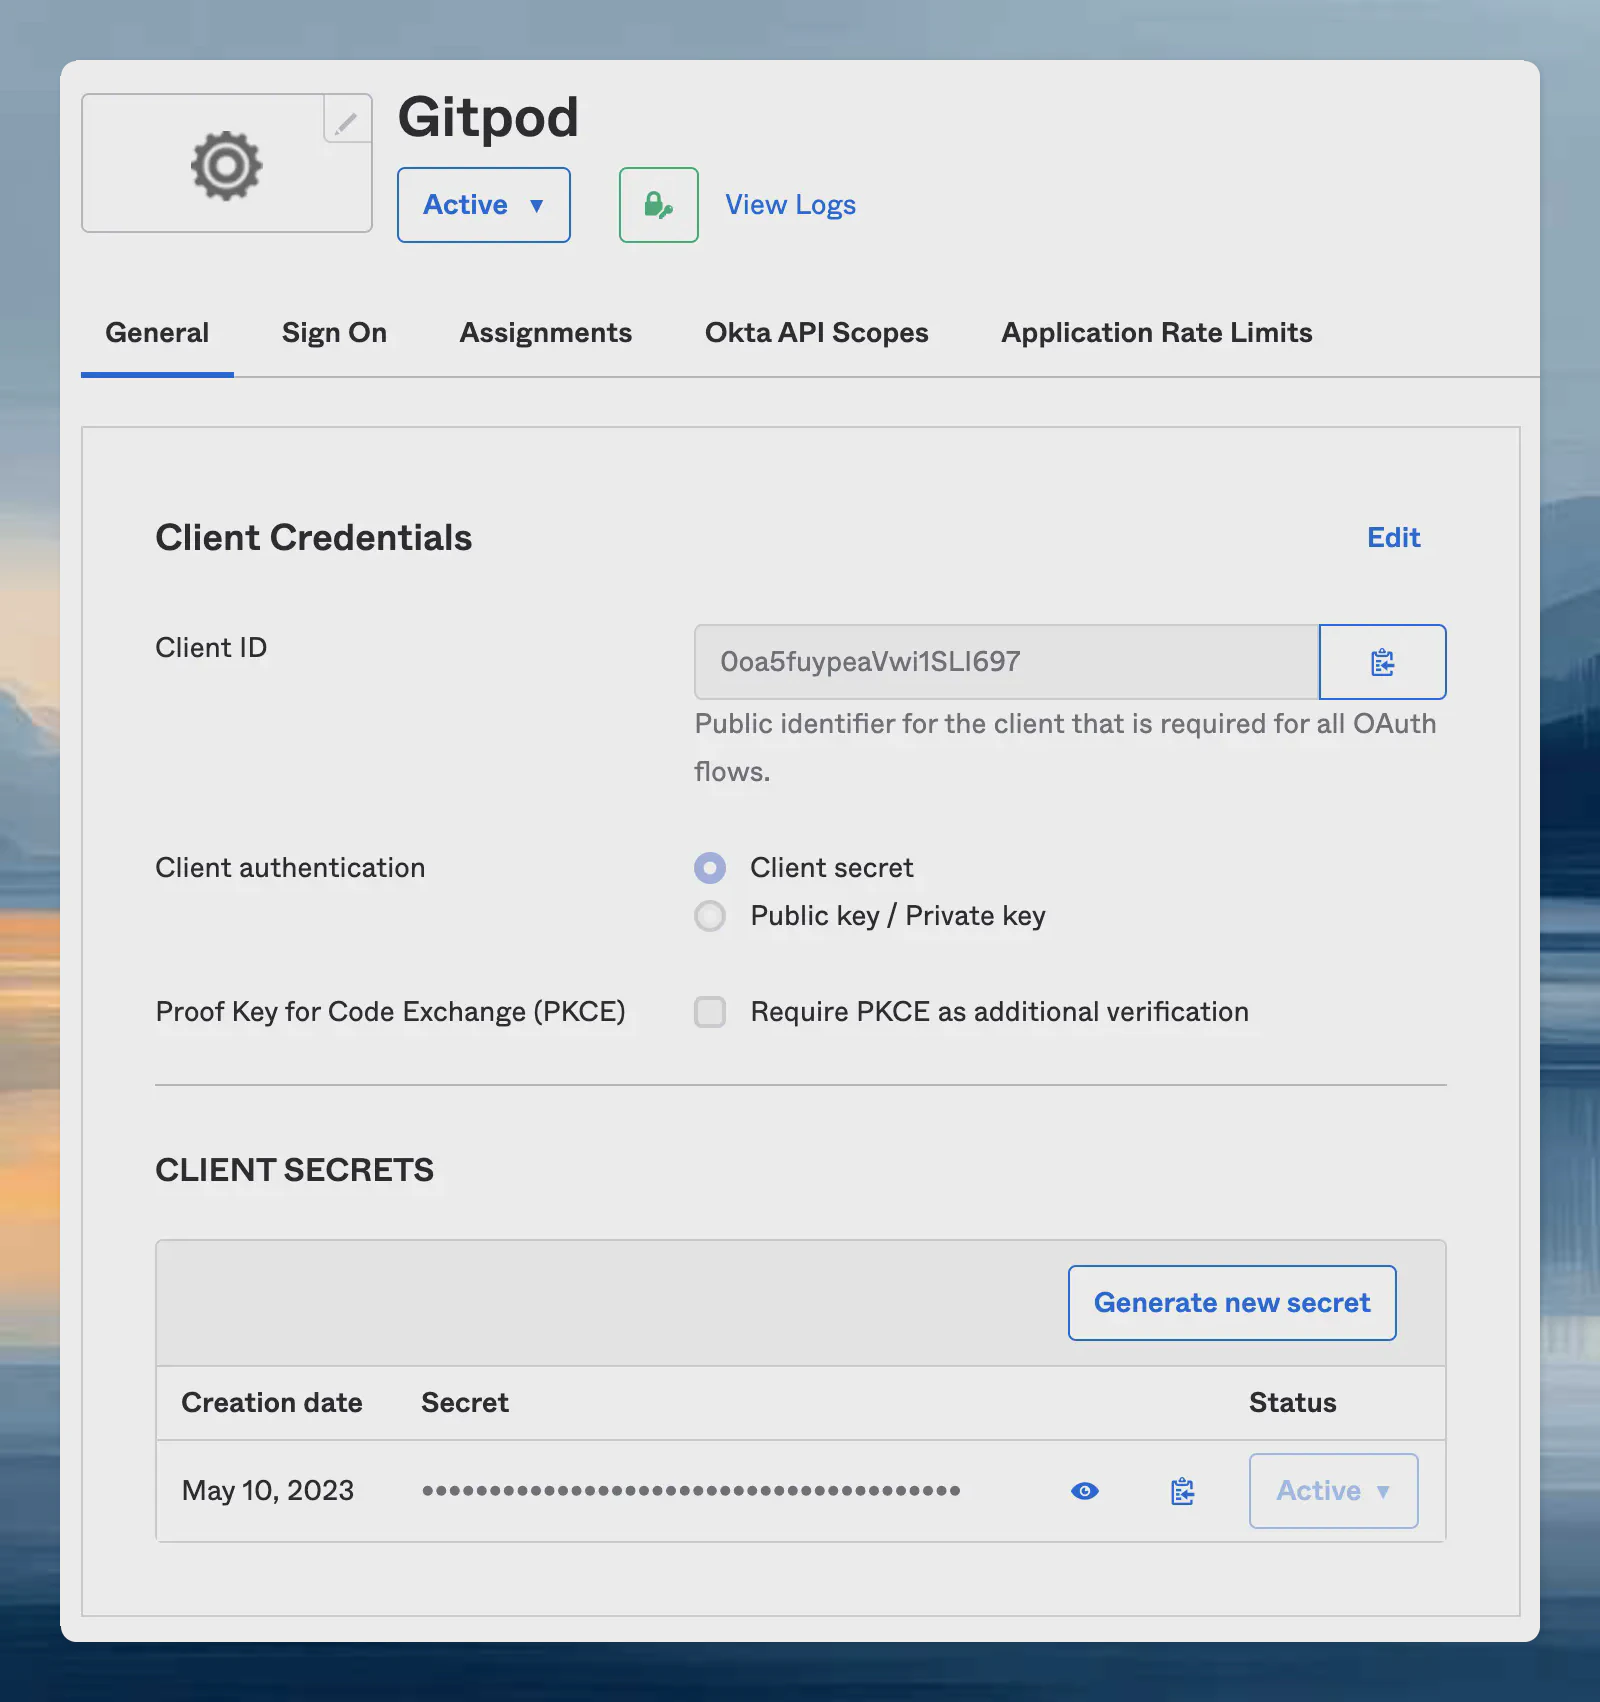
 5. Obtain Client ID & Client Secret
* Copy the `Client ID` and use it as input in Gitpod setup (see [details](/classic/admin/setup-gitpod/configure-sso#general-instructions:~:text=on%20this%20screen.-,Clicking%20%E2%80%9CVerify%20SSO%20Configuration%E2%80%9D,-will%20ensure%20that) above under "General instructions")
* Copy `Client Secret` and use it as input in Gitpod setup (see [details](/classic/admin/setup-gitpod/configure-sso#general-instructions:~:text=on%20this%20screen.-,Clicking%20%E2%80%9CVerify%20SSO%20Configuration%E2%80%9D,-will%20ensure%20that) above under "General instructions")
* Set the `Issuer` to your Okta instance, eg: `https://amazingco.okta.com/`
5. Obtain Client ID & Client Secret
* Copy the `Client ID` and use it as input in Gitpod setup (see [details](/classic/admin/setup-gitpod/configure-sso#general-instructions:~:text=on%20this%20screen.-,Clicking%20%E2%80%9CVerify%20SSO%20Configuration%E2%80%9D,-will%20ensure%20that) above under "General instructions")
* Copy `Client Secret` and use it as input in Gitpod setup (see [details](/classic/admin/setup-gitpod/configure-sso#general-instructions:~:text=on%20this%20screen.-,Clicking%20%E2%80%9CVerify%20SSO%20Configuration%E2%80%9D,-will%20ensure%20that) above under "General instructions")
* Set the `Issuer` to your Okta instance, eg: `https://amazingco.okta.com/`
 6. Continue with Gitpod SSO Configuration verification: [Clicking “Verify SSO Configuration”](/classic/admin/setup-gitpod/configure-sso#general-instructions:~:text=on%20this%20screen.-,Clicking%20%E2%80%9CVerify%20SSO%20Configuration%E2%80%9D,-will%20ensure%20that)
***
### Google
*As prerequisites* you will need the following:
* Access to setup a new [API Credentials](https://console.cloud.google.com/apis/credentials) in your GCP Account
*Creating a Gitpod SSO Integration*
1. Navigate to your Google Cloud Console, API Credentials
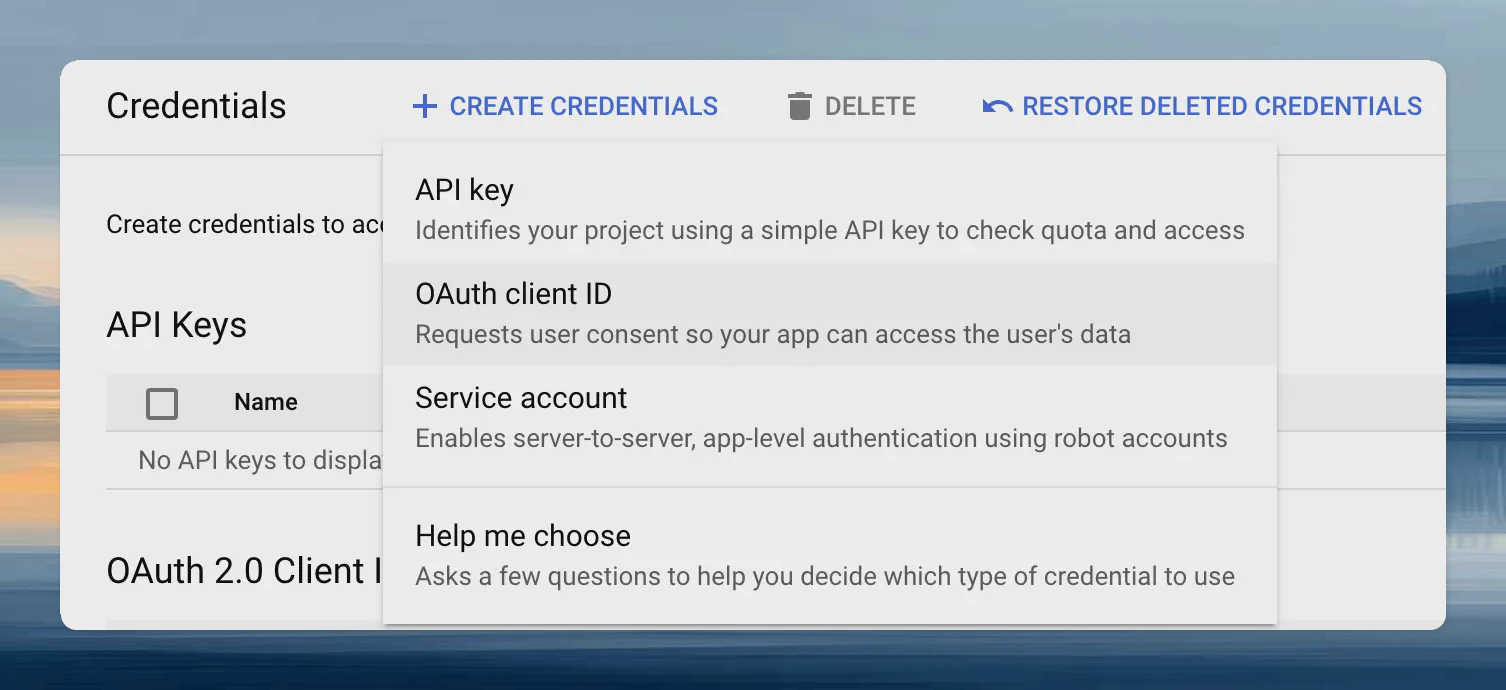
2. Select Create Credentials, and choose OAuth client ID
6. Continue with Gitpod SSO Configuration verification: [Clicking “Verify SSO Configuration”](/classic/admin/setup-gitpod/configure-sso#general-instructions:~:text=on%20this%20screen.-,Clicking%20%E2%80%9CVerify%20SSO%20Configuration%E2%80%9D,-will%20ensure%20that)
***
### Google
*As prerequisites* you will need the following:
* Access to setup a new [API Credentials](https://console.cloud.google.com/apis/credentials) in your GCP Account
*Creating a Gitpod SSO Integration*
1. Navigate to your Google Cloud Console, API Credentials
2. Select Create Credentials, and choose OAuth client ID
 3. Configure your OAuth Client ID, by specifying the Authorized Redirect URIs. You will be able to find it on the setup page.
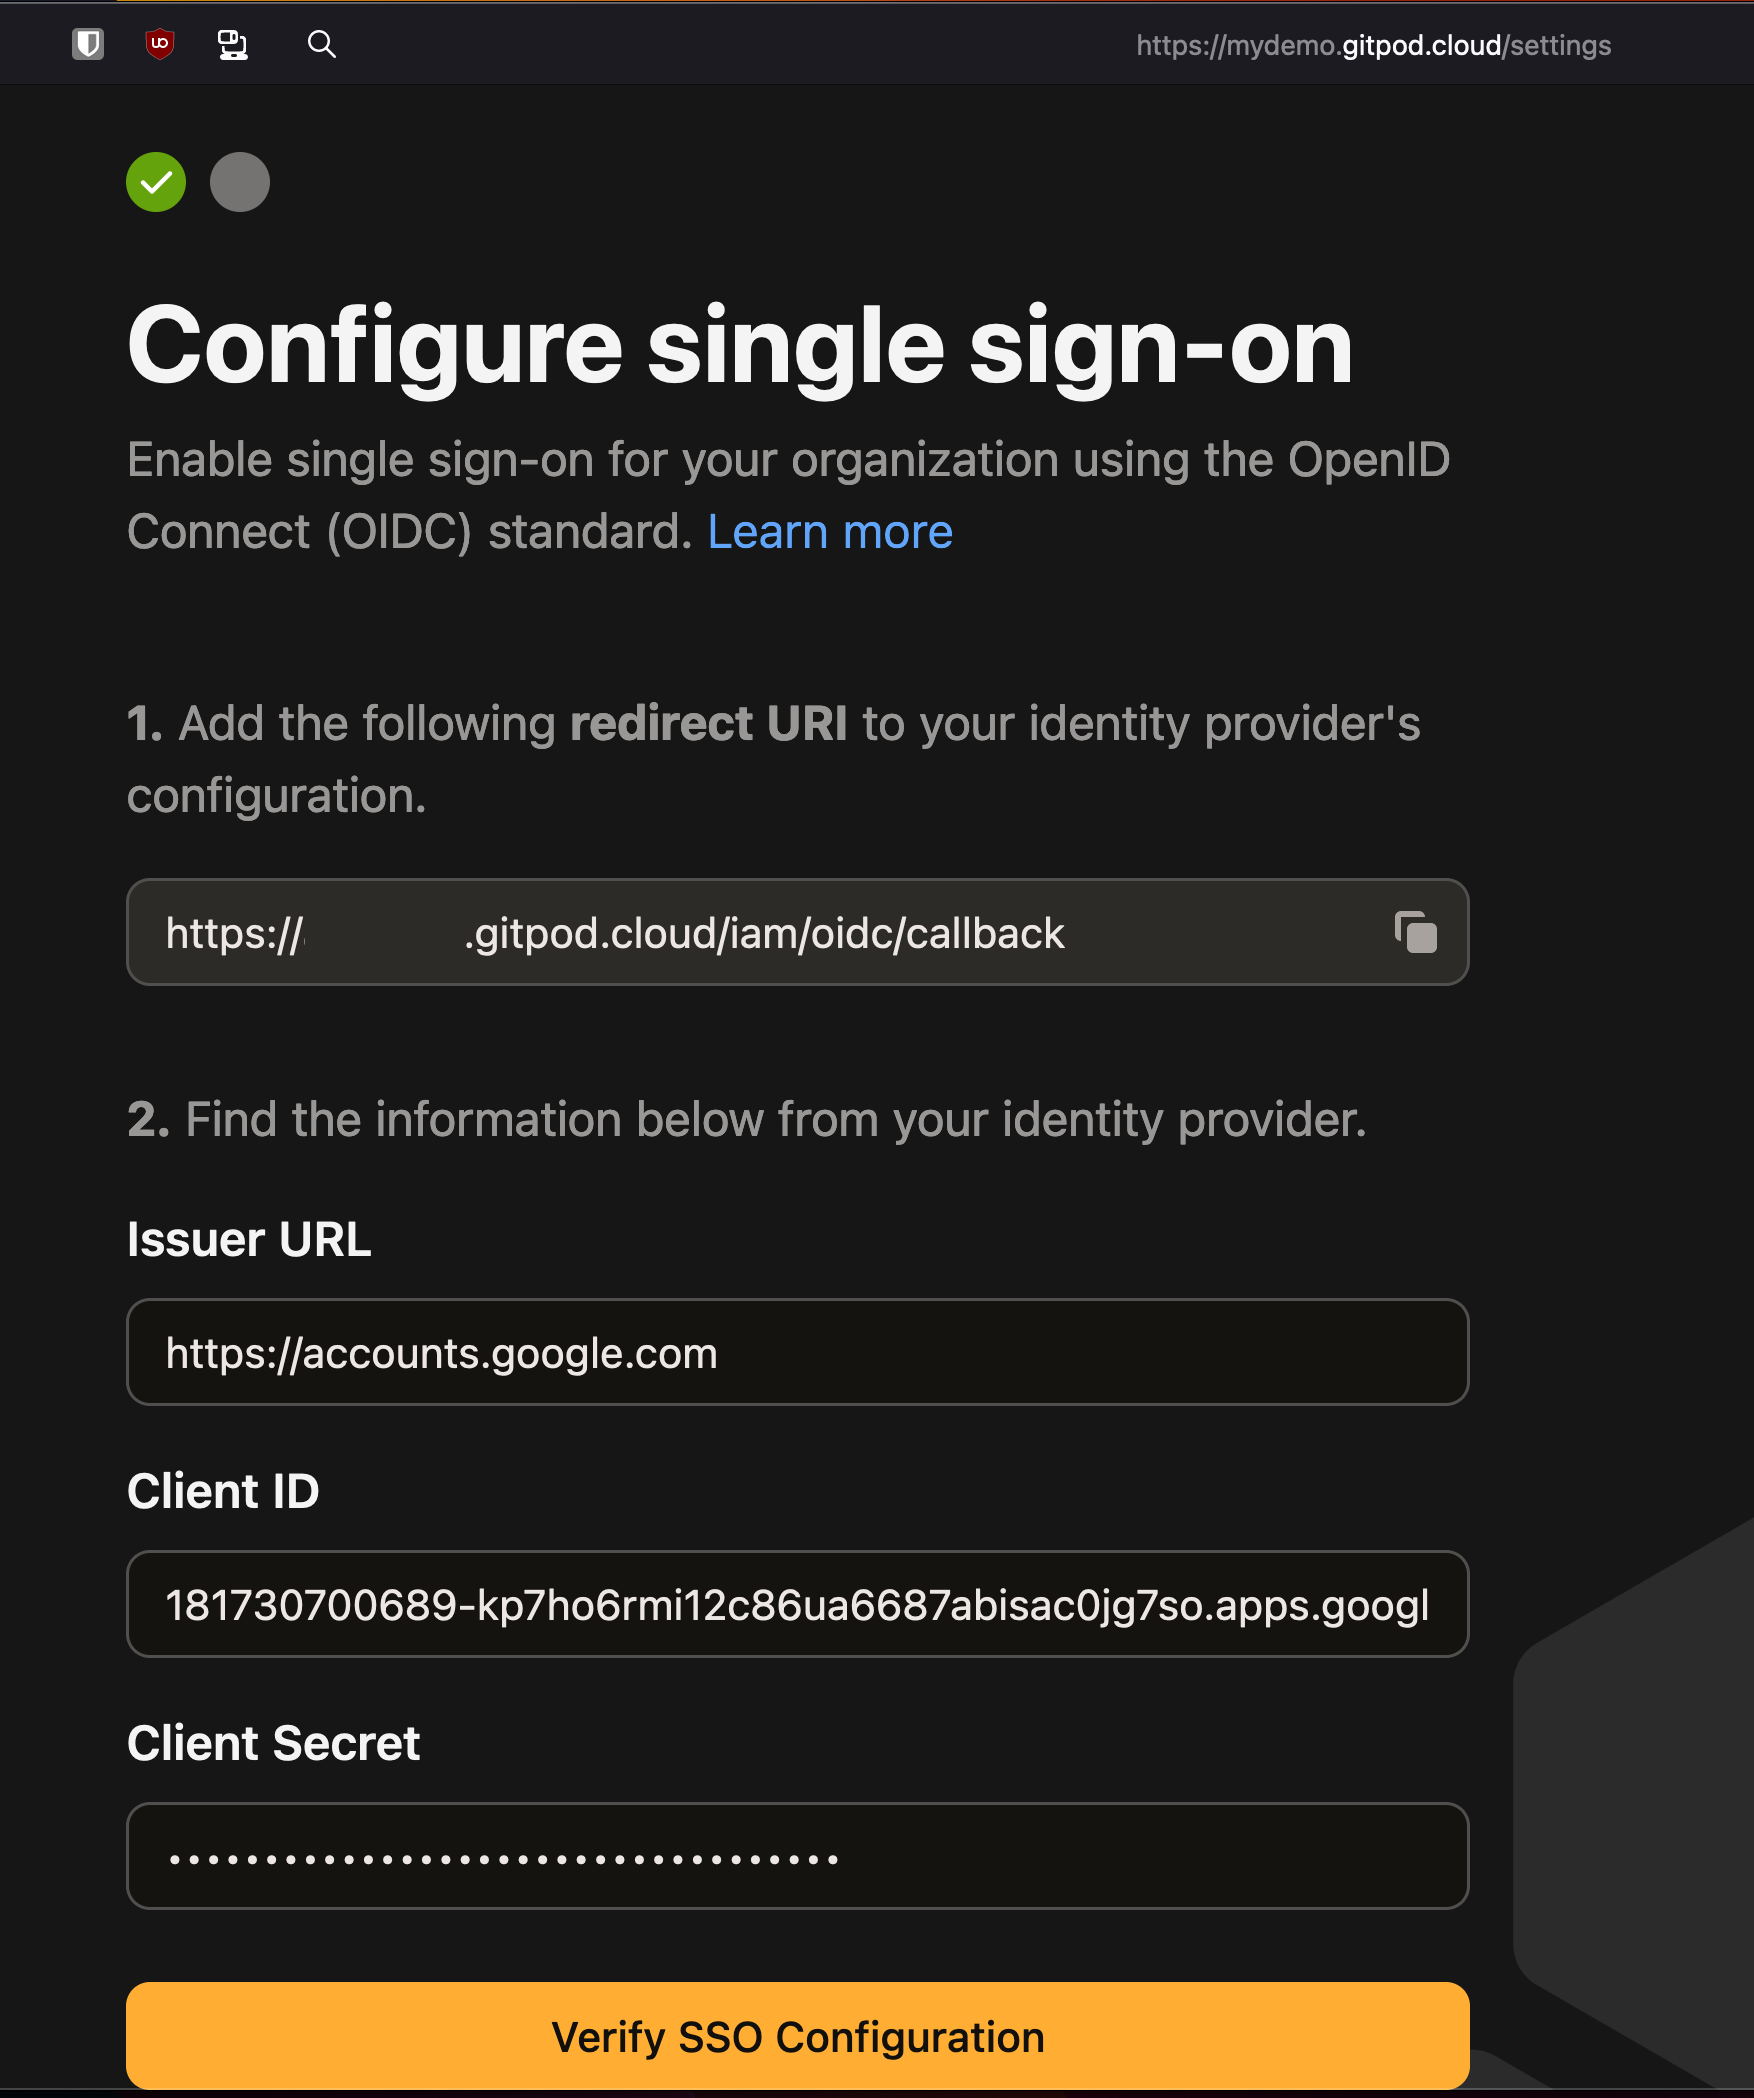 4. Obtain the Client ID & Client Secret and input these into your Gitpod Setup page
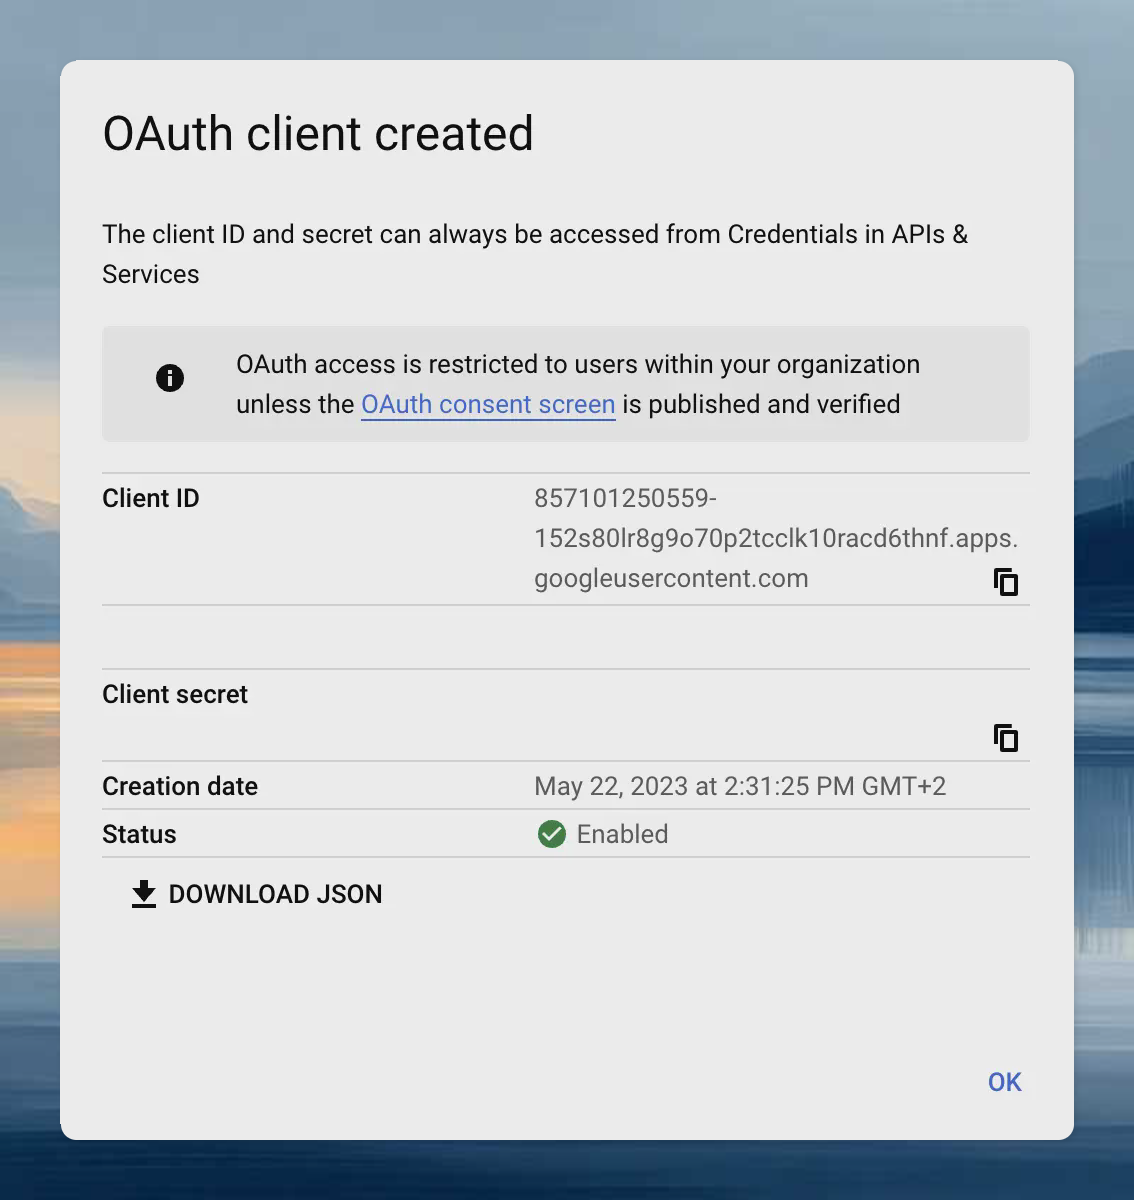 5. Set Provider's Issuer URL to `https://accounts.google.com`
6. Proceed to verify the integration on the Gitpod setup page: [Clicking “Verify SSO Configuration”](/classic/admin/setup-gitpod/configure-sso#general-instructions:~:text=on%20this%20screen.-,Clicking%20%E2%80%9CVerify%20SSO%20Configuration%E2%80%9D,-will%20ensure%20that)
***
### Azure AD (Microsoft Entra ID)
As prerequisites you will need the following:
* Access to [Microsoft Entra admin center](https://entra.microsoft.com/)
*Create an OIDC application*
1. On the [Microsoft Entra admin center](https://entra.microsoft.com/), navigate to *Identity > Applications*
2. Select `New Registration`
5. Set Provider's Issuer URL to `https://accounts.google.com`
6. Proceed to verify the integration on the Gitpod setup page: [Clicking “Verify SSO Configuration”](/classic/admin/setup-gitpod/configure-sso#general-instructions:~:text=on%20this%20screen.-,Clicking%20%E2%80%9CVerify%20SSO%20Configuration%E2%80%9D,-will%20ensure%20that)
***
### Azure AD (Microsoft Entra ID)
As prerequisites you will need the following:
* Access to [Microsoft Entra admin center](https://entra.microsoft.com/)
*Create an OIDC application*
1. On the [Microsoft Entra admin center](https://entra.microsoft.com/), navigate to *Identity > Applications*
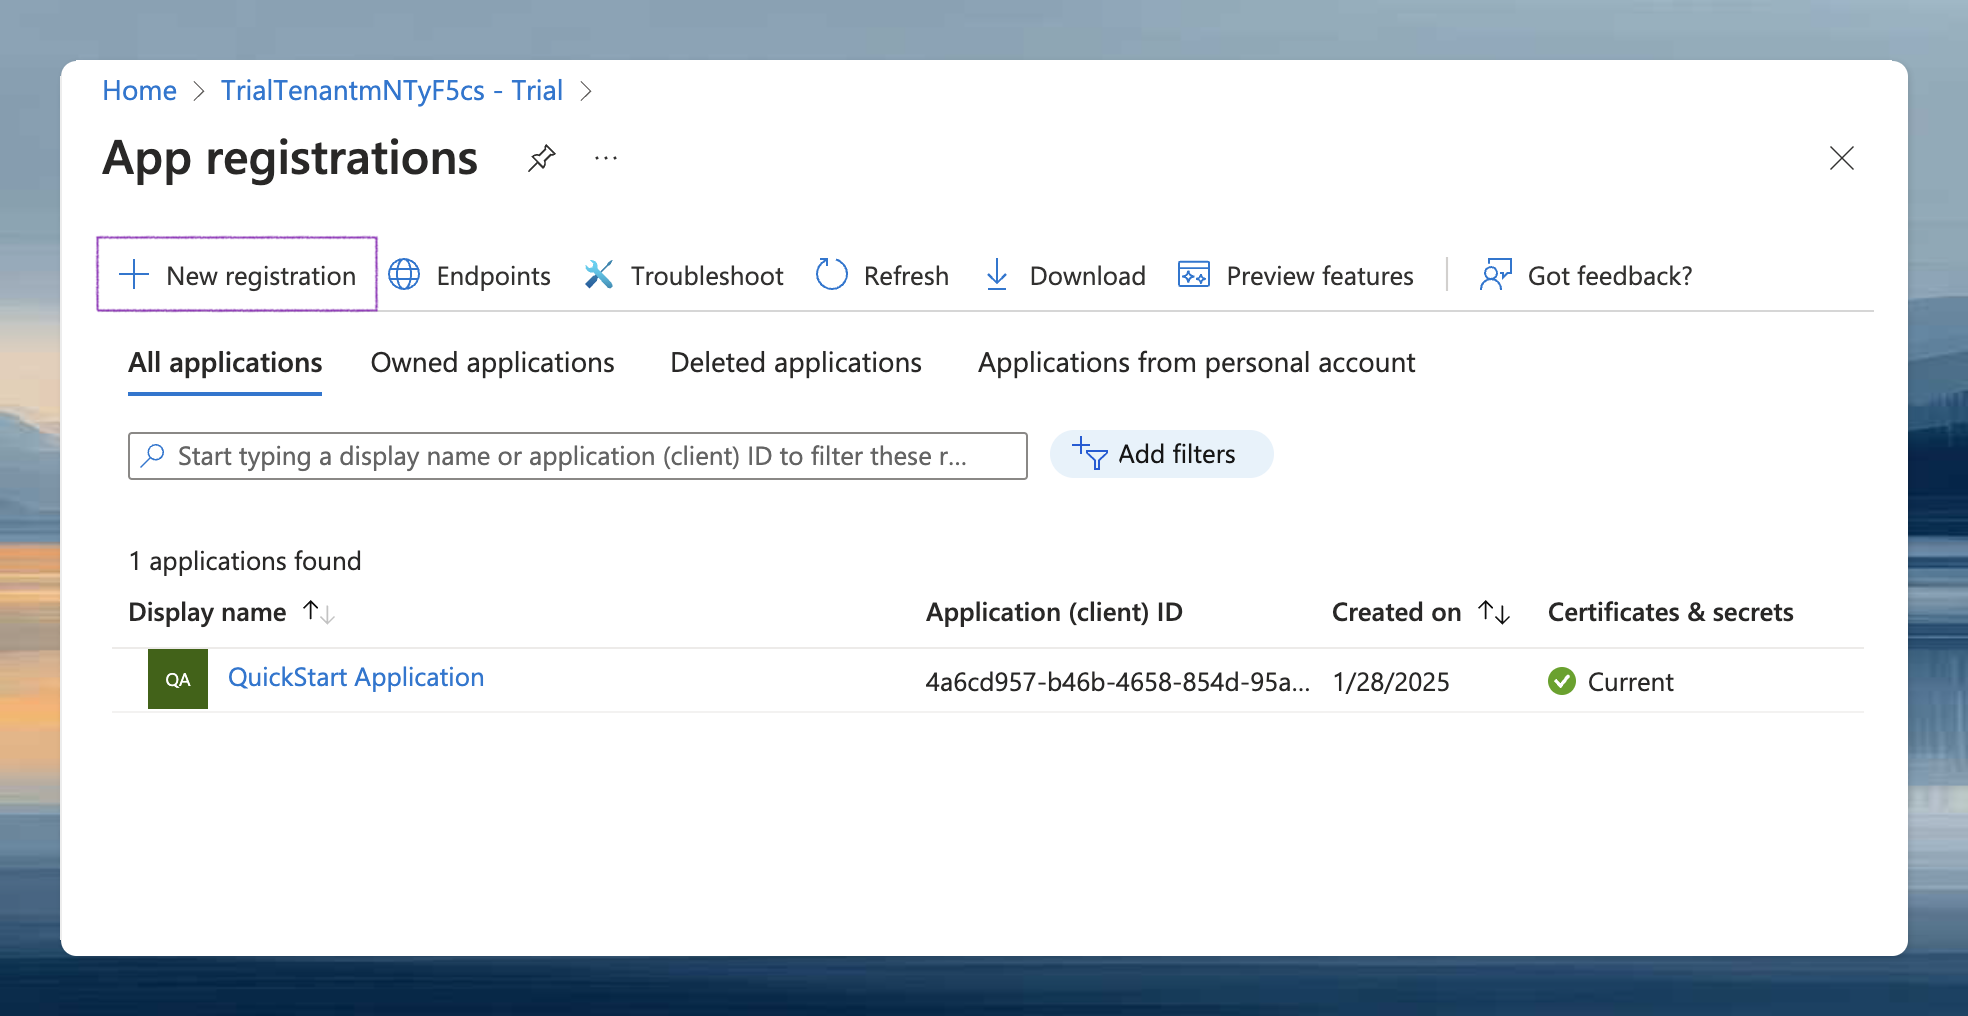
2. Select `New Registration`
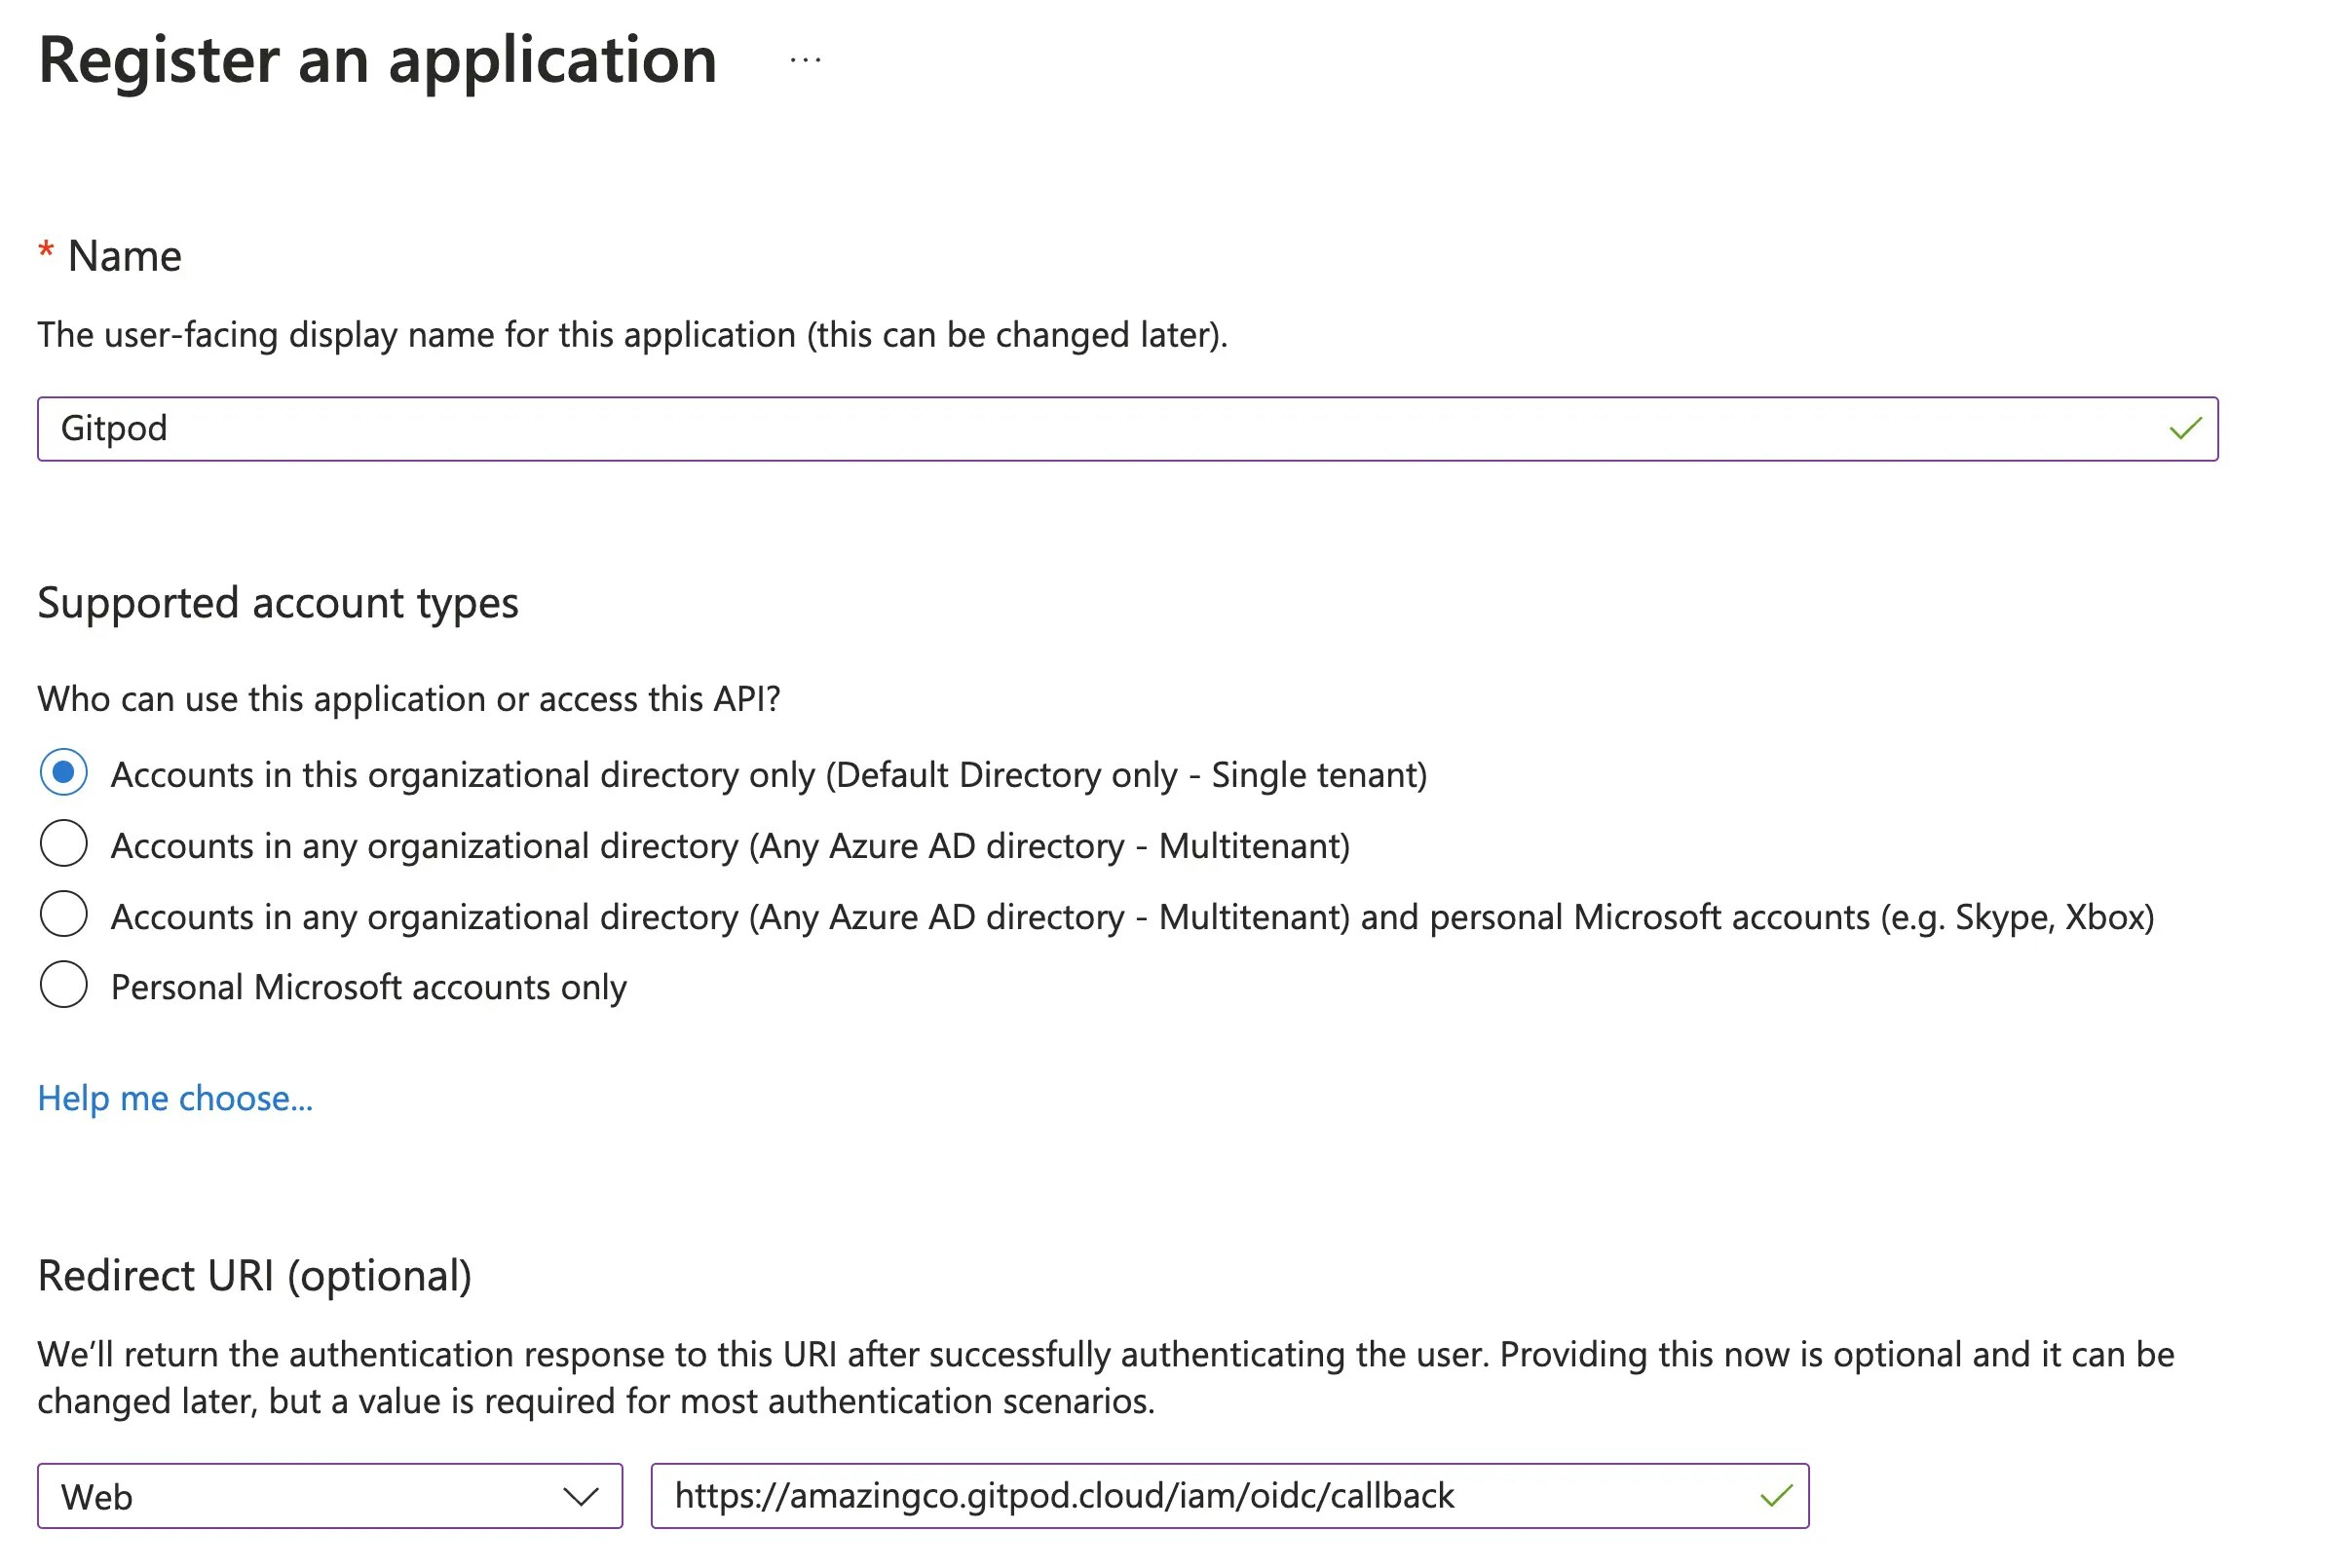
 3. Specify General Settings
* App name, e.g. `Gitpod`
* Platform: `Web`
* Paste the redirect URI
* You'll find the redirect URI on the Gitpod SSO setup page
* `https:///iam/oidc/callback`
3. Specify General Settings
* App name, e.g. `Gitpod`
* Platform: `Web`
* Paste the redirect URI
* You'll find the redirect URI on the Gitpod SSO setup page
* `https:///iam/oidc/callback`
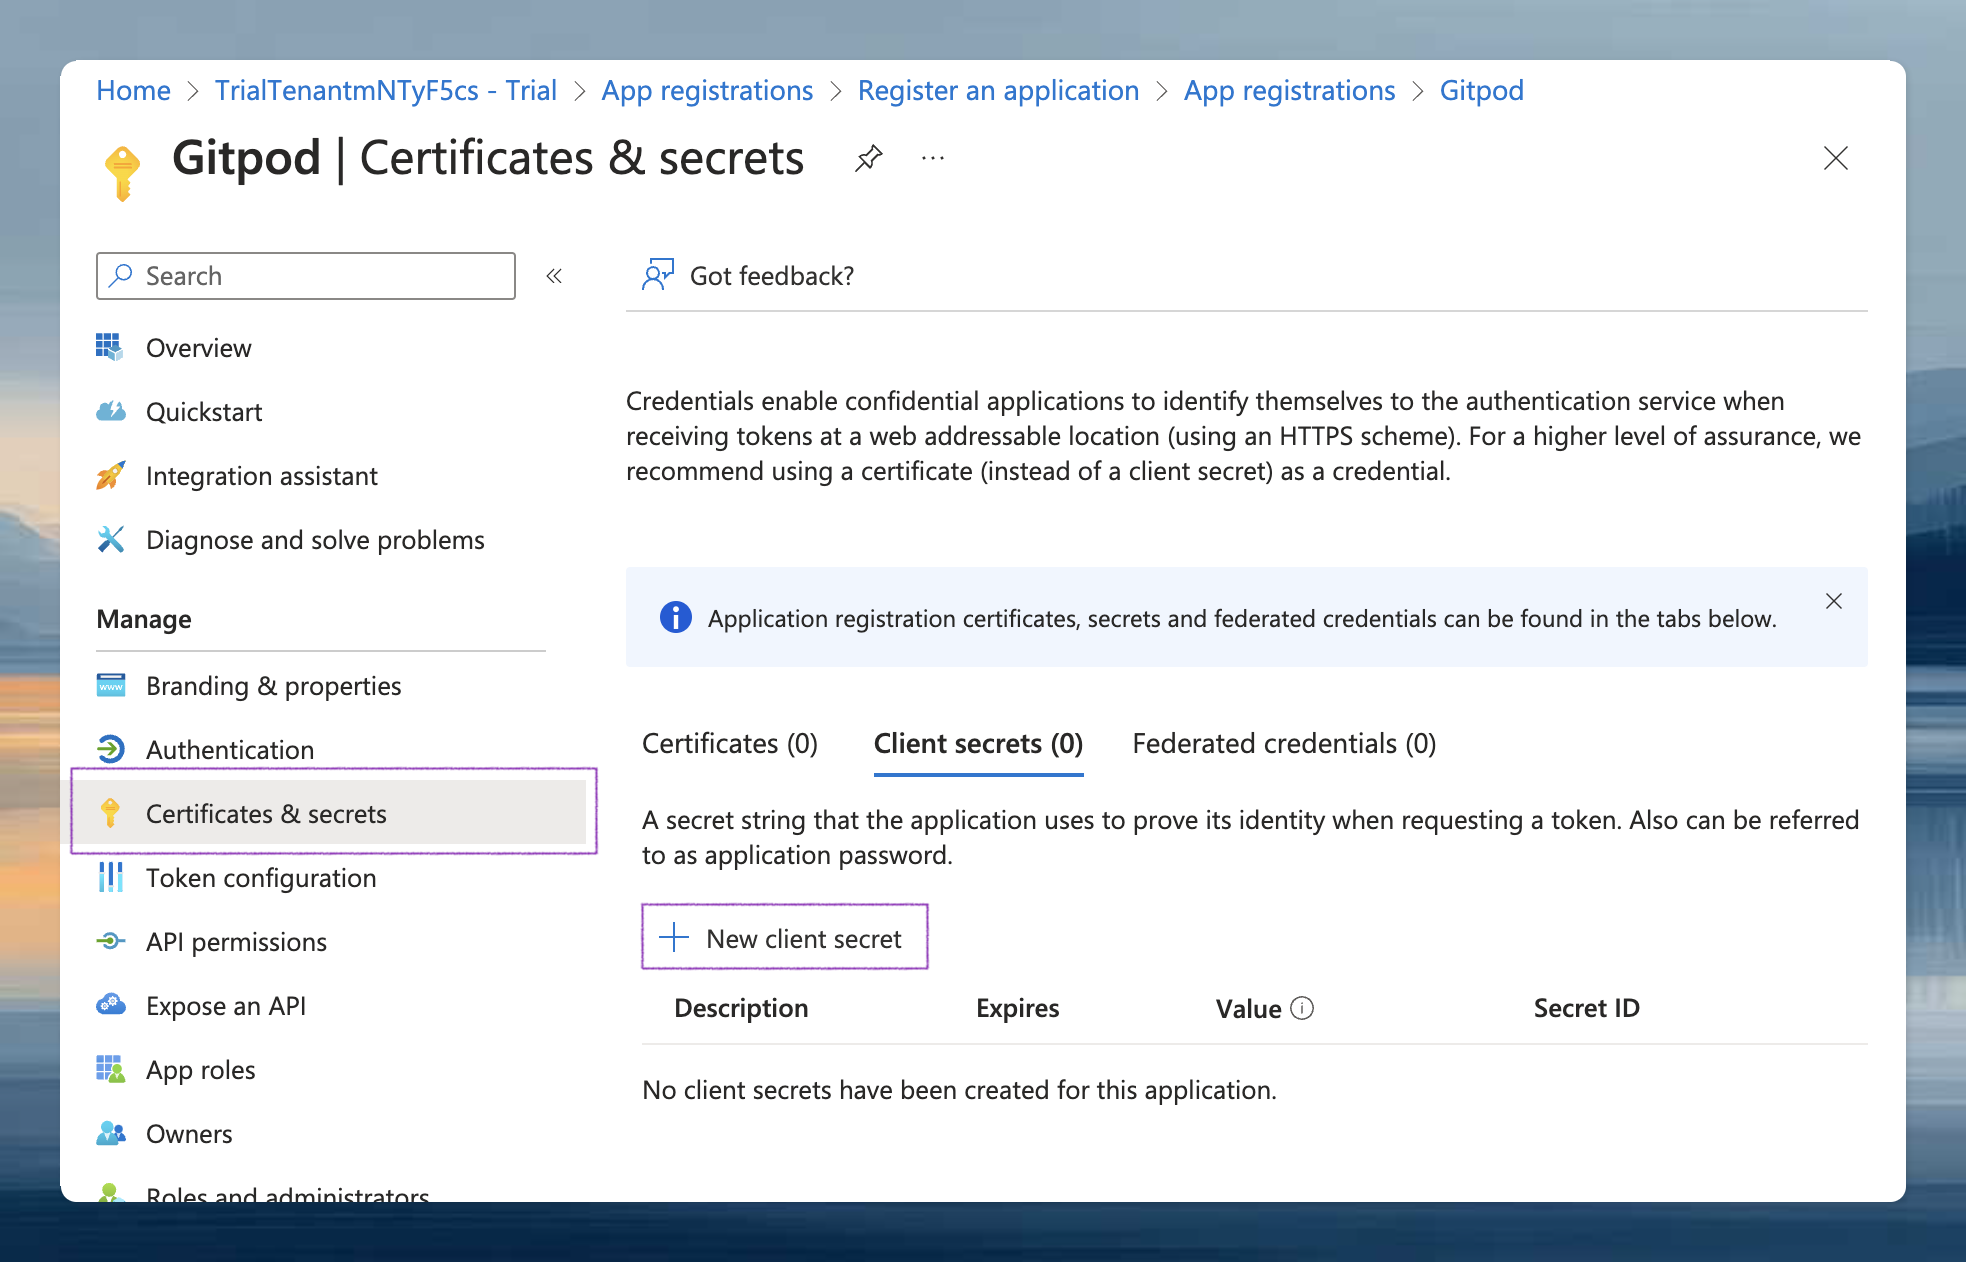
 4. Obtain *Client Secret* from the *Certificates & secrets* page
* Once the application is registered, navigate to the subpage *Certificates & secrets* to create and obtain a new client secret.
* Click the *New client secret* button
4. Obtain *Client Secret* from the *Certificates & secrets* page
* Once the application is registered, navigate to the subpage *Certificates & secrets* to create and obtain a new client secret.
* Click the *New client secret* button
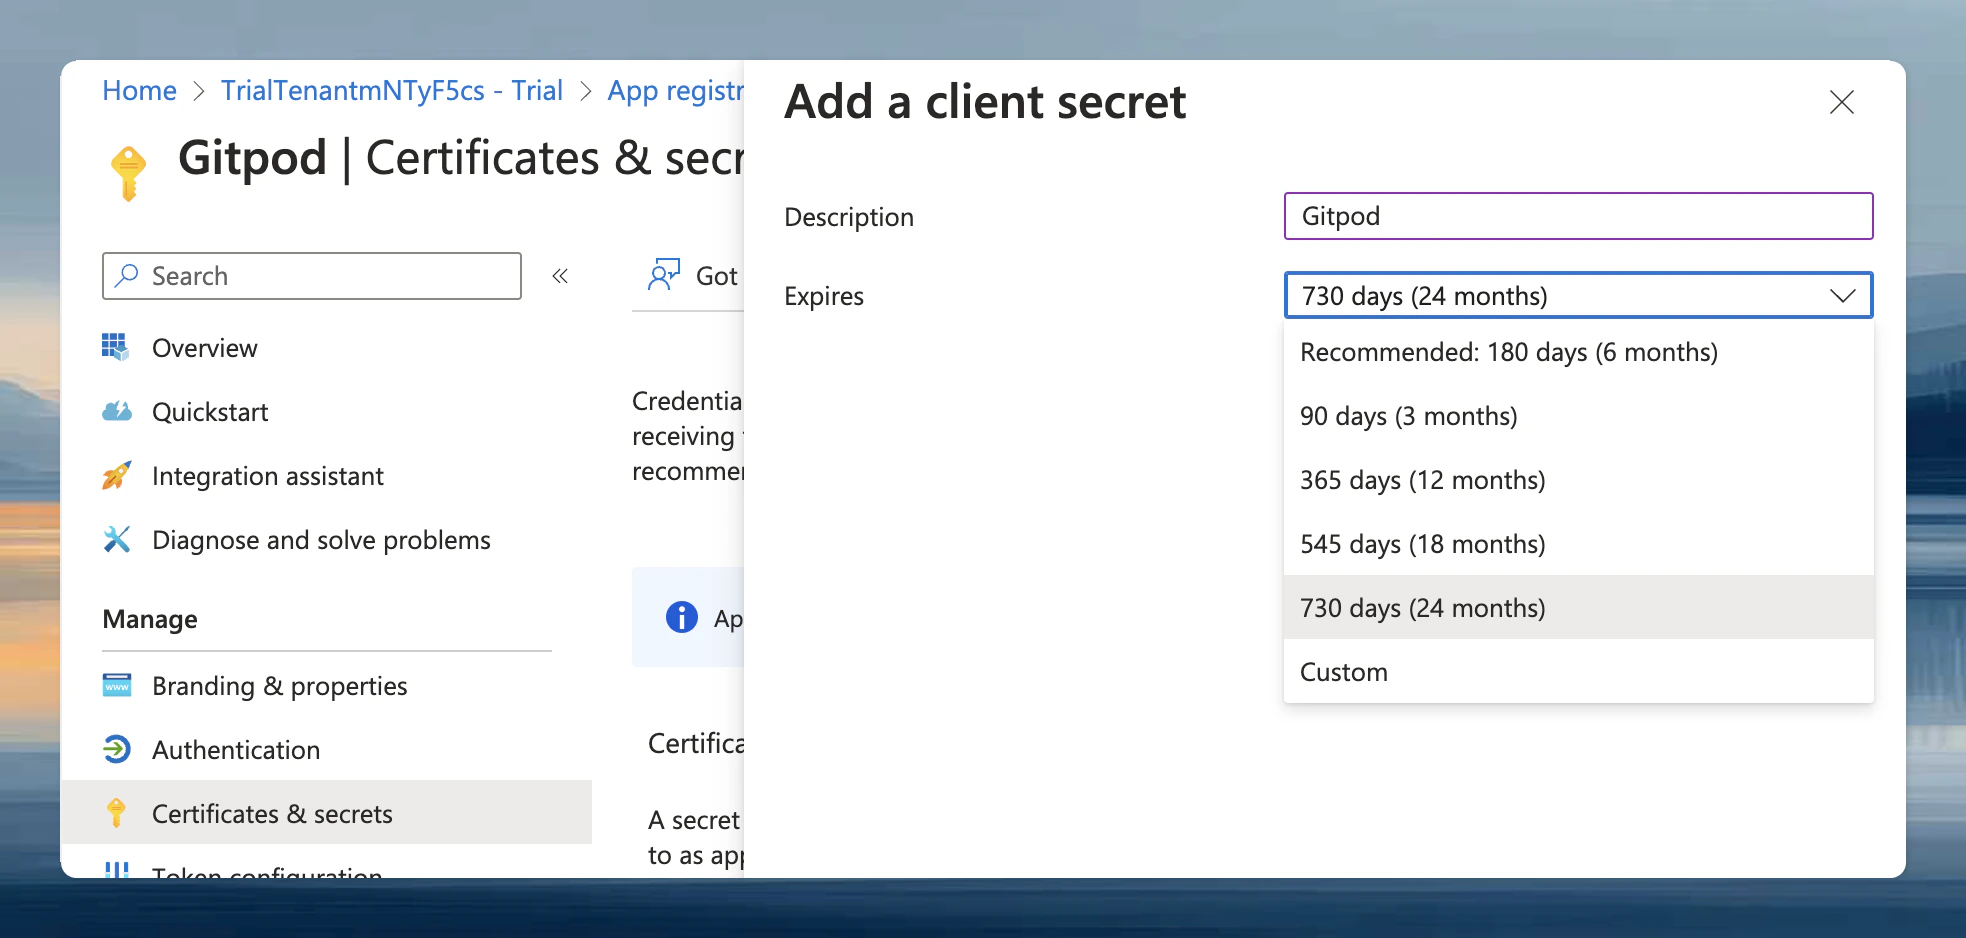
 * Adjust the expiry of the client secret
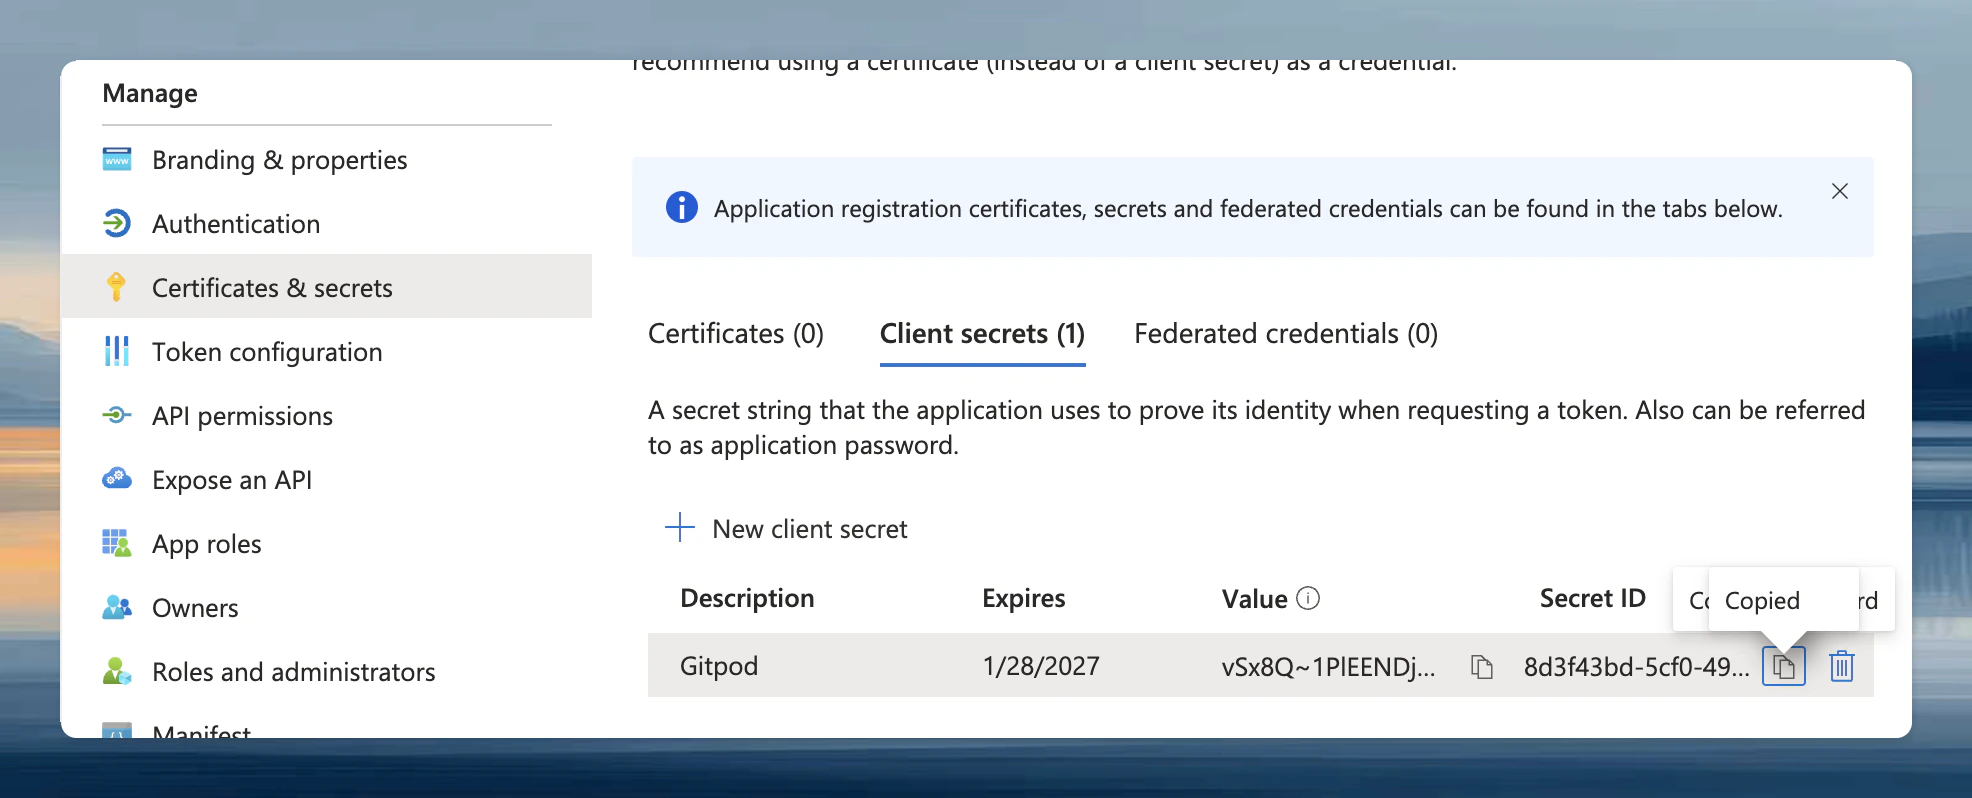
 * Then copy the value of the client secret to be pasted in Gitpod's SSO setup
 5. Configure OIDC Scopes
* The default selection of OIDC scopes in Microsoft Entra ID doesn't meet the requirements for Gitpod. Navigate to *API Permissions > Add a permission* to make the necessary changes
5. Configure OIDC Scopes
* The default selection of OIDC scopes in Microsoft Entra ID doesn't meet the requirements for Gitpod. Navigate to *API Permissions > Add a permission* to make the necessary changes
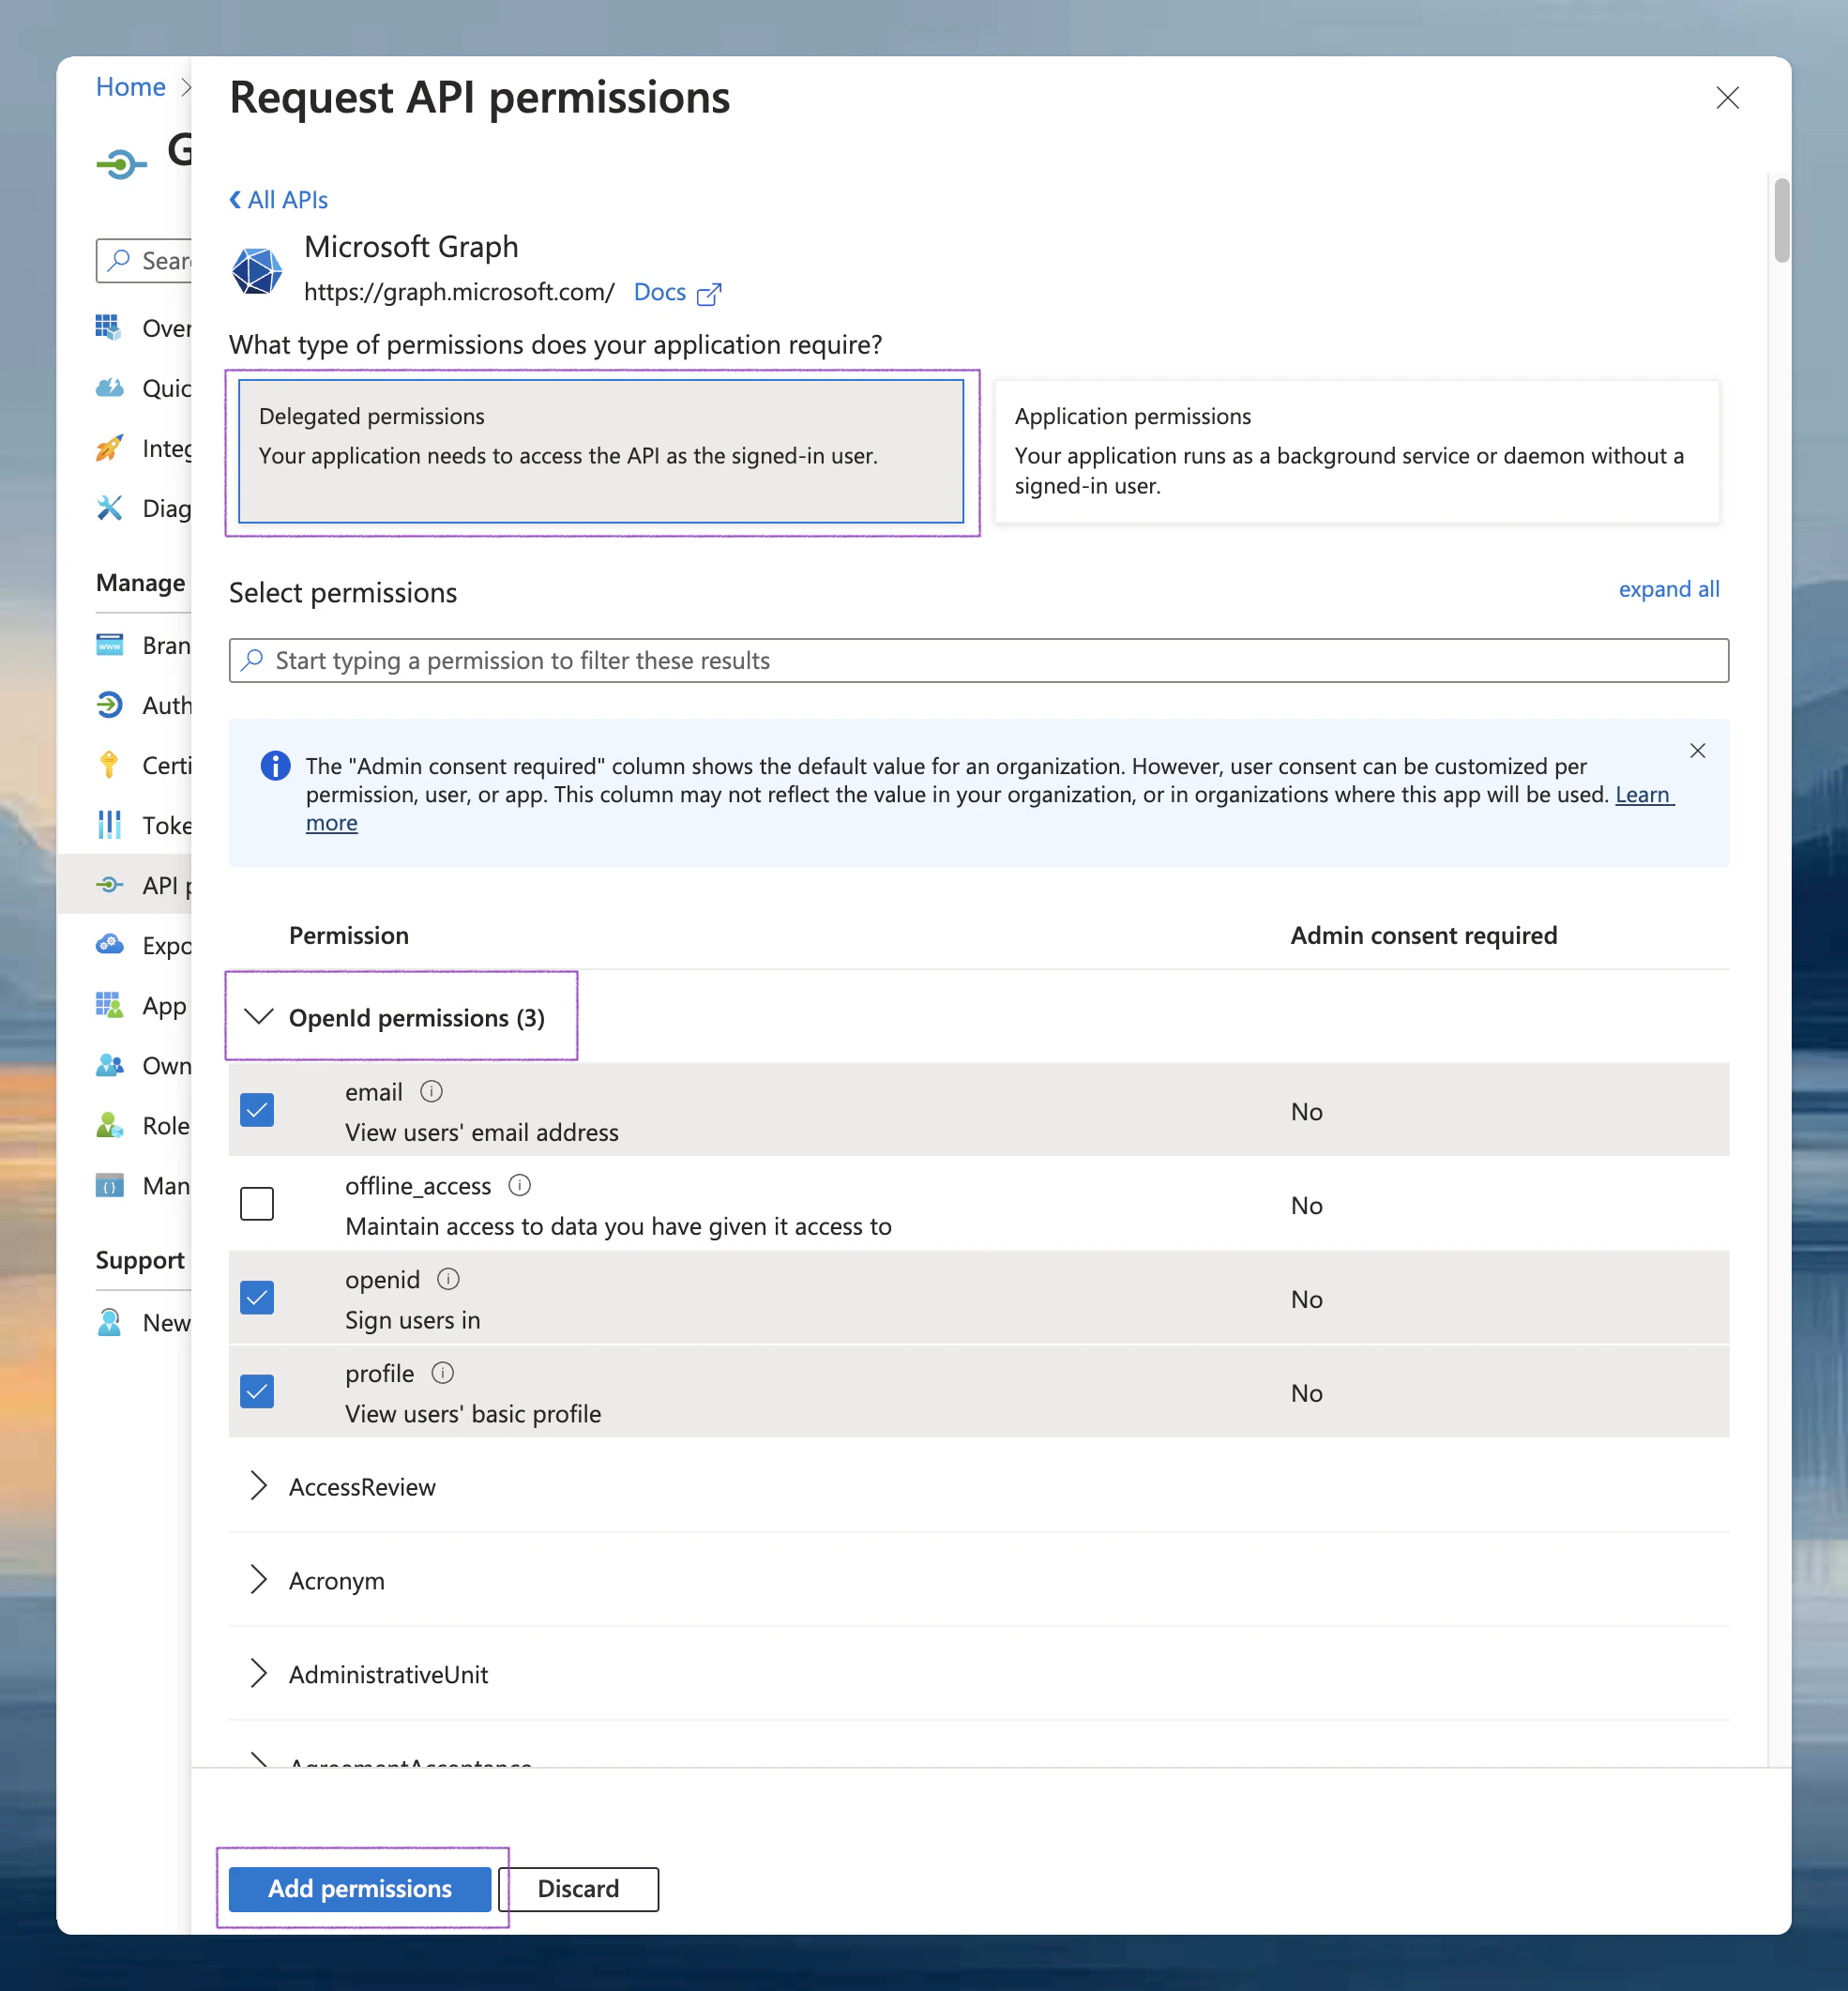
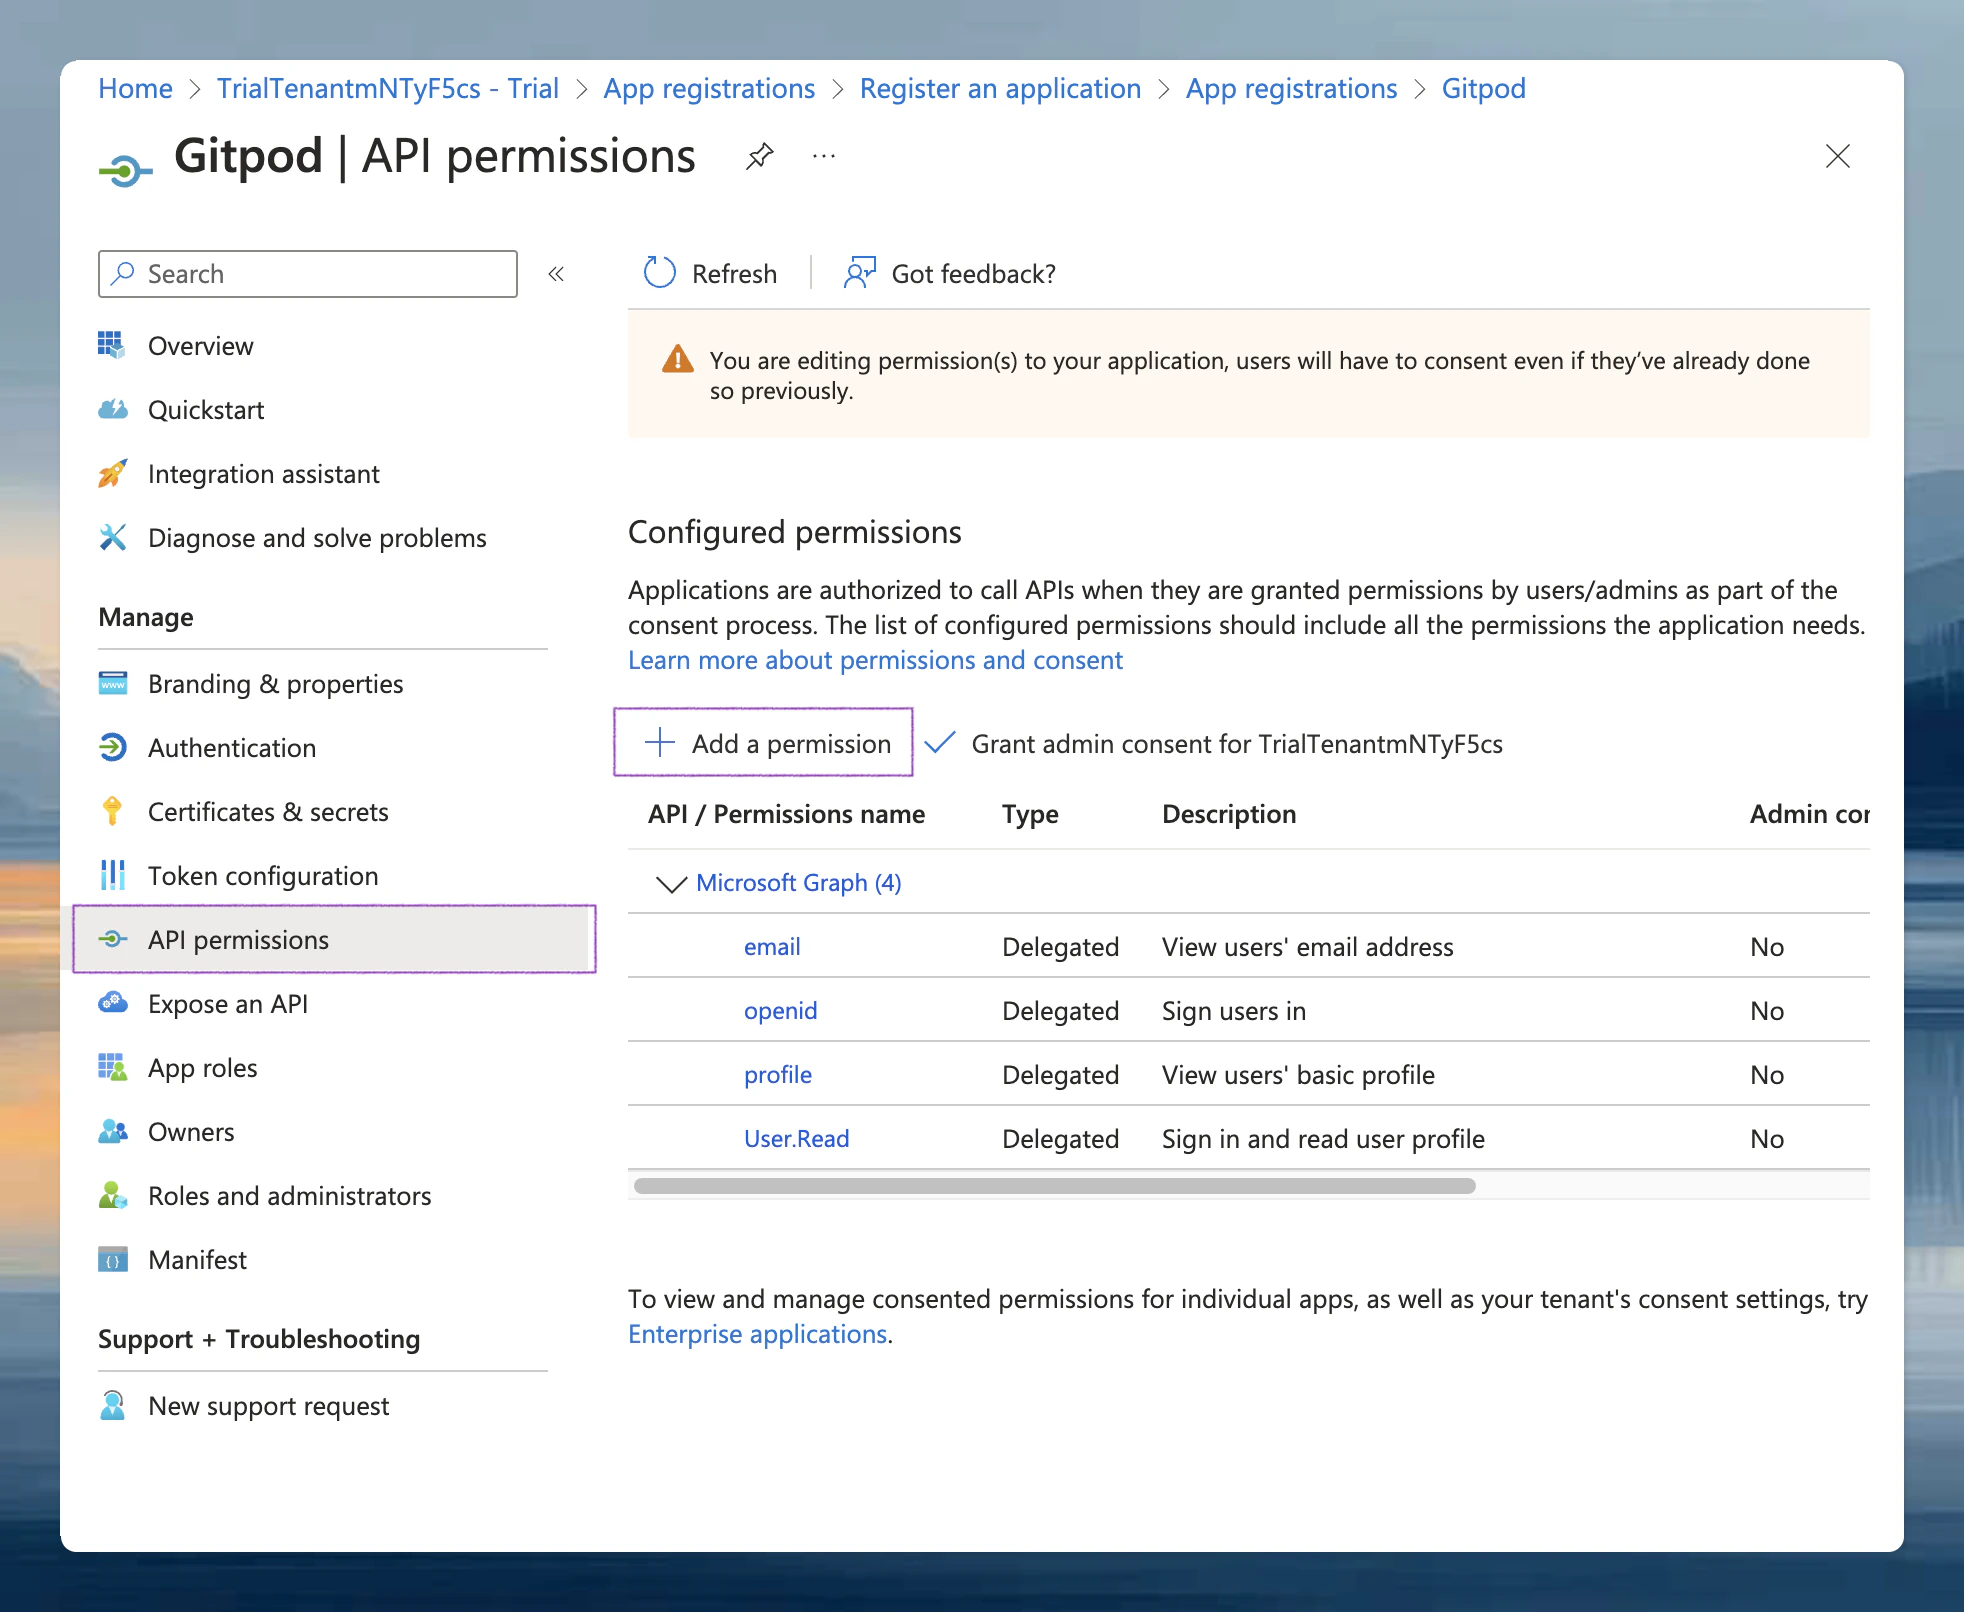 * Select *Delegated permissions* and *OpenId*, then ensure to enable the following scopes:
* `email`
* `openid`
* `profile`
*
* Select *Delegated permissions* and *OpenId*, then ensure to enable the following scopes:
* `email`
* `openid`
* `profile`
*
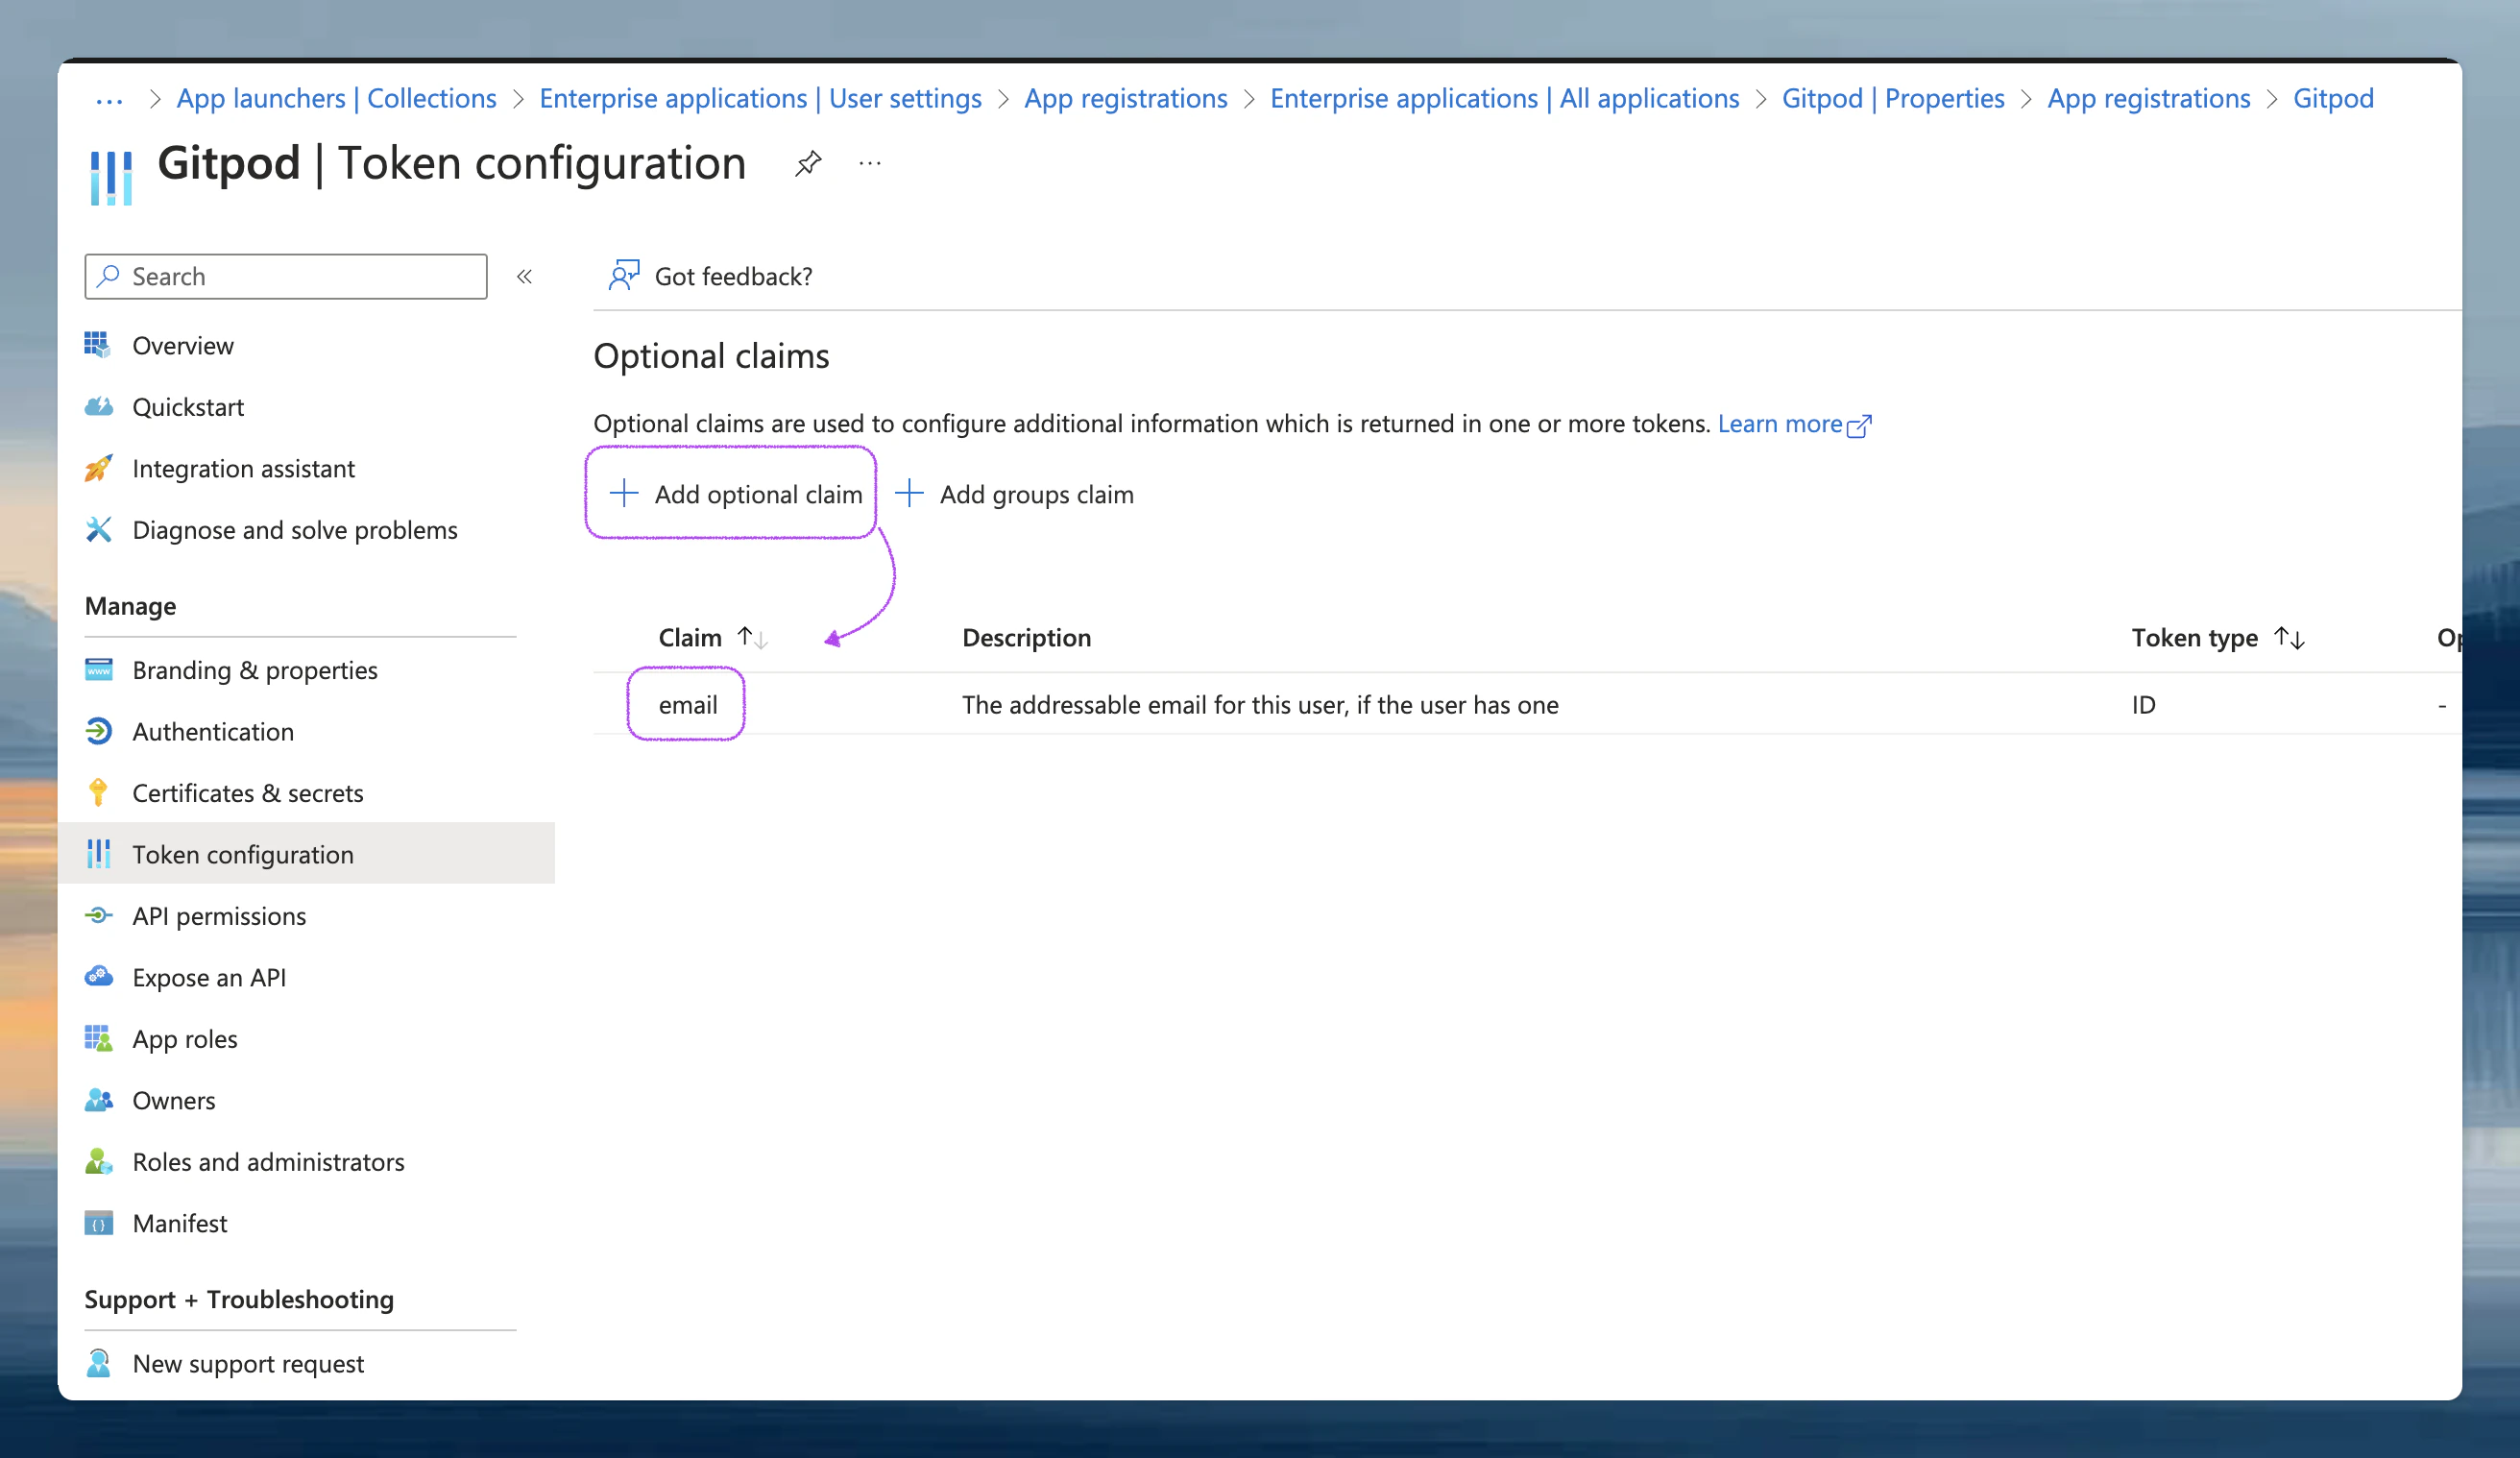
 * Although the `email` claim is part of the standard OIDC specification, depending on the setup, Microsoft Entra ID does not include it by default in ID tokens. Under *Manage*, select *Token configuration* and fix this:
* Click *Add optional claim*
* Add the `email` scope
*
* Although the `email` claim is part of the standard OIDC specification, depending on the setup, Microsoft Entra ID does not include it by default in ID tokens. Under *Manage*, select *Token configuration* and fix this:
* Click *Add optional claim*
* Add the `email` scope
*
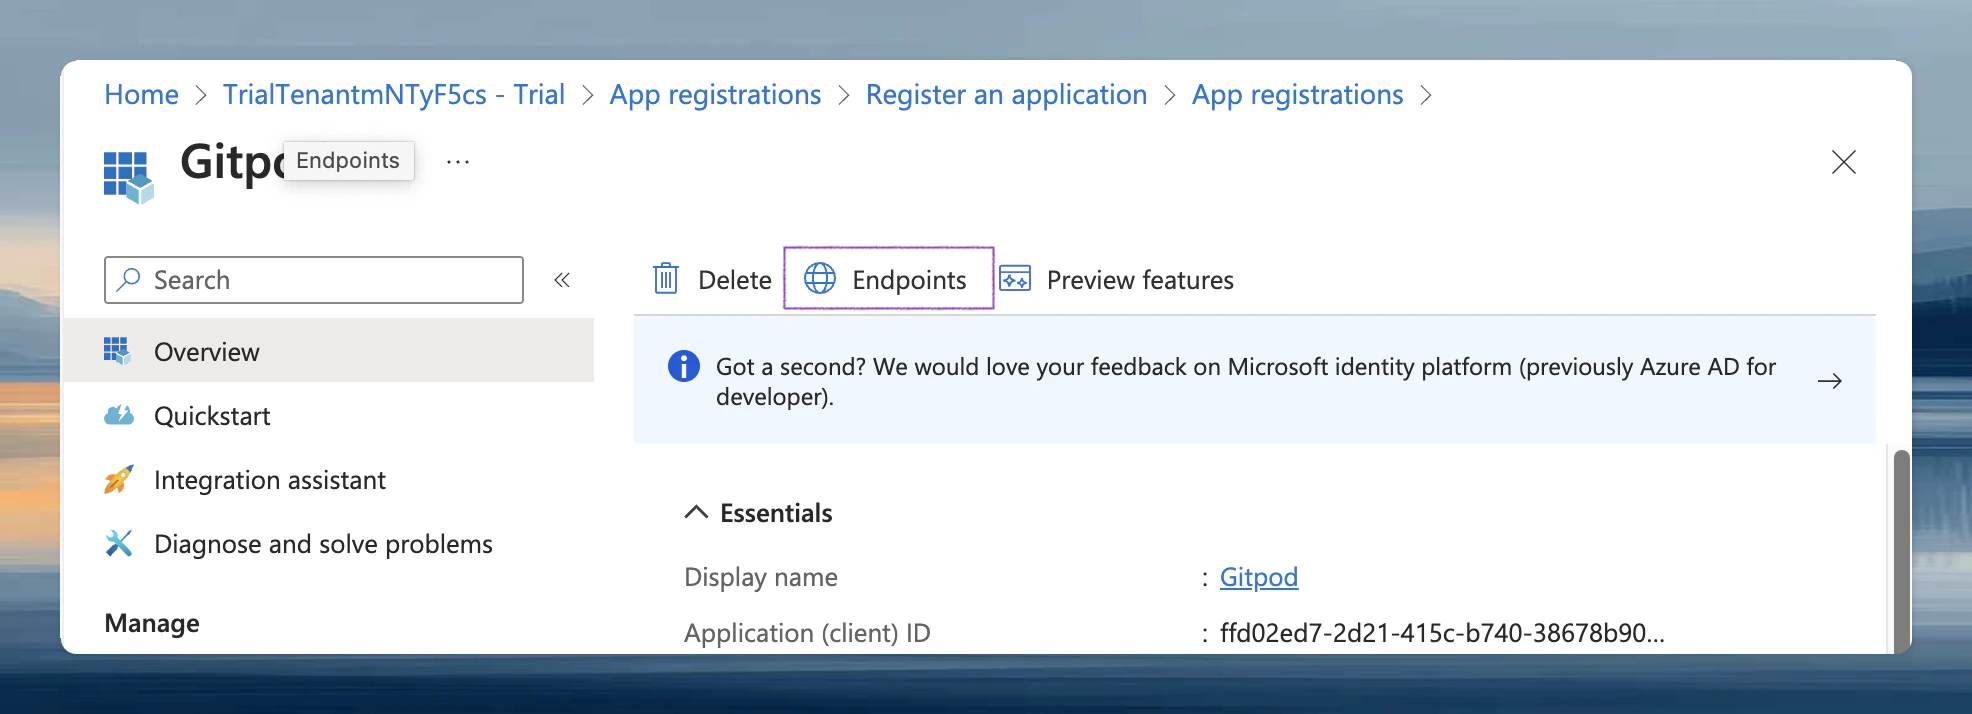
 6. Obtain *Issuer URL* from *Endpoints* tab
* Navigate to the *Overview* page and select *Endpoints*
6. Obtain *Issuer URL* from *Endpoints* tab
* Navigate to the *Overview* page and select *Endpoints*
 * Copy the *Authority URL* to be used as *Issuer URL* in Gitpod's SSO setup
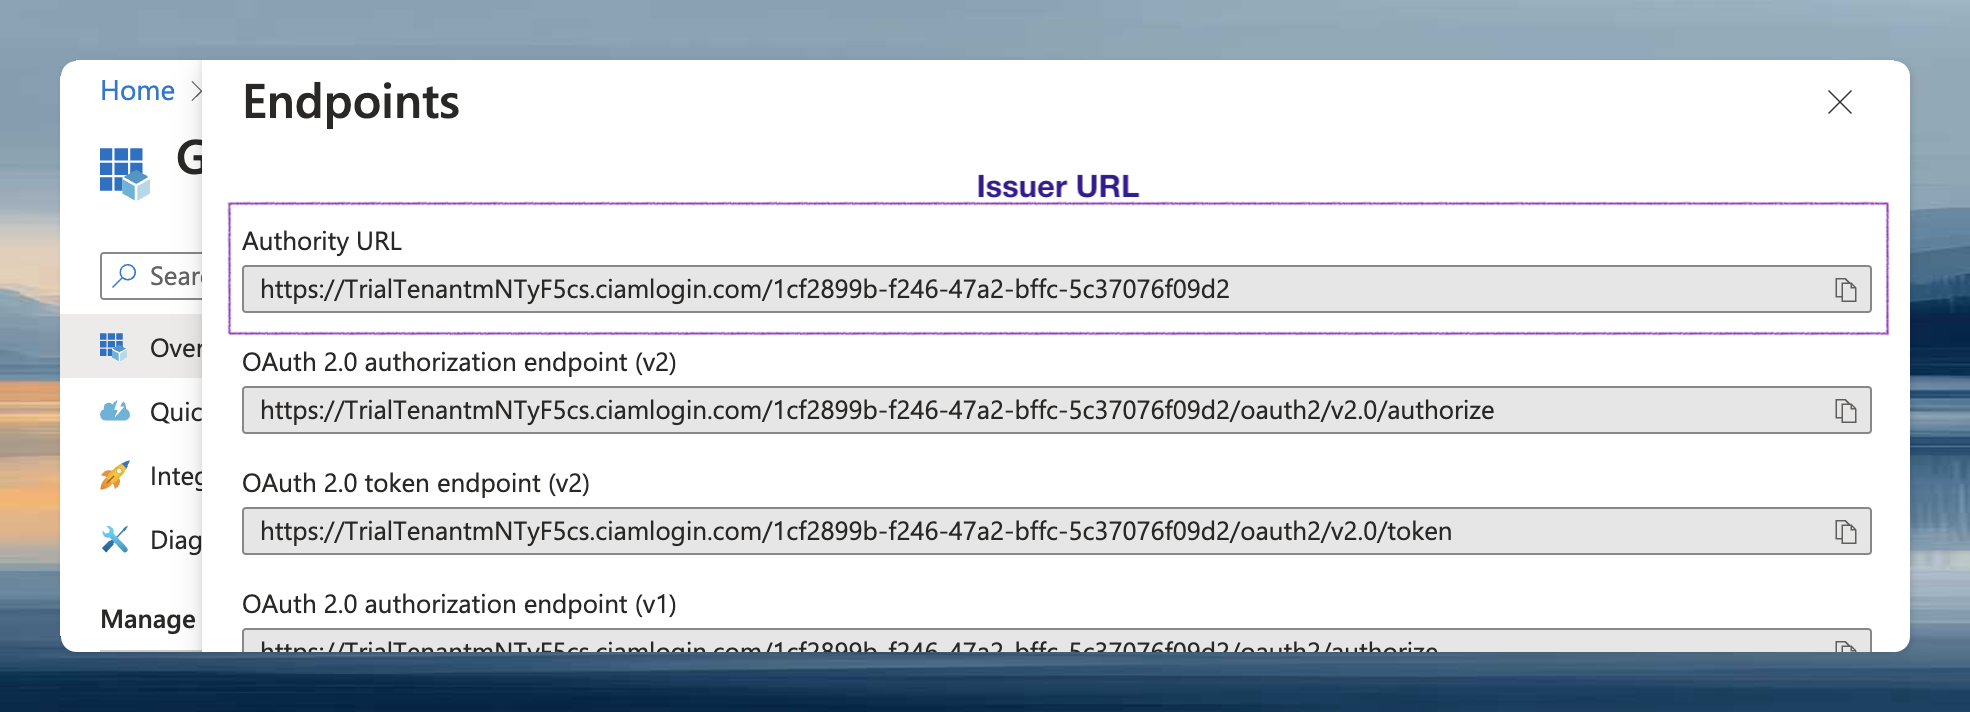 > **Note**: Validate the **Issuer URL** by checking the [OIDC Discovery](https://learn.microsoft.com/en-us/entra/identity-platform/v2-protocols-oidc#find-your-apps-openid-configuration-document-uri) location. In some configurations, the **Issuer URL** needs to be adjusted.
* If the *Authority URL* reads like `https://login.microsoftonline.com/{tenant}/v2.0`, the OIDC Discovery location is `https://login.microsoftonline.com/{tenant}/v2.0/.well-known/openid-configuration`. Open this URL in your browser and check the `issuer` field.
* Check the `issuer` field in the OIDC Discovery output and ensure this matches the *Authority URL* (*Issuer URL*).
If not, e.g. if it reads like `https://sts.windows.net/{tenant}`, please try again with`{authority_url}/v2.0/.well-known/openid-configuration` and use `{authority_url}/v2.0` as **Issuer URL** in Gitpod's SSO setup.
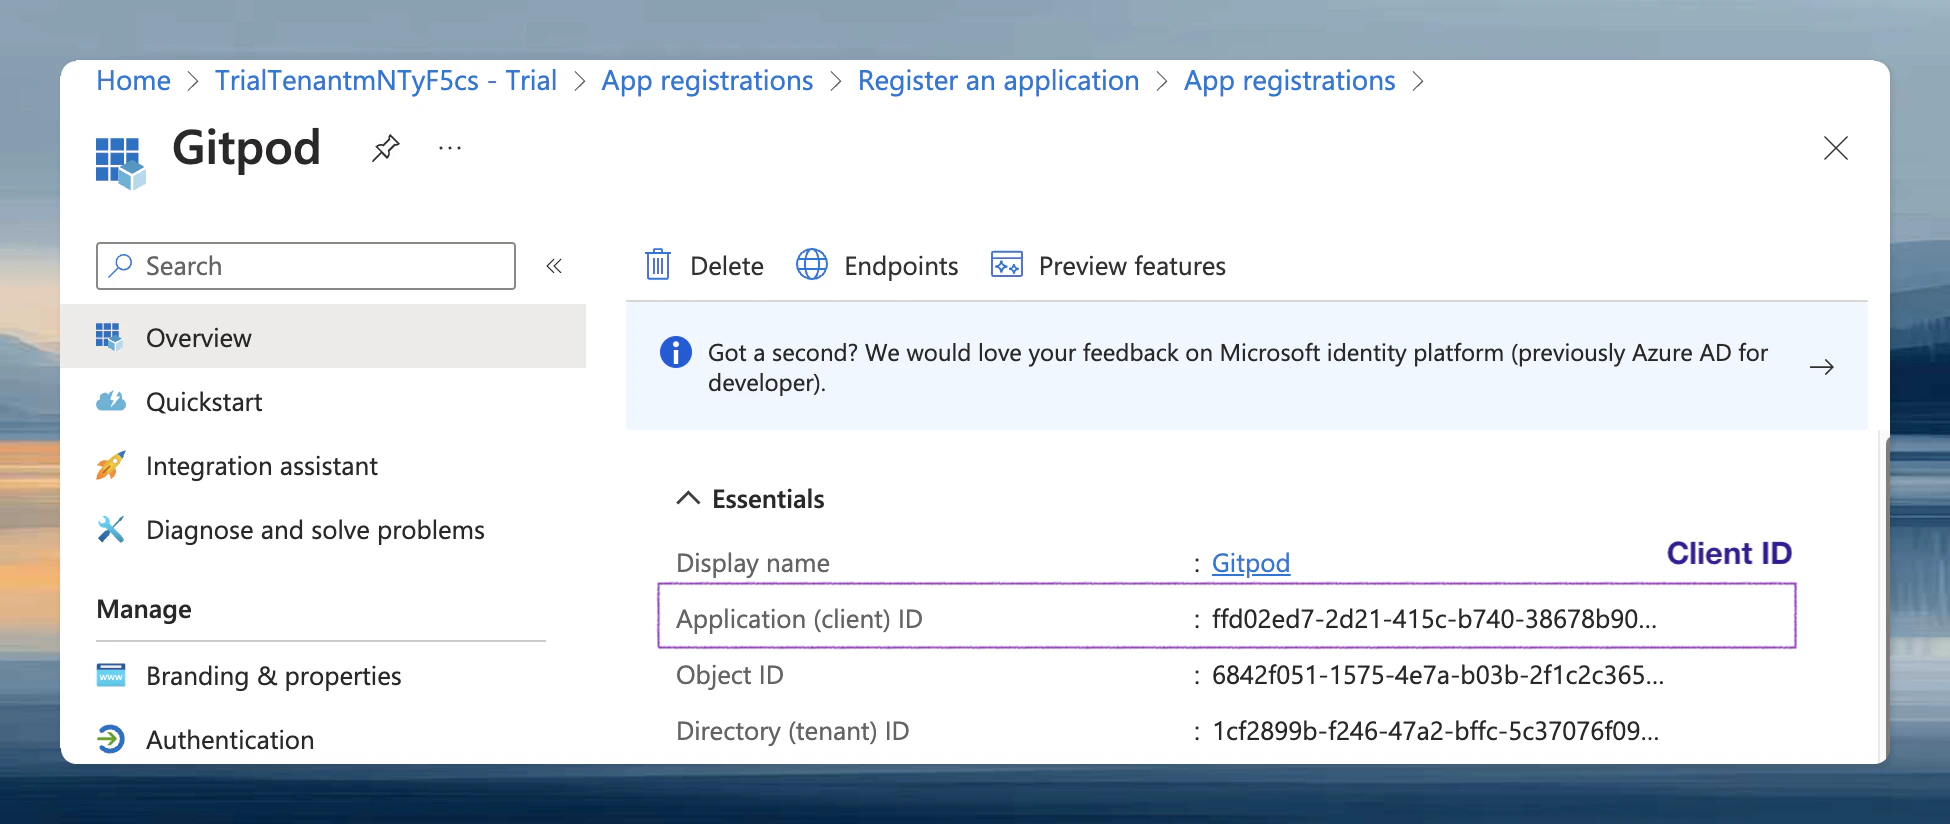
7. Obtain the *Client ID* from the *Overview* page
* Navigate to the *Overview* page and copy the *Application (client) ID* value to be used as *Client ID* in Gitpod's SSO setup
> **Note**: Validate the **Issuer URL** by checking the [OIDC Discovery](https://learn.microsoft.com/en-us/entra/identity-platform/v2-protocols-oidc#find-your-apps-openid-configuration-document-uri) location. In some configurations, the **Issuer URL** needs to be adjusted.
* If the *Authority URL* reads like `https://login.microsoftonline.com/{tenant}/v2.0`, the OIDC Discovery location is `https://login.microsoftonline.com/{tenant}/v2.0/.well-known/openid-configuration`. Open this URL in your browser and check the `issuer` field.
* Check the `issuer` field in the OIDC Discovery output and ensure this matches the *Authority URL* (*Issuer URL*).
If not, e.g. if it reads like `https://sts.windows.net/{tenant}`, please try again with`{authority_url}/v2.0/.well-known/openid-configuration` and use `{authority_url}/v2.0` as **Issuer URL** in Gitpod's SSO setup.
7. Obtain the *Client ID* from the *Overview* page
* Navigate to the *Overview* page and copy the *Application (client) ID* value to be used as *Client ID* in Gitpod's SSO setup
 8. Proceed to verify the SSO configuration on the Gitpod SSO setup page: [Clicking "Verify SSO Configuration"](/classic/admin/setup-gitpod/configure-sso#general-instructions:~:text=on%20this%20screen.-,Clicking%20%E2%80%9CVerify%20SSO%20Configuration%E2%80%9D,-will%20ensure%20that)
***
### AWS Cognito
{' '}
Choose this option if you already use AWS Cognito. AWS Cognito is also a good
option in a testing or Proof of Value (PoV) scenario where you don't have an
IDP you can easily integrate with. In this scenario, most settings should be
left at their defaults.
*Follow the [Cognito User Pool setup process](https://eu-central-1.console.aws.amazon.com/cognito/v2/home), then copy the necessary values into the Gitpod SSO Configuration UI*
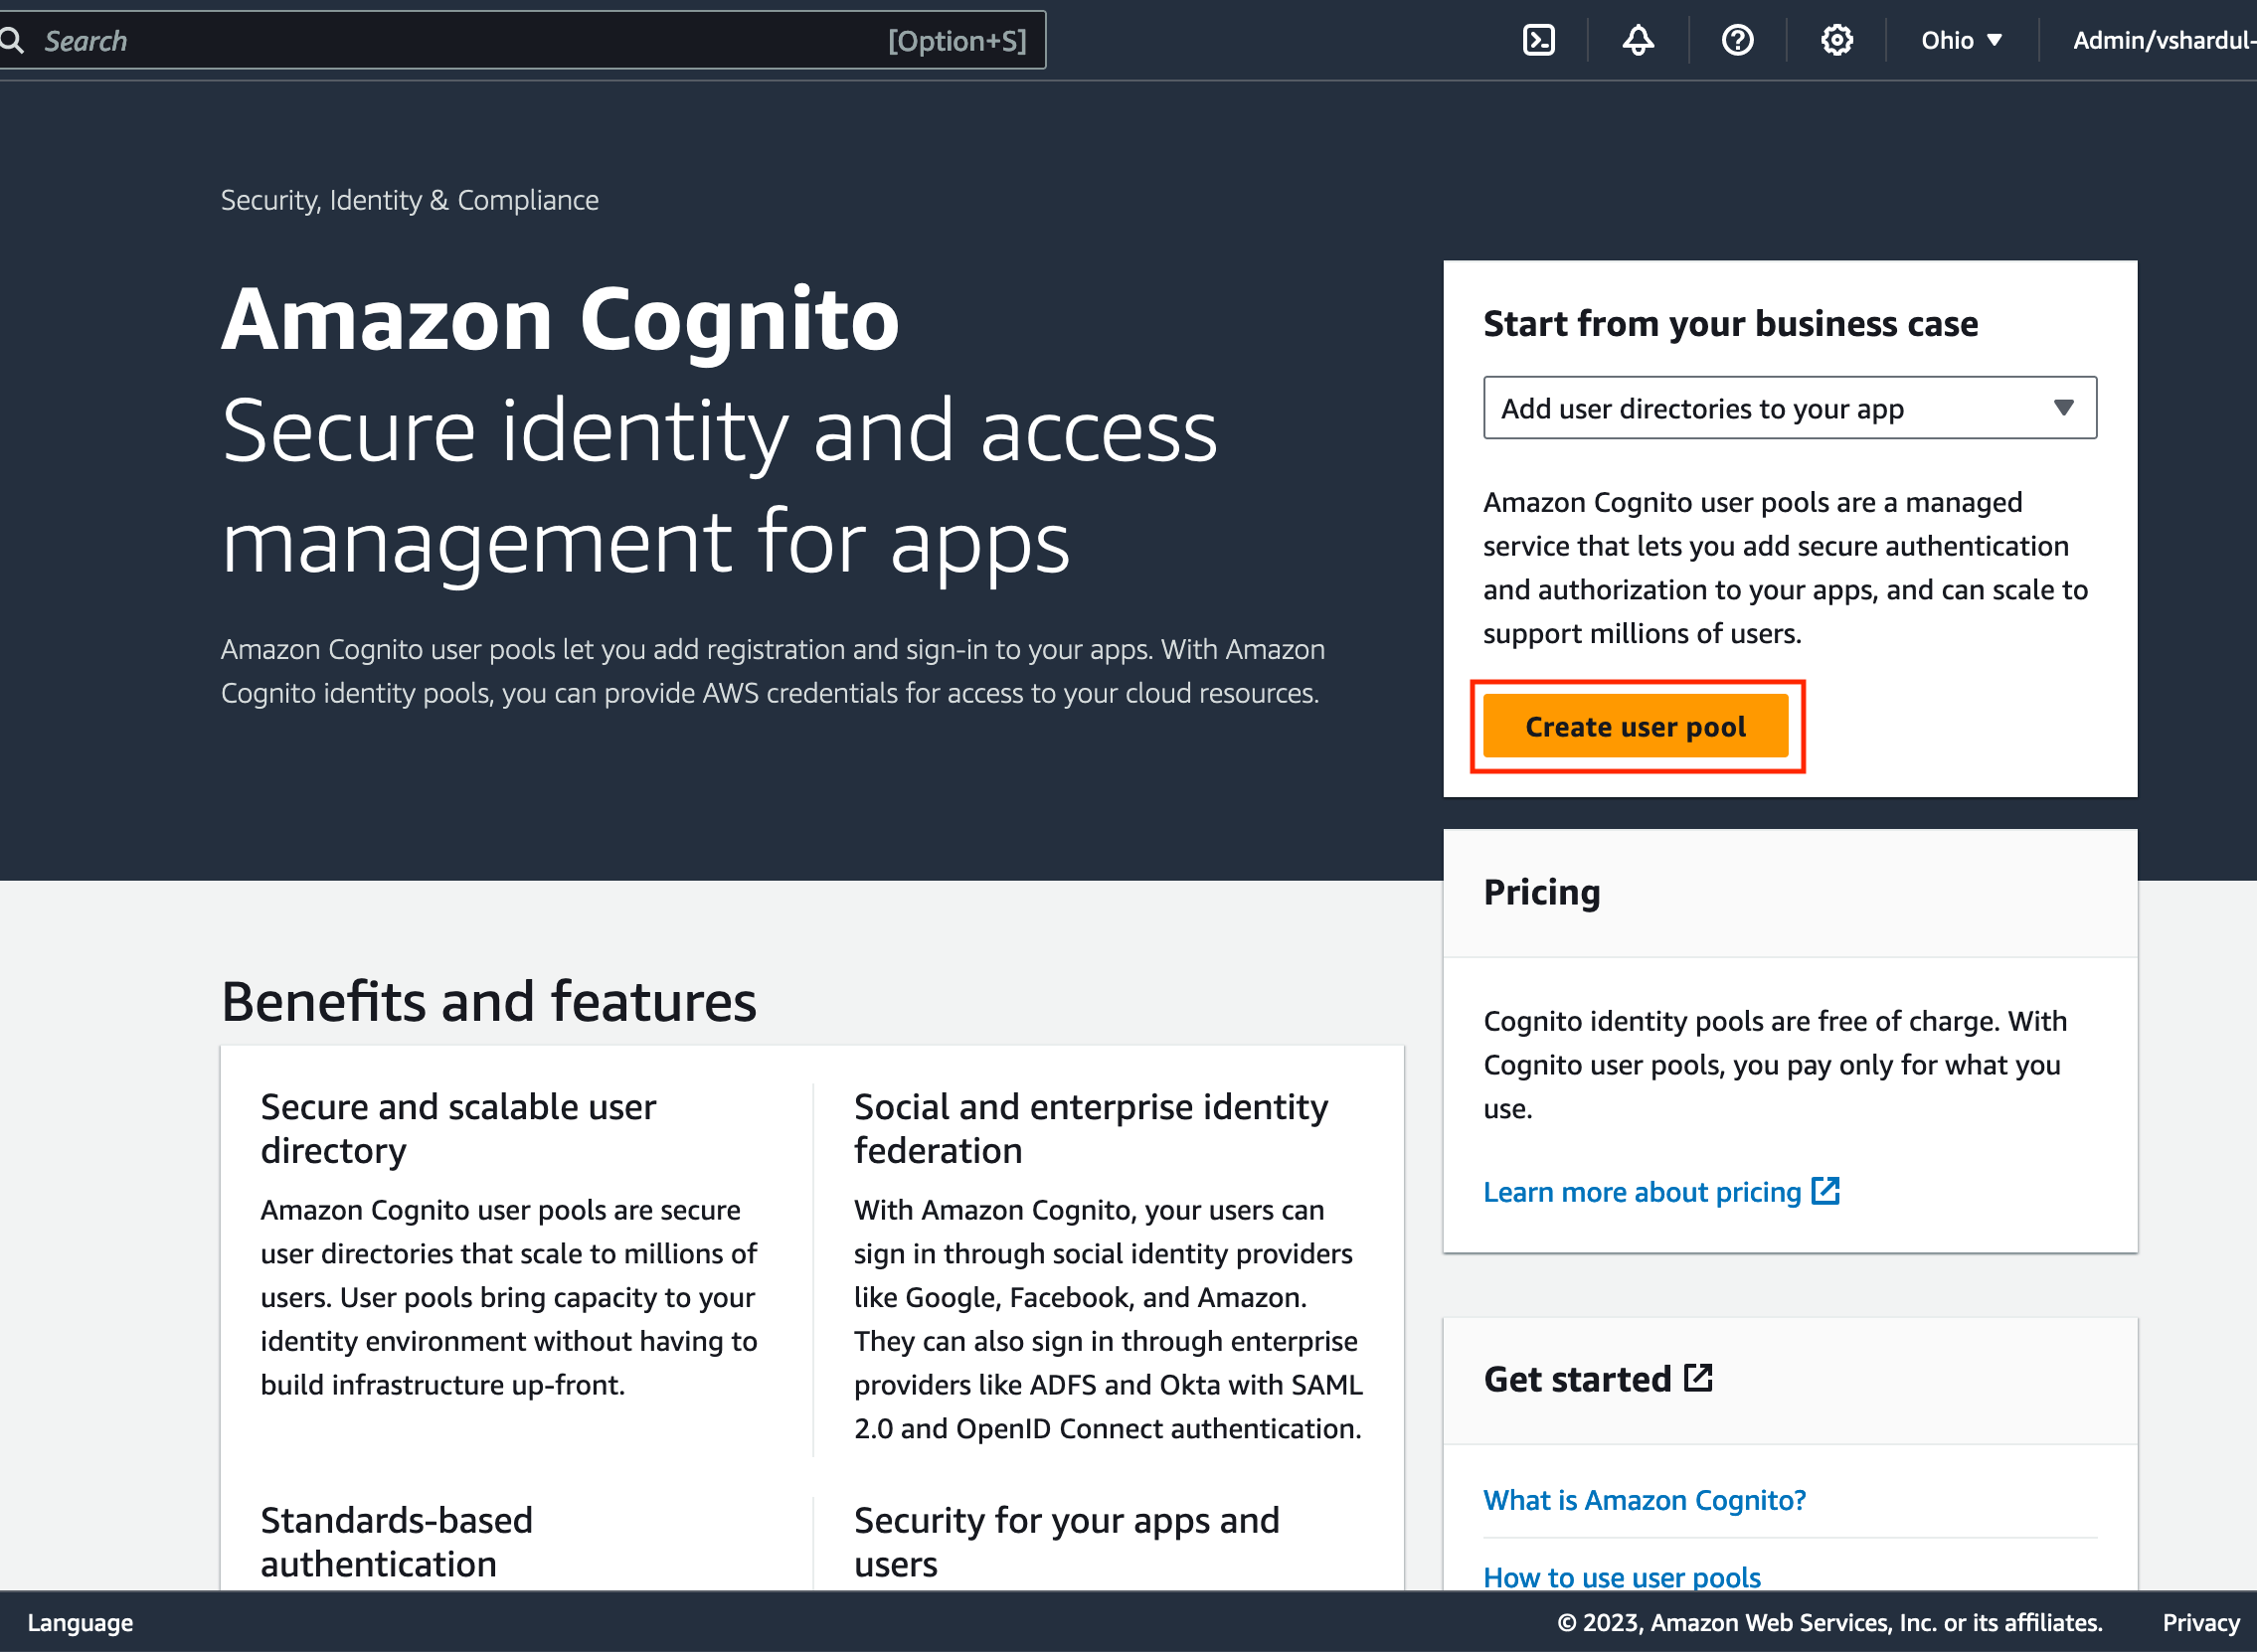
1. Navigate to the Cognito page in the AWS console. Select create user pool:
8. Proceed to verify the SSO configuration on the Gitpod SSO setup page: [Clicking "Verify SSO Configuration"](/classic/admin/setup-gitpod/configure-sso#general-instructions:~:text=on%20this%20screen.-,Clicking%20%E2%80%9CVerify%20SSO%20Configuration%E2%80%9D,-will%20ensure%20that)
***
### AWS Cognito
{' '}
Choose this option if you already use AWS Cognito. AWS Cognito is also a good
option in a testing or Proof of Value (PoV) scenario where you don't have an
IDP you can easily integrate with. In this scenario, most settings should be
left at their defaults.
*Follow the [Cognito User Pool setup process](https://eu-central-1.console.aws.amazon.com/cognito/v2/home), then copy the necessary values into the Gitpod SSO Configuration UI*
1. Navigate to the Cognito page in the AWS console. Select create user pool:
 2. Configure sign-in experience:
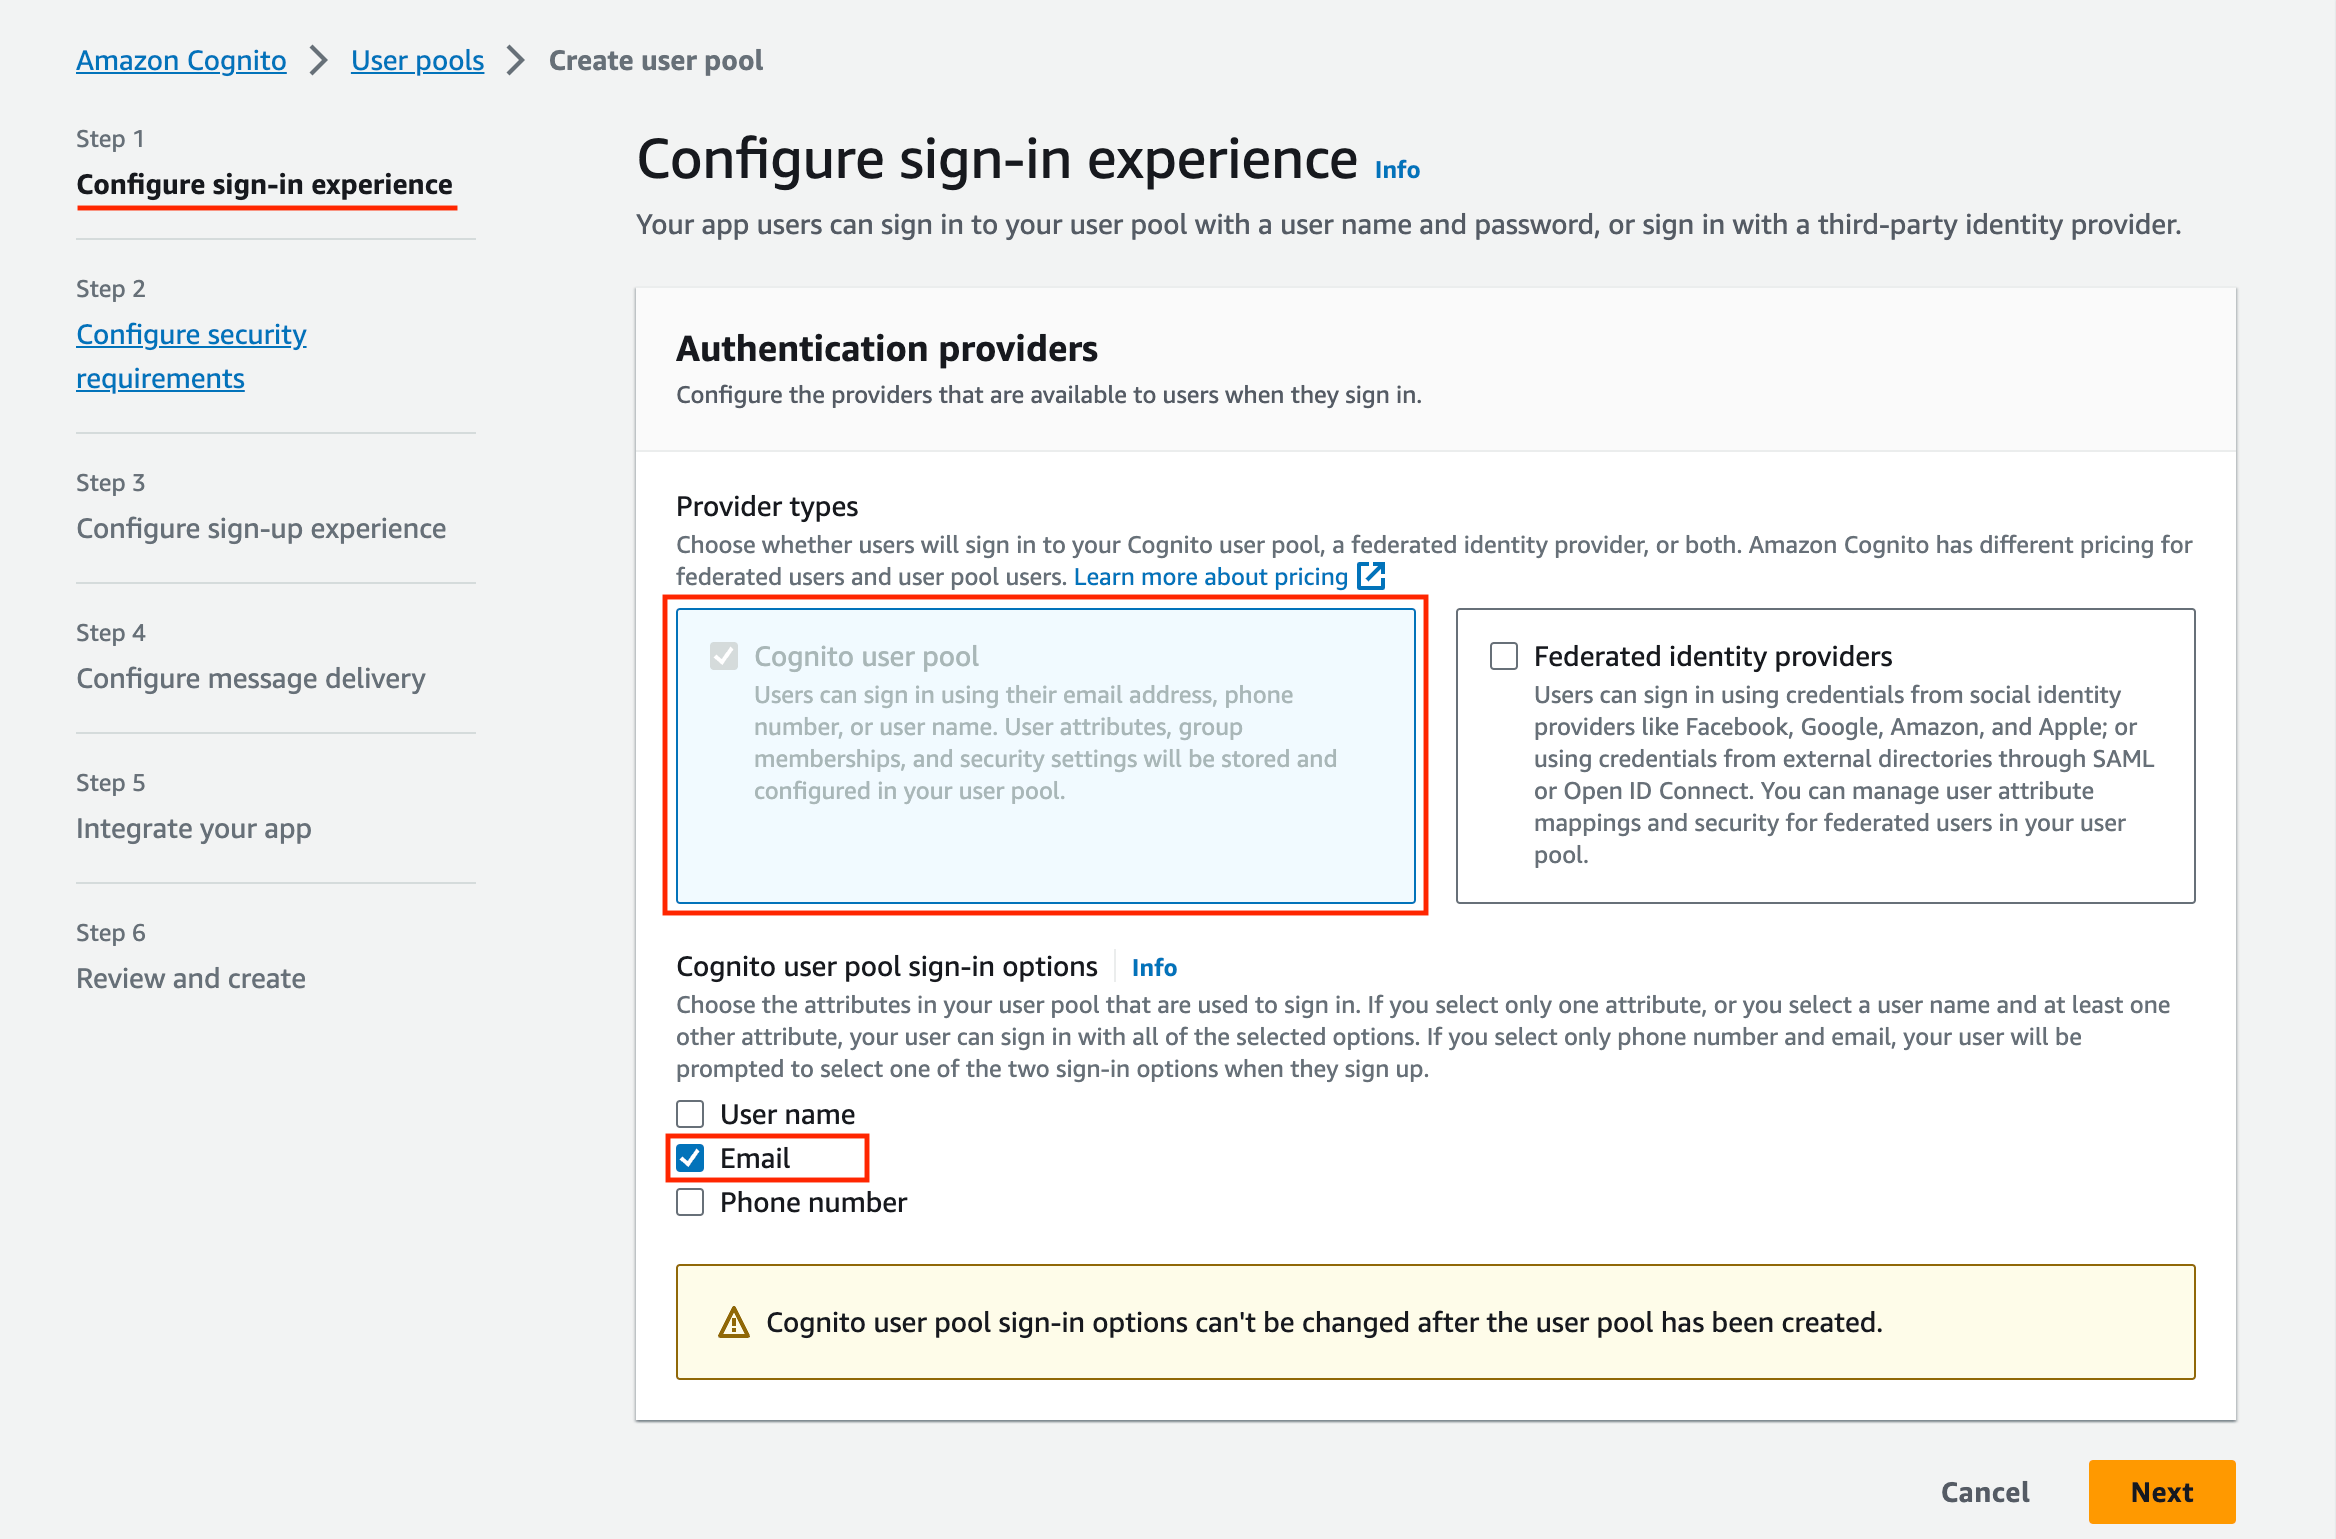 * Select `Cognito user pool` as provider type
* Select email as the Cognito user pool signin option
3. Configure Security requirements:
* Select `Cognito user pool` as provider type
* Select email as the Cognito user pool signin option
3. Configure Security requirements:
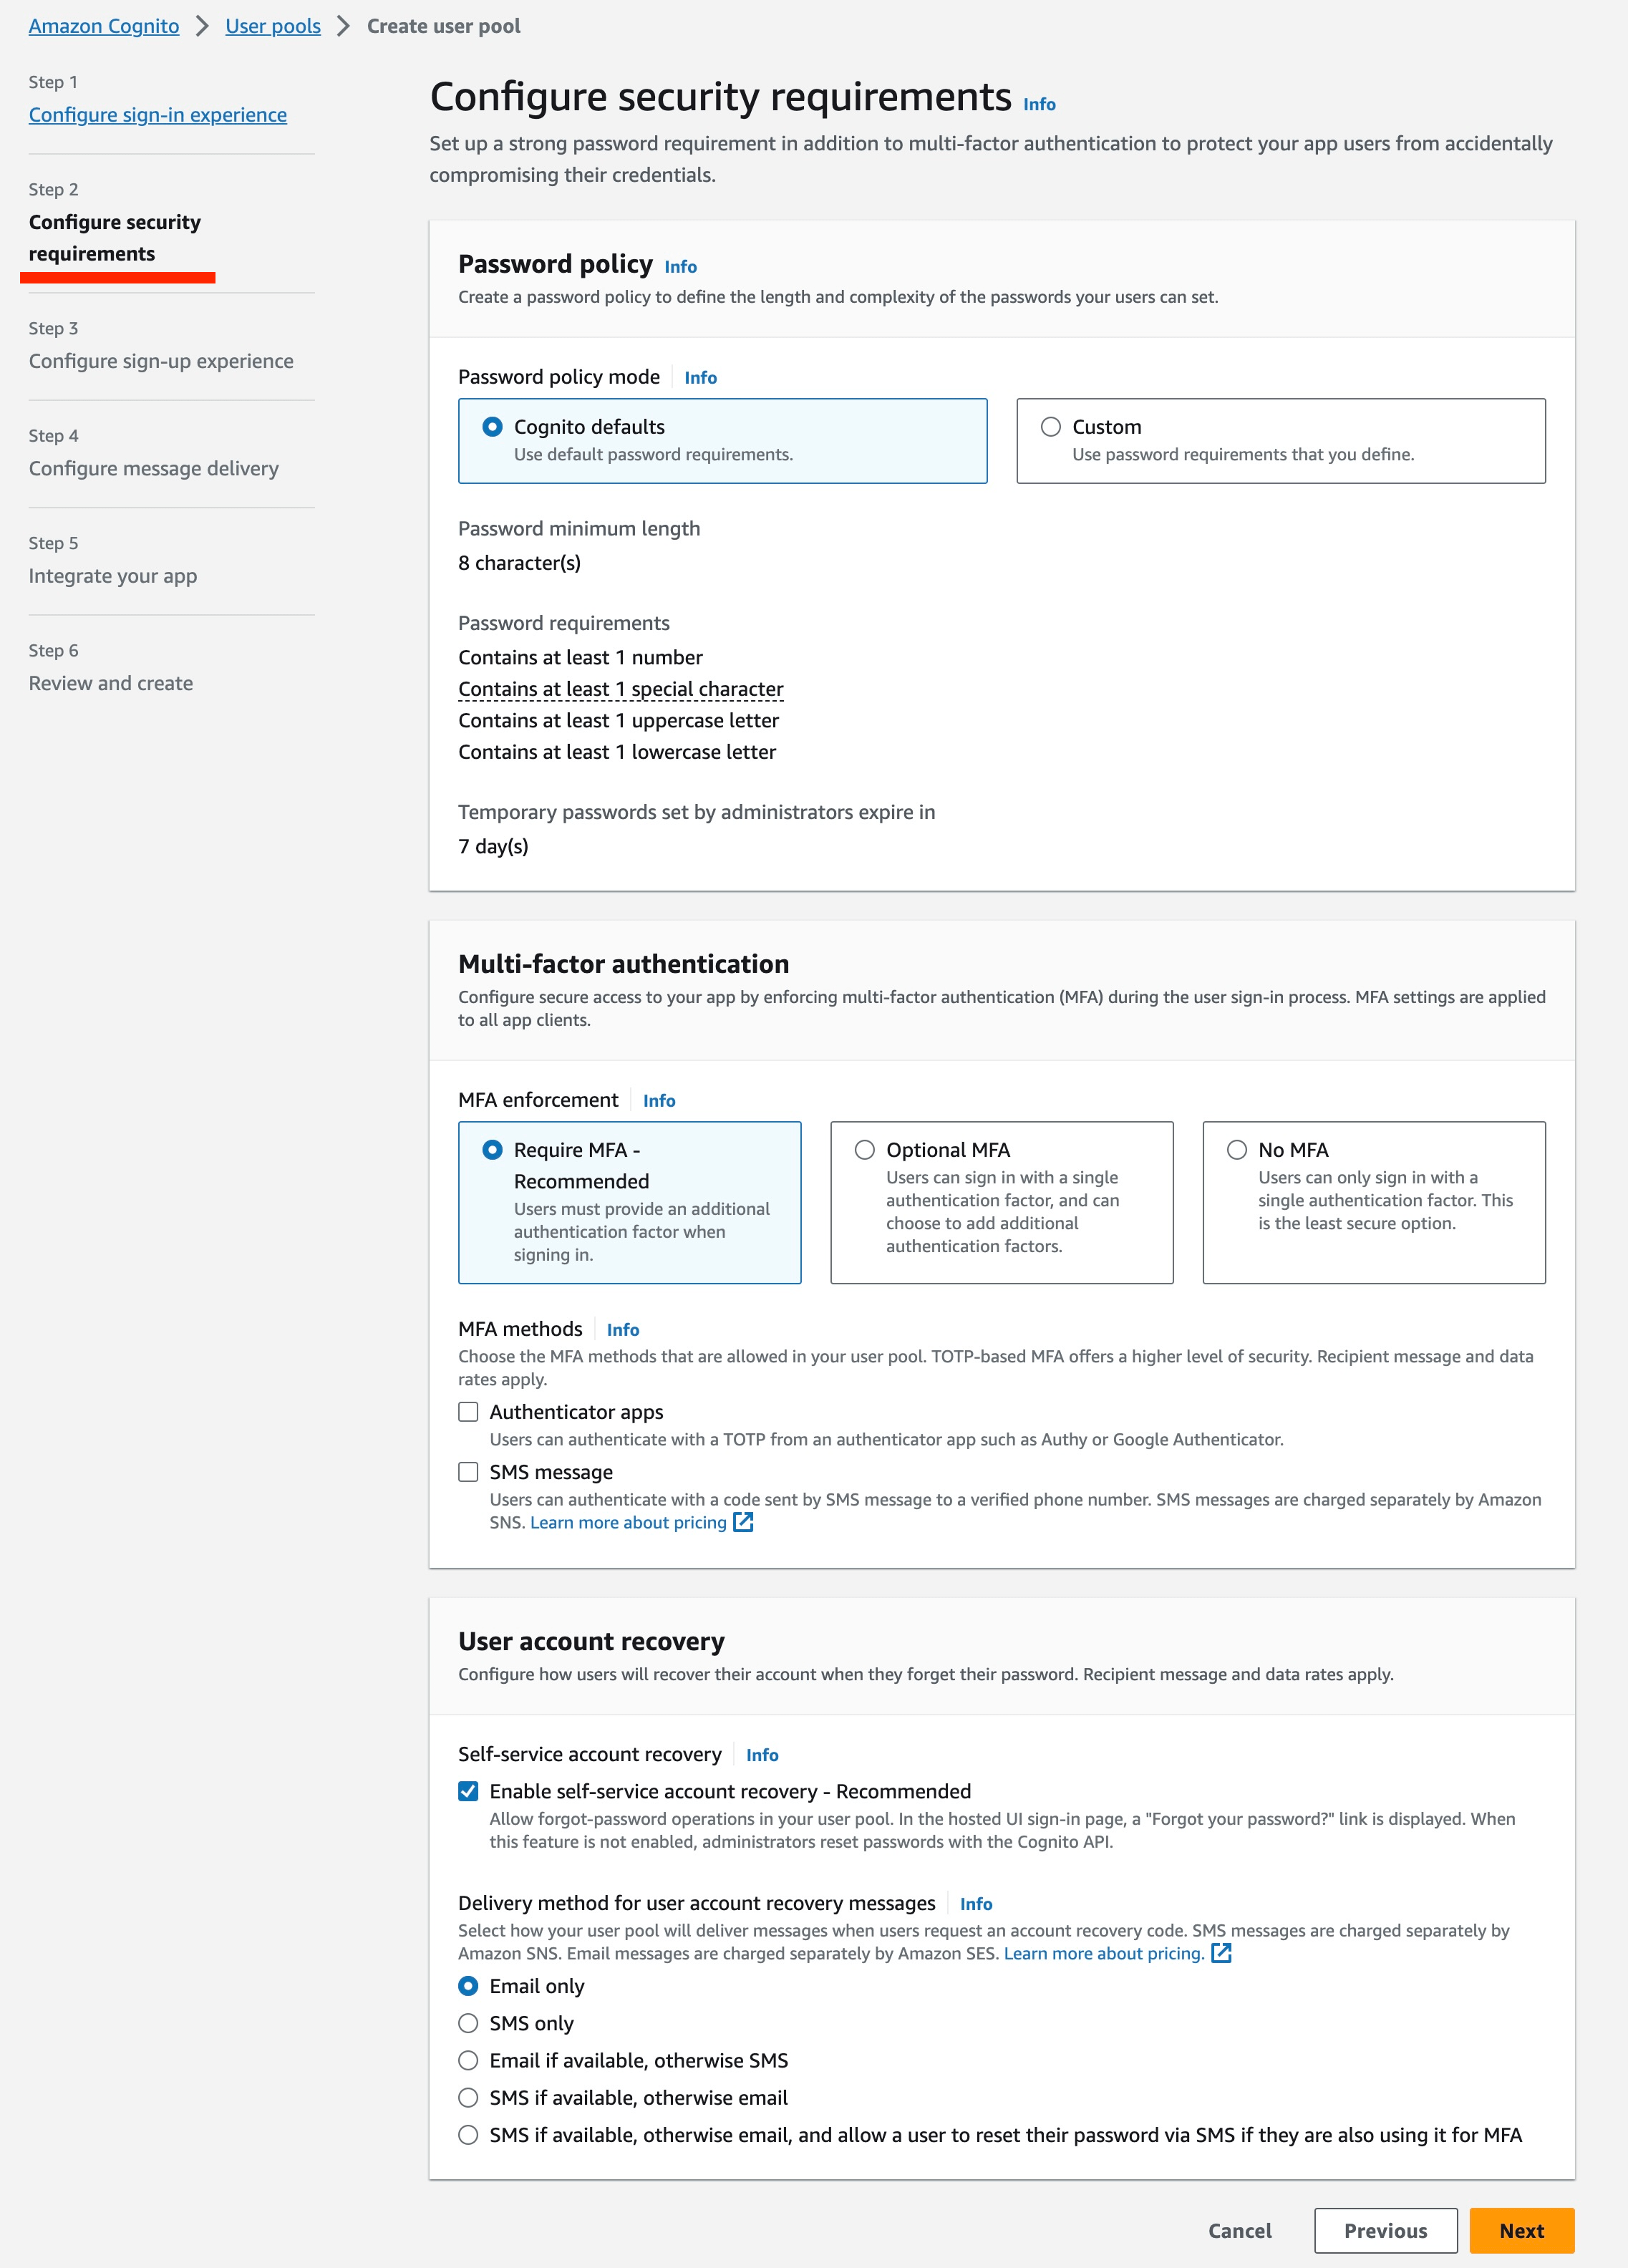 * For development purposes, consider modifying the MFA enforcment policy to not require MFA. For all production use cases, configure the MFA and user account recovery sections according to organizational guidelines
4. Configure sign-up experience:
* For development purposes, consider modifying the MFA enforcment policy to not require MFA. For all production use cases, configure the MFA and user account recovery sections according to organizational guidelines
4. Configure sign-up experience:
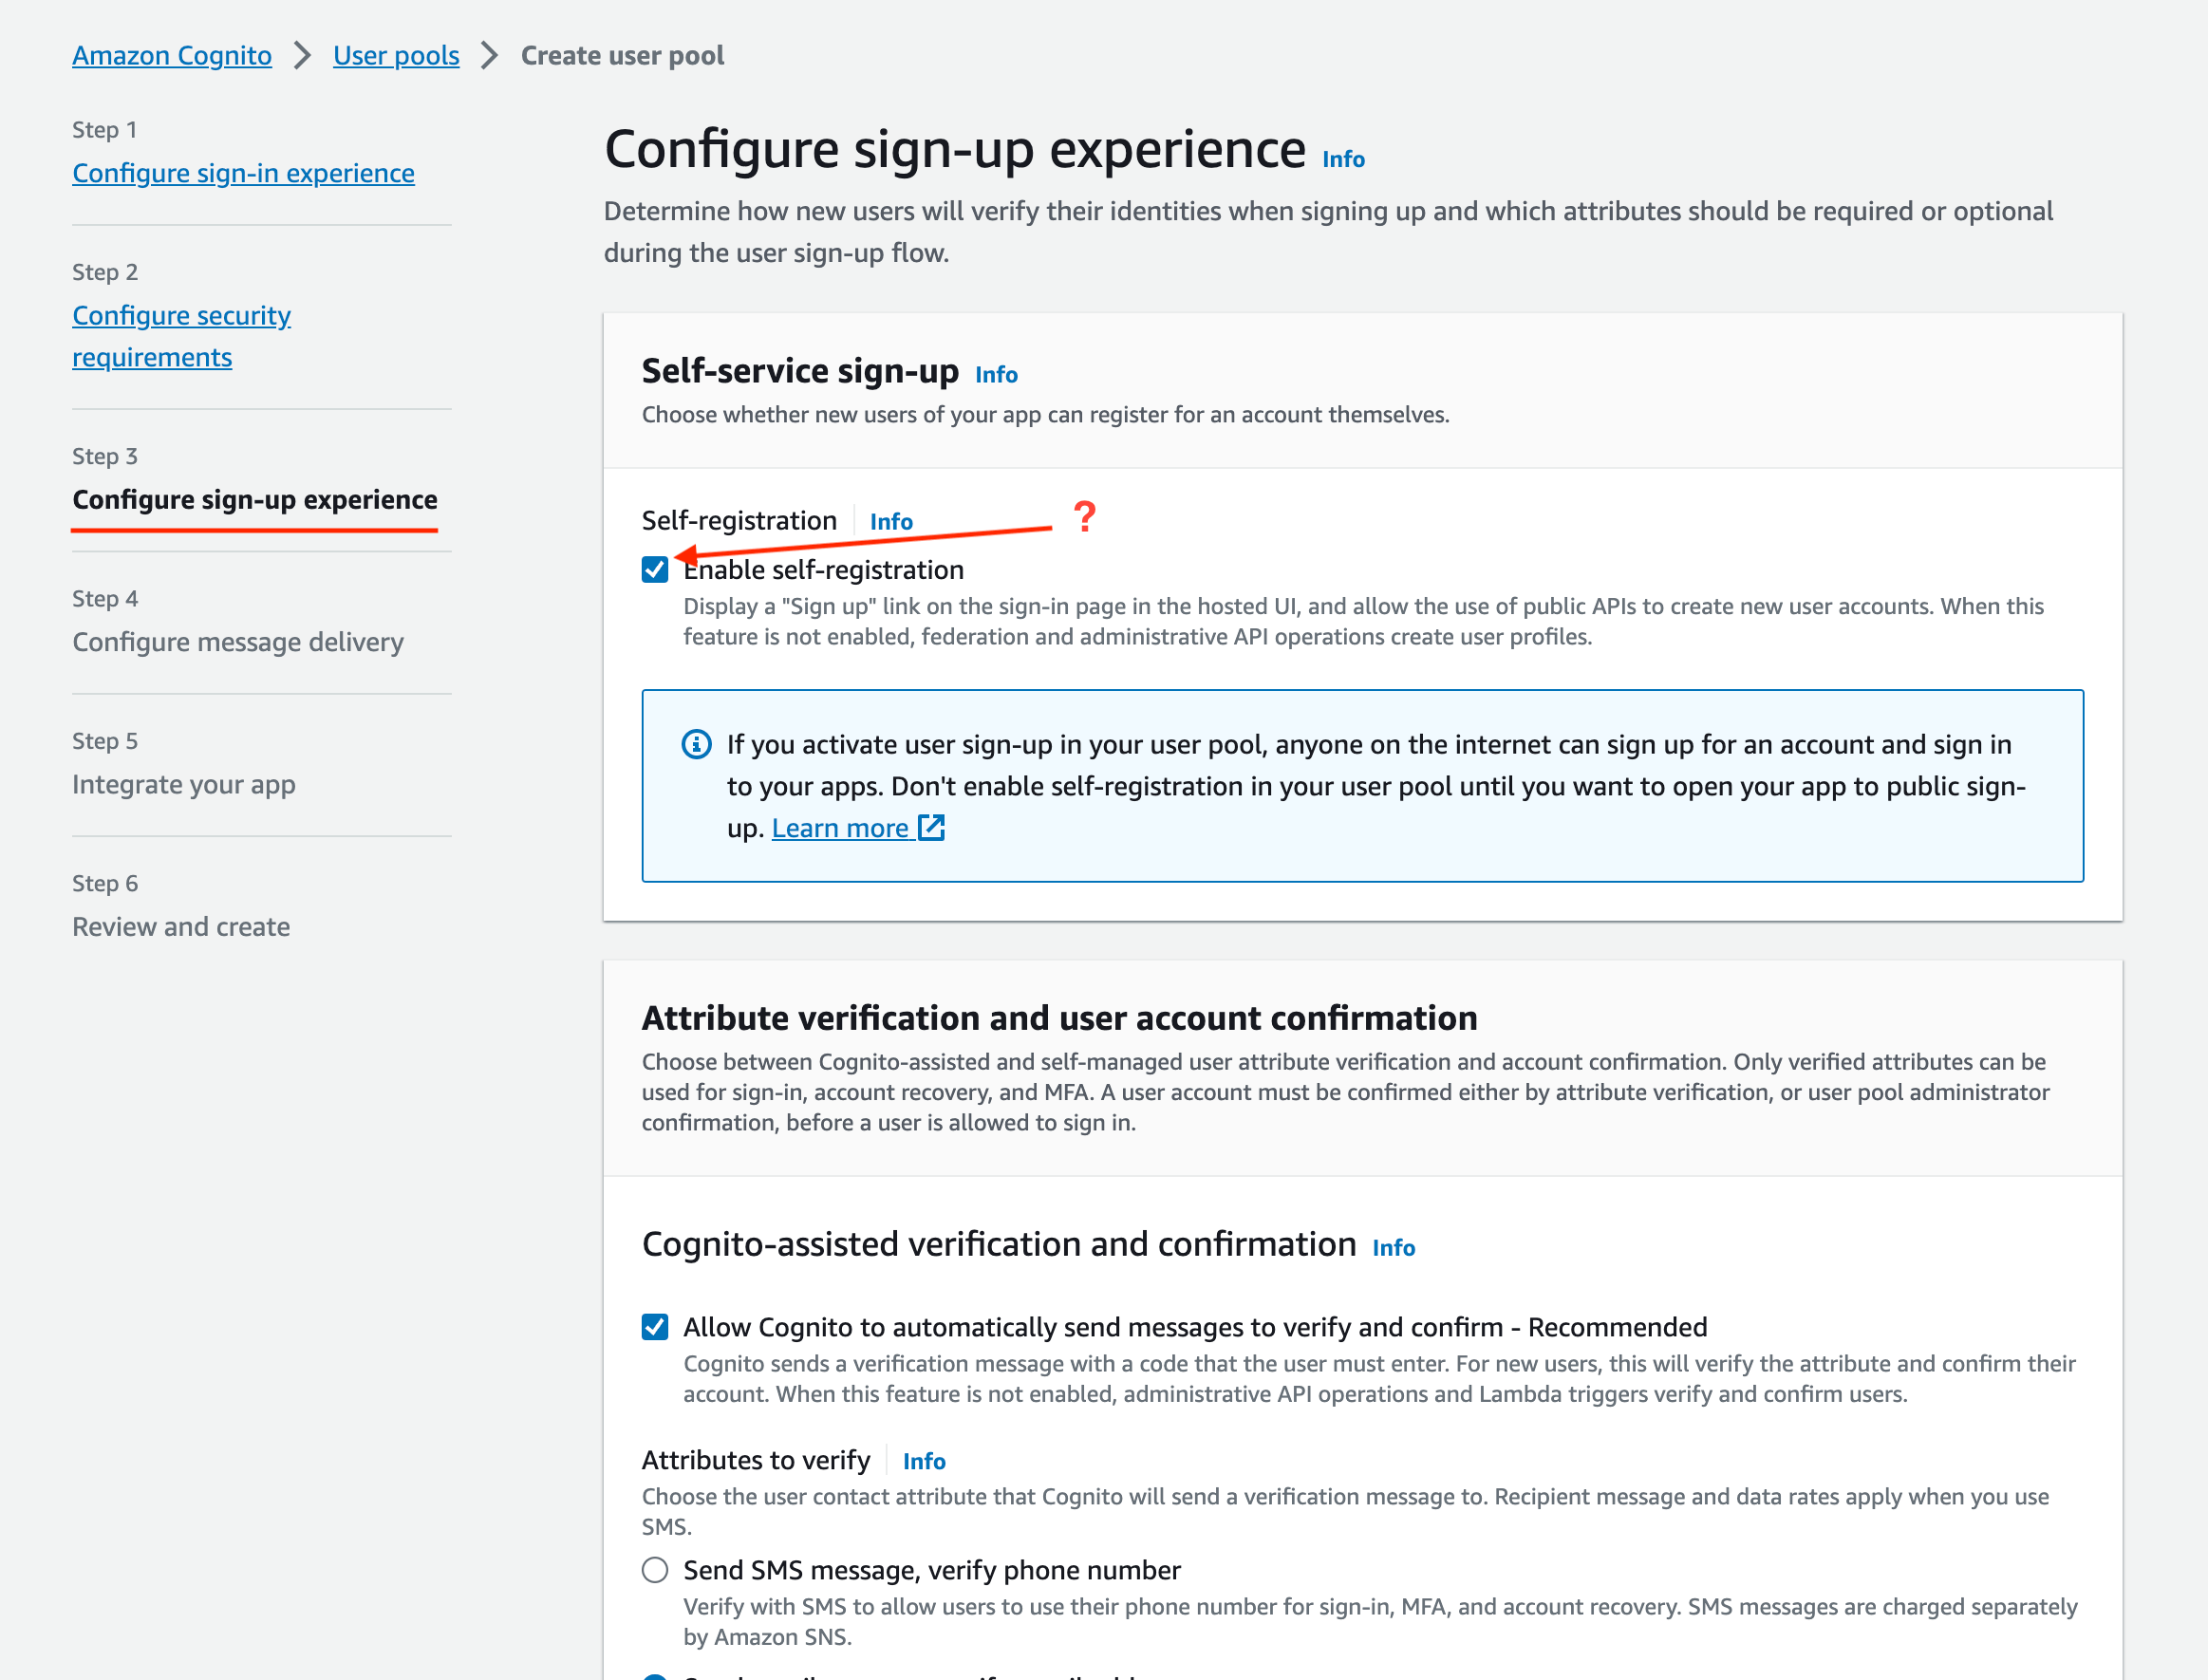 * Disable Self Registration if you want to limit access. For example, if your instance is accessible on the public internet, you may not want anyone to be able to self-register.
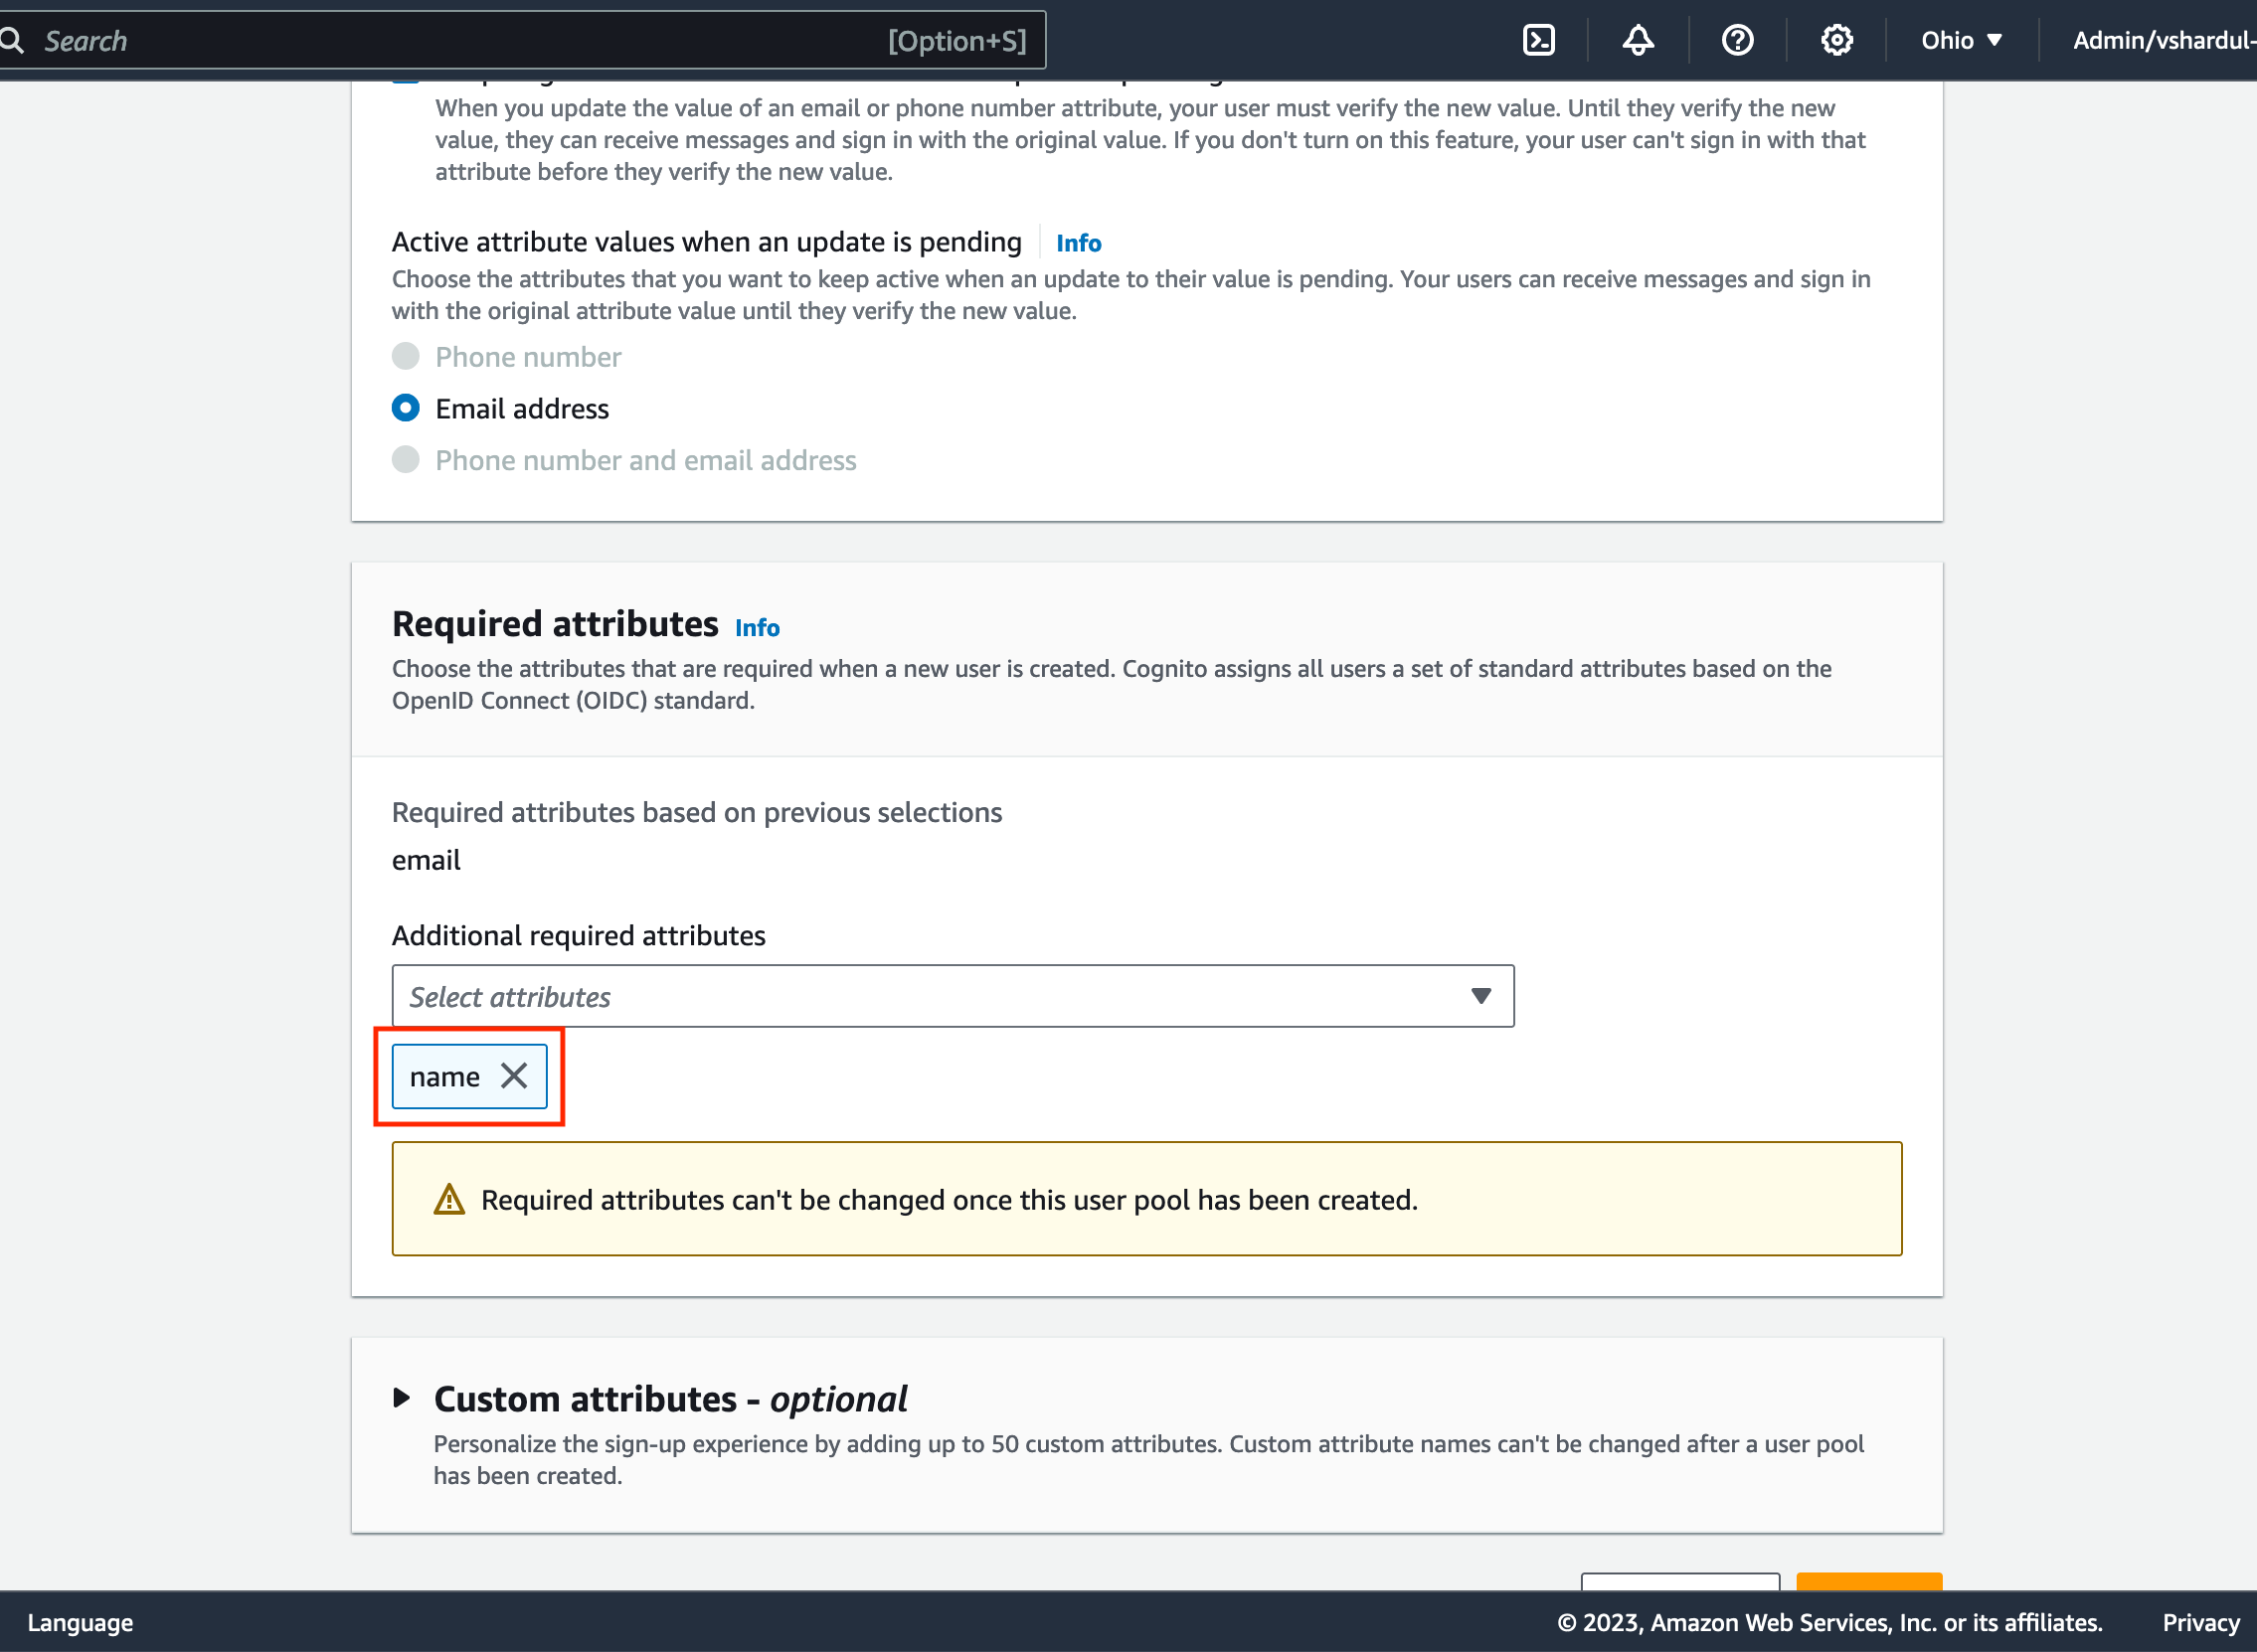
In the `Required Attributes` section, ensure that name is selected:
* Disable Self Registration if you want to limit access. For example, if your instance is accessible on the public internet, you may not want anyone to be able to self-register.
In the `Required Attributes` section, ensure that name is selected:
 5. Configure Message Delivery:
 * For dev Setups, use Cognito as the email provider; for production setups, use company SES setup
6. Integrate your app:
* For dev Setups, use Cognito as the email provider; for production setups, use company SES setup
6. Integrate your app:
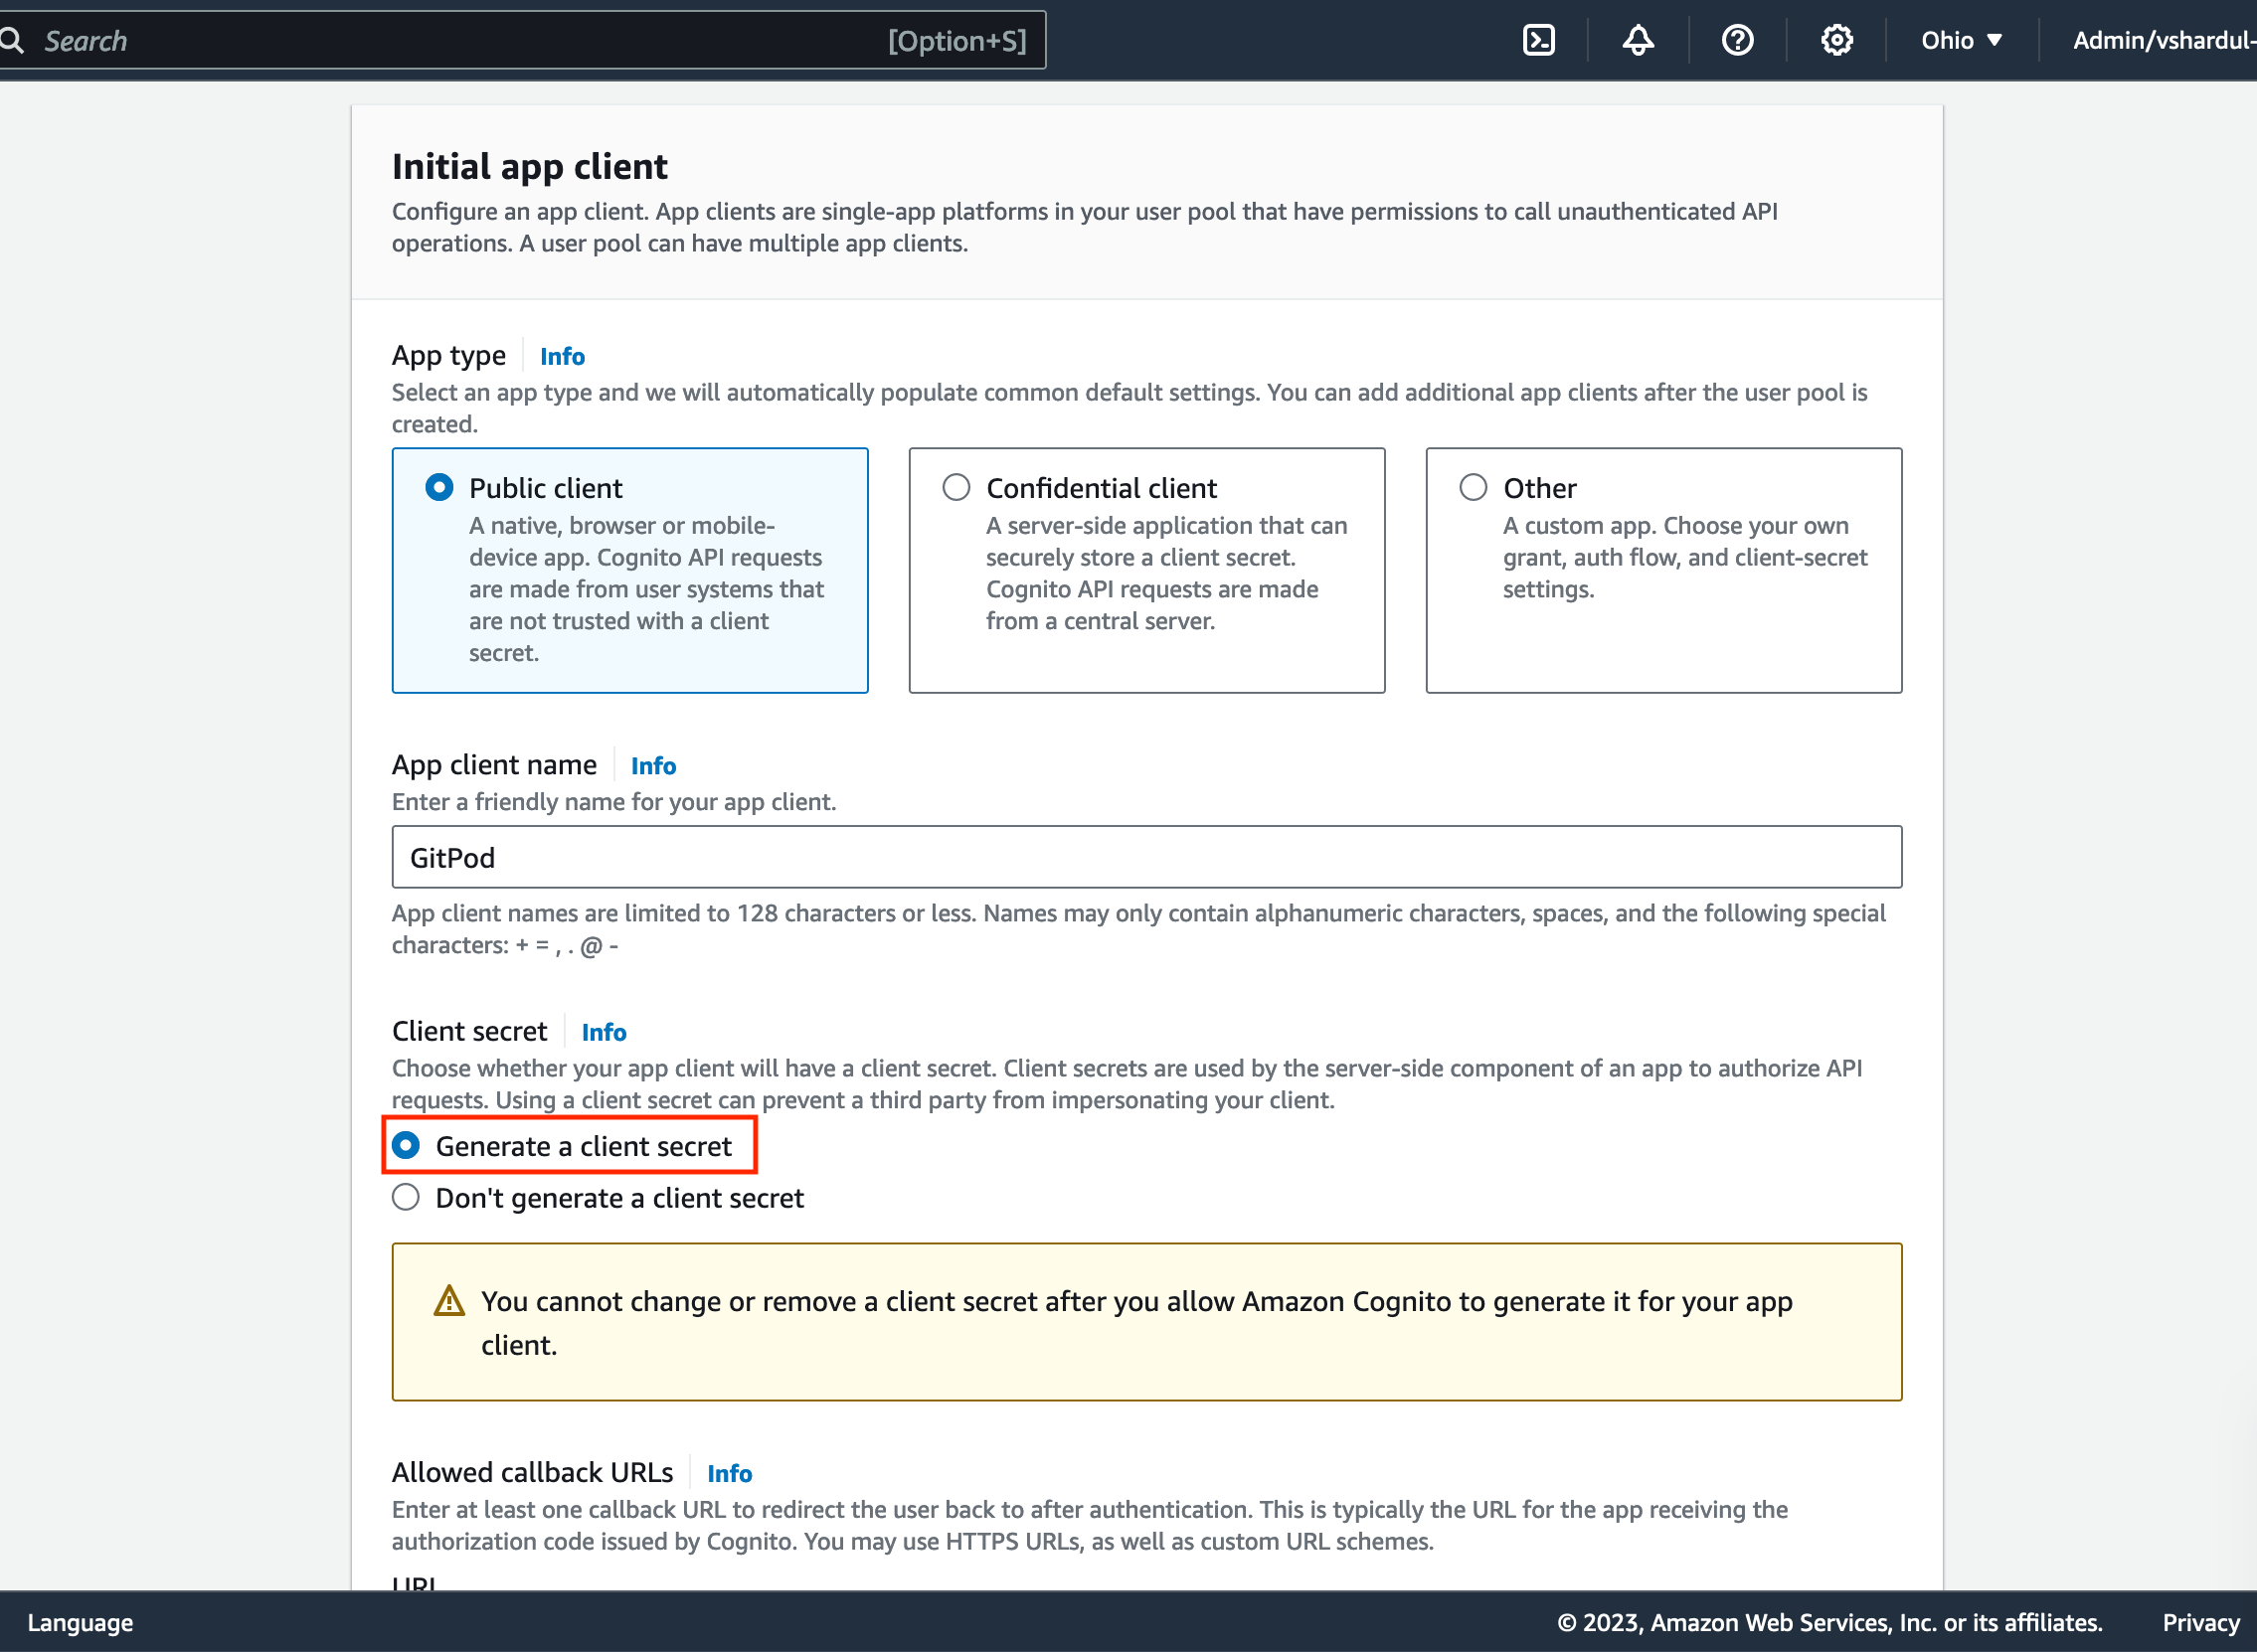
 * Follow company best practice for most settings
* Ensure to select `Generate a client secret` in the Client secret section:
* Follow company best practice for most settings
* Ensure to select `Generate a client secret` in the Client secret section:
 * Define the call back url as provided by the Enterprise instance in the Configure single sign-on setup page (see [above](#3-set-up-gitpod)):
 * As the identity provider, select `Cognito` (under Advanced app client settings)
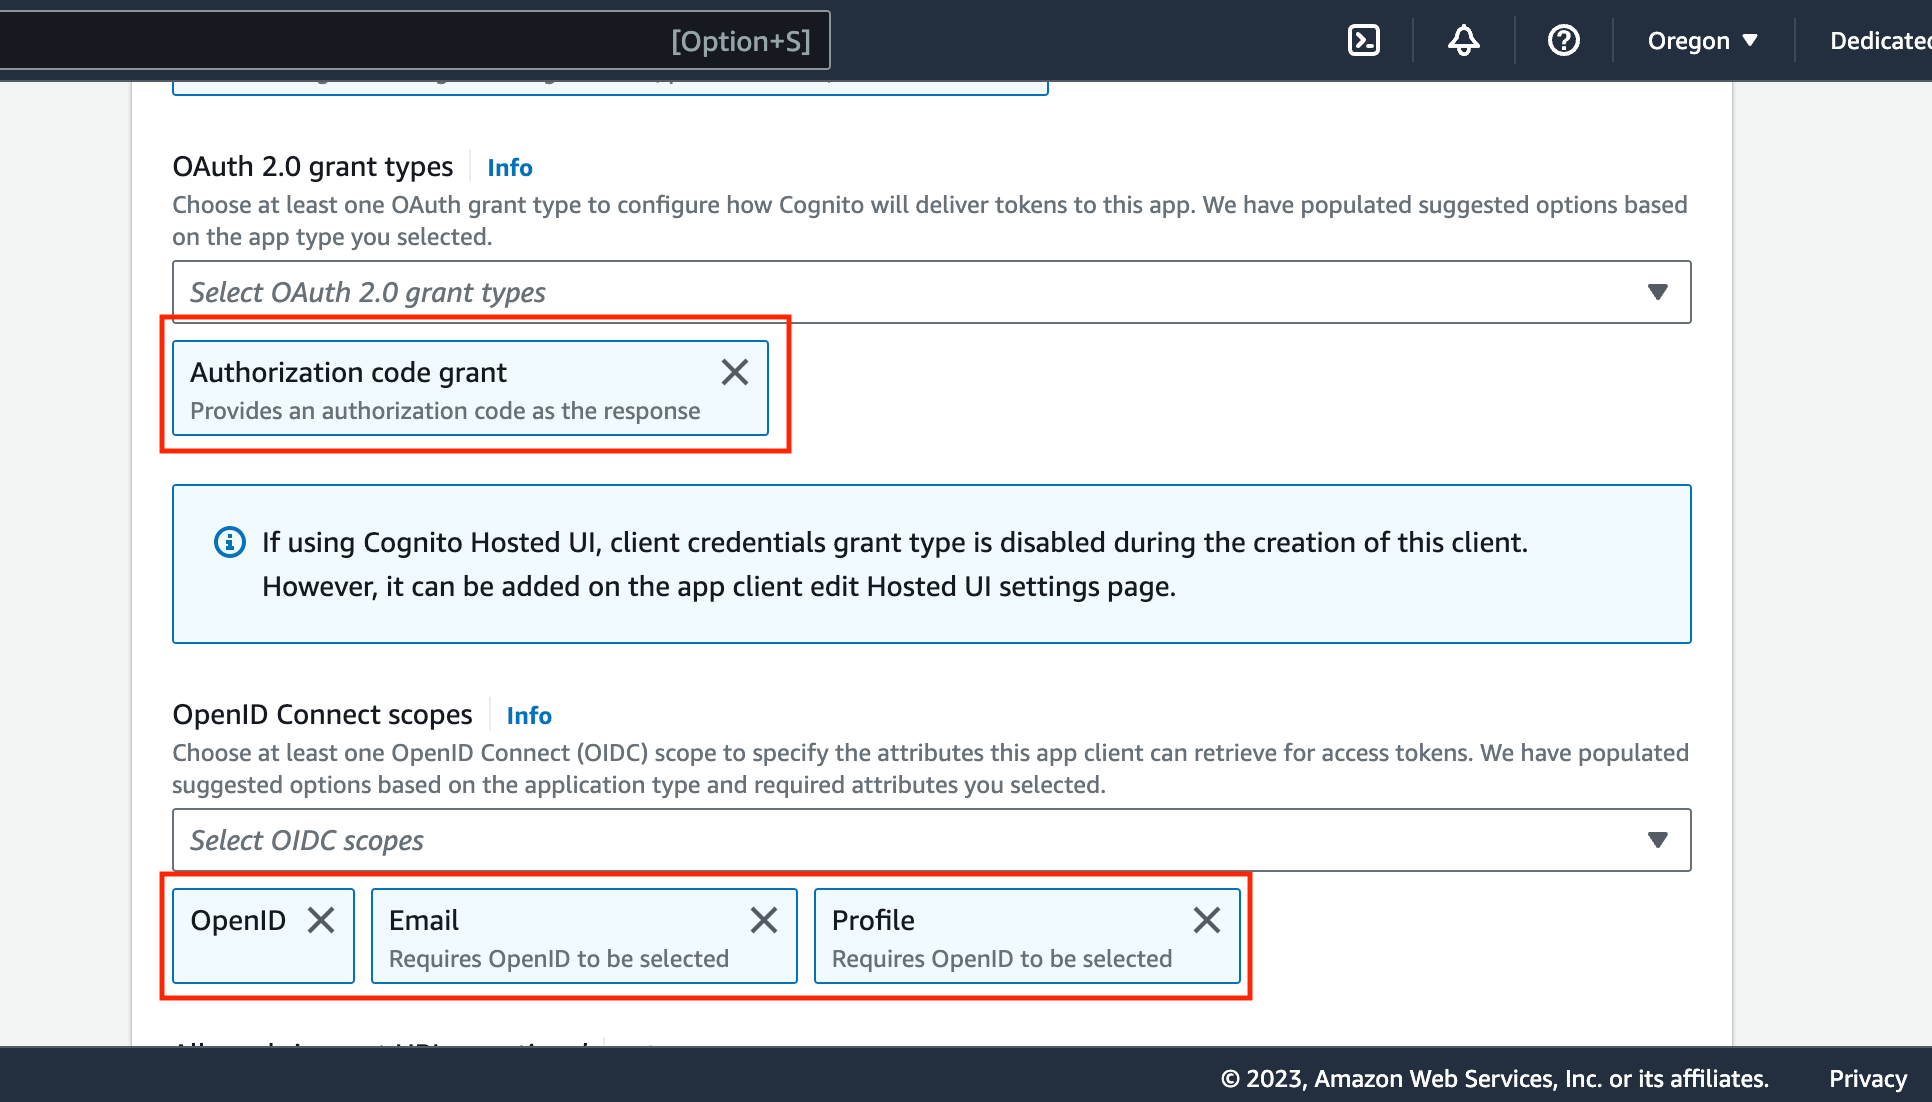
* OAuth 2.0 grant types, select `Auth Code Grant`
* Under OpenID Connect Scopes, select `OpenID`, `Email`, `Profile`:
* As the identity provider, select `Cognito` (under Advanced app client settings)
* OAuth 2.0 grant types, select `Auth Code Grant`
* Under OpenID Connect Scopes, select `OpenID`, `Email`, `Profile`:
 7. Now create the cognito user pool. The review page should look similar to this:
8. Start pasting the necessary values into the Gitpod SSO setup page. Navigate to:
```text theme={null}
https://cognito-idp..amazonaws.com//.well-known/openid-configuration
```
This will return a web page with raw json data:
7. Now create the cognito user pool. The review page should look similar to this:
8. Start pasting the necessary values into the Gitpod SSO setup page. Navigate to:
```text theme={null}
https://cognito-idp..amazonaws.com//.well-known/openid-configuration
```
This will return a web page with raw json data:
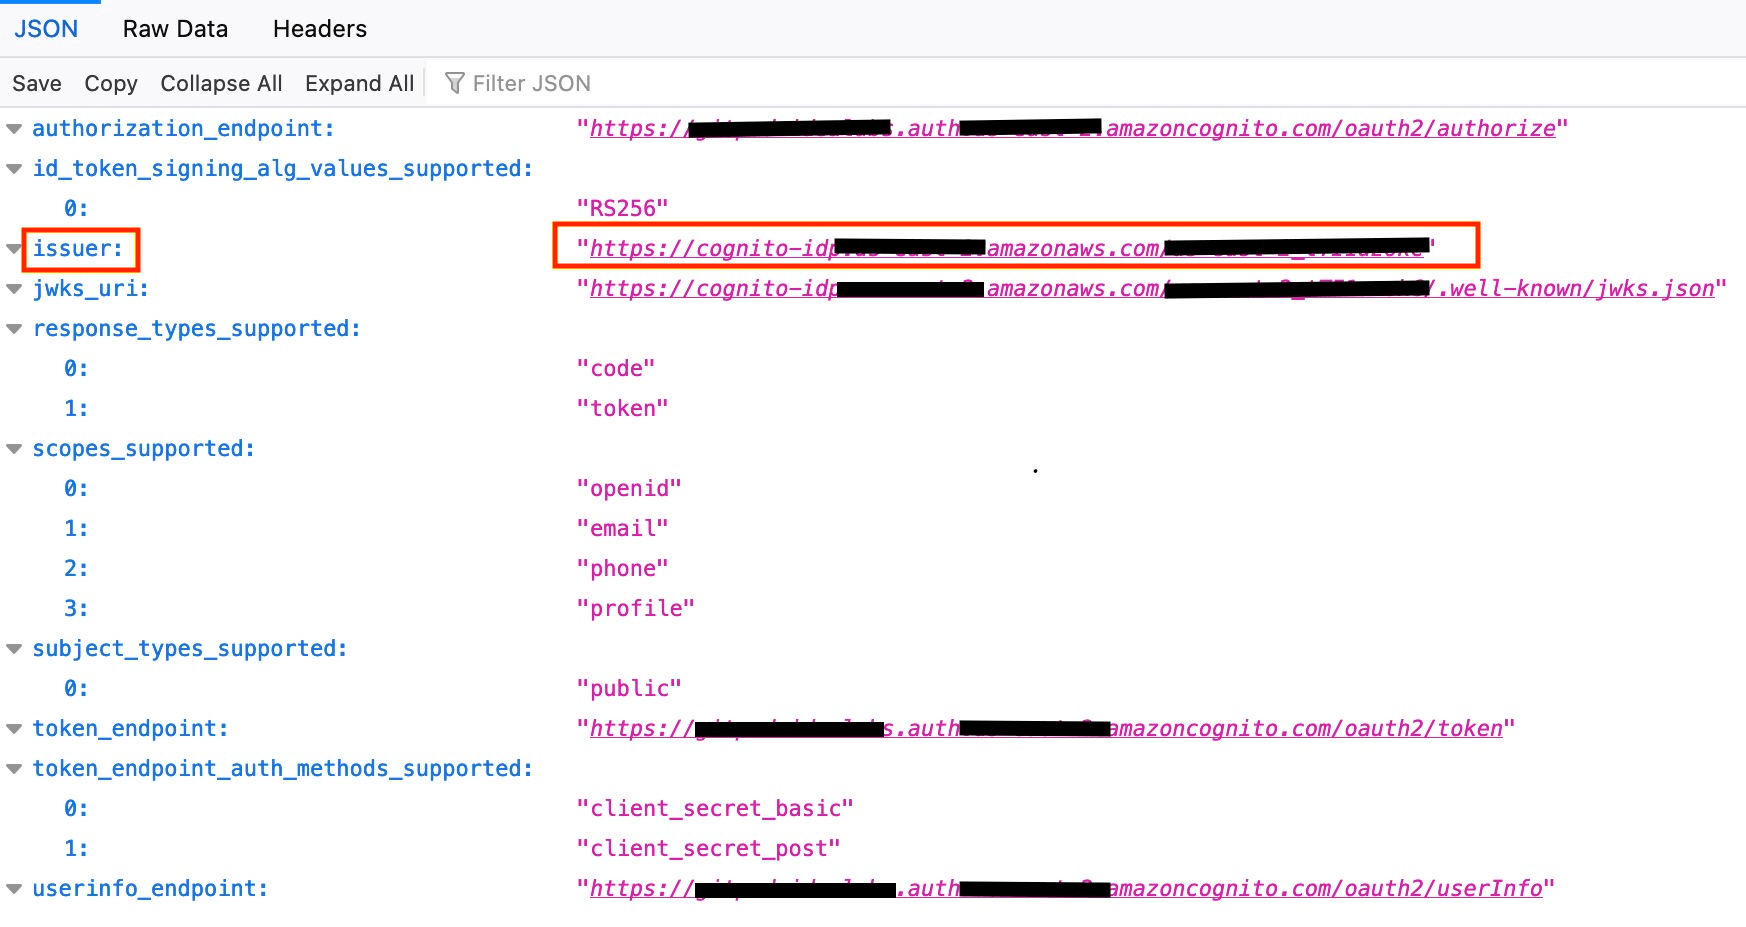 * Copy the `issuer URL` highlighted above into the respective field on the Gitpod SSO setup page
9. Navigate to the Cognito console, and find the User pool created above. Navigate to the App client meta data as below:
* Copy the `issuer URL` highlighted above into the respective field on the Gitpod SSO setup page
9. Navigate to the Cognito console, and find the User pool created above. Navigate to the App client meta data as below:
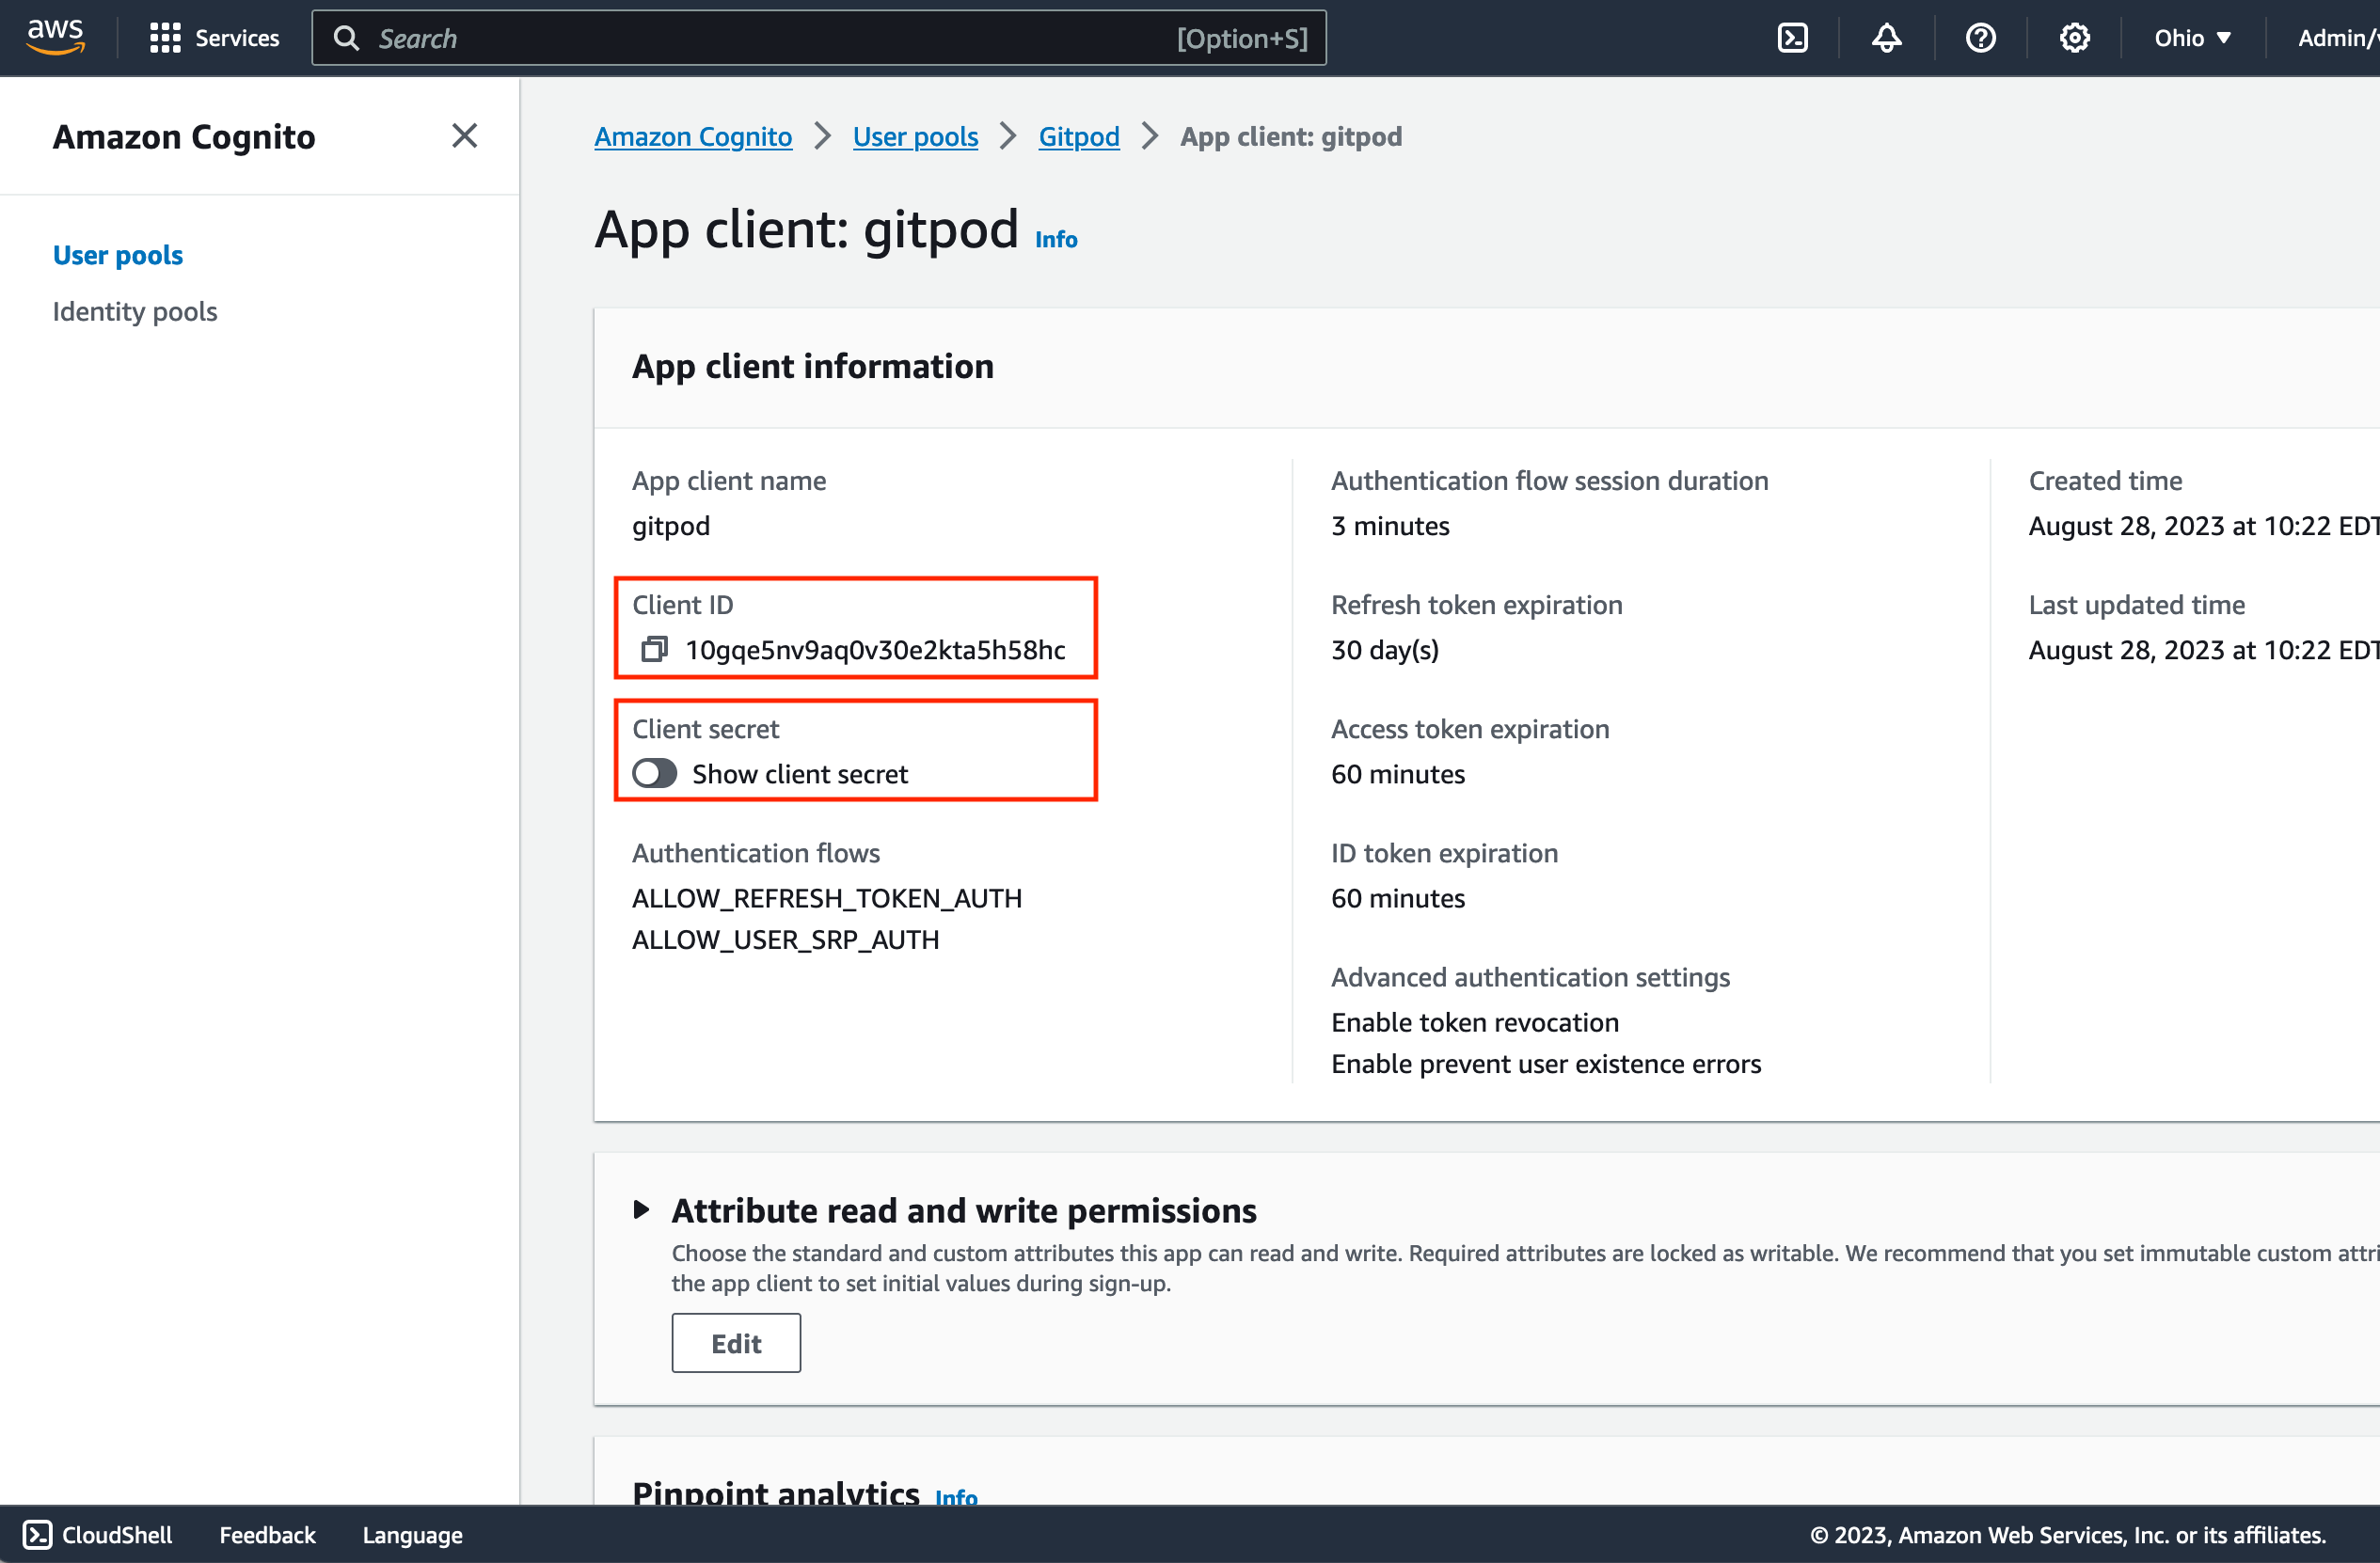 * Copy the `Client ID` from the Cognito app client page into the respective field on the Gitpod SSO setup page
* Copy the `Client Secret` into the respective field on the Gitpod SSO setup page
10. Proceed to Verify the SSO configuration on the GitHub SSO setup page [by clicking “Verify SSO Configuration”](/classic/admin/setup-gitpod/configure-sso#general-instructions:~:text=on%20this%20screen.-,Clicking%20%E2%80%9CVerify%20SSO%20Configuration%E2%80%9D,-will%20ensure%20that)
***
### Self-hosted GitLab
*As* *prerequisites* you will need the following:
* Admin Permission of your Self-hosted GitLab
*Creating a Gitpod SSO Integration*
1. Navigate to your GitLab instance's applications settings page. eg: `https://gitlab-demo.gitpod.io/admin/applications`.
2. Click on the `New application` button.
* Copy the `Client ID` from the Cognito app client page into the respective field on the Gitpod SSO setup page
* Copy the `Client Secret` into the respective field on the Gitpod SSO setup page
10. Proceed to Verify the SSO configuration on the GitHub SSO setup page [by clicking “Verify SSO Configuration”](/classic/admin/setup-gitpod/configure-sso#general-instructions:~:text=on%20this%20screen.-,Clicking%20%E2%80%9CVerify%20SSO%20Configuration%E2%80%9D,-will%20ensure%20that)
***
### Self-hosted GitLab
*As* *prerequisites* you will need the following:
* Admin Permission of your Self-hosted GitLab
*Creating a Gitpod SSO Integration*
1. Navigate to your GitLab instance's applications settings page. eg: `https://gitlab-demo.gitpod.io/admin/applications`.
2. Click on the `New application` button.
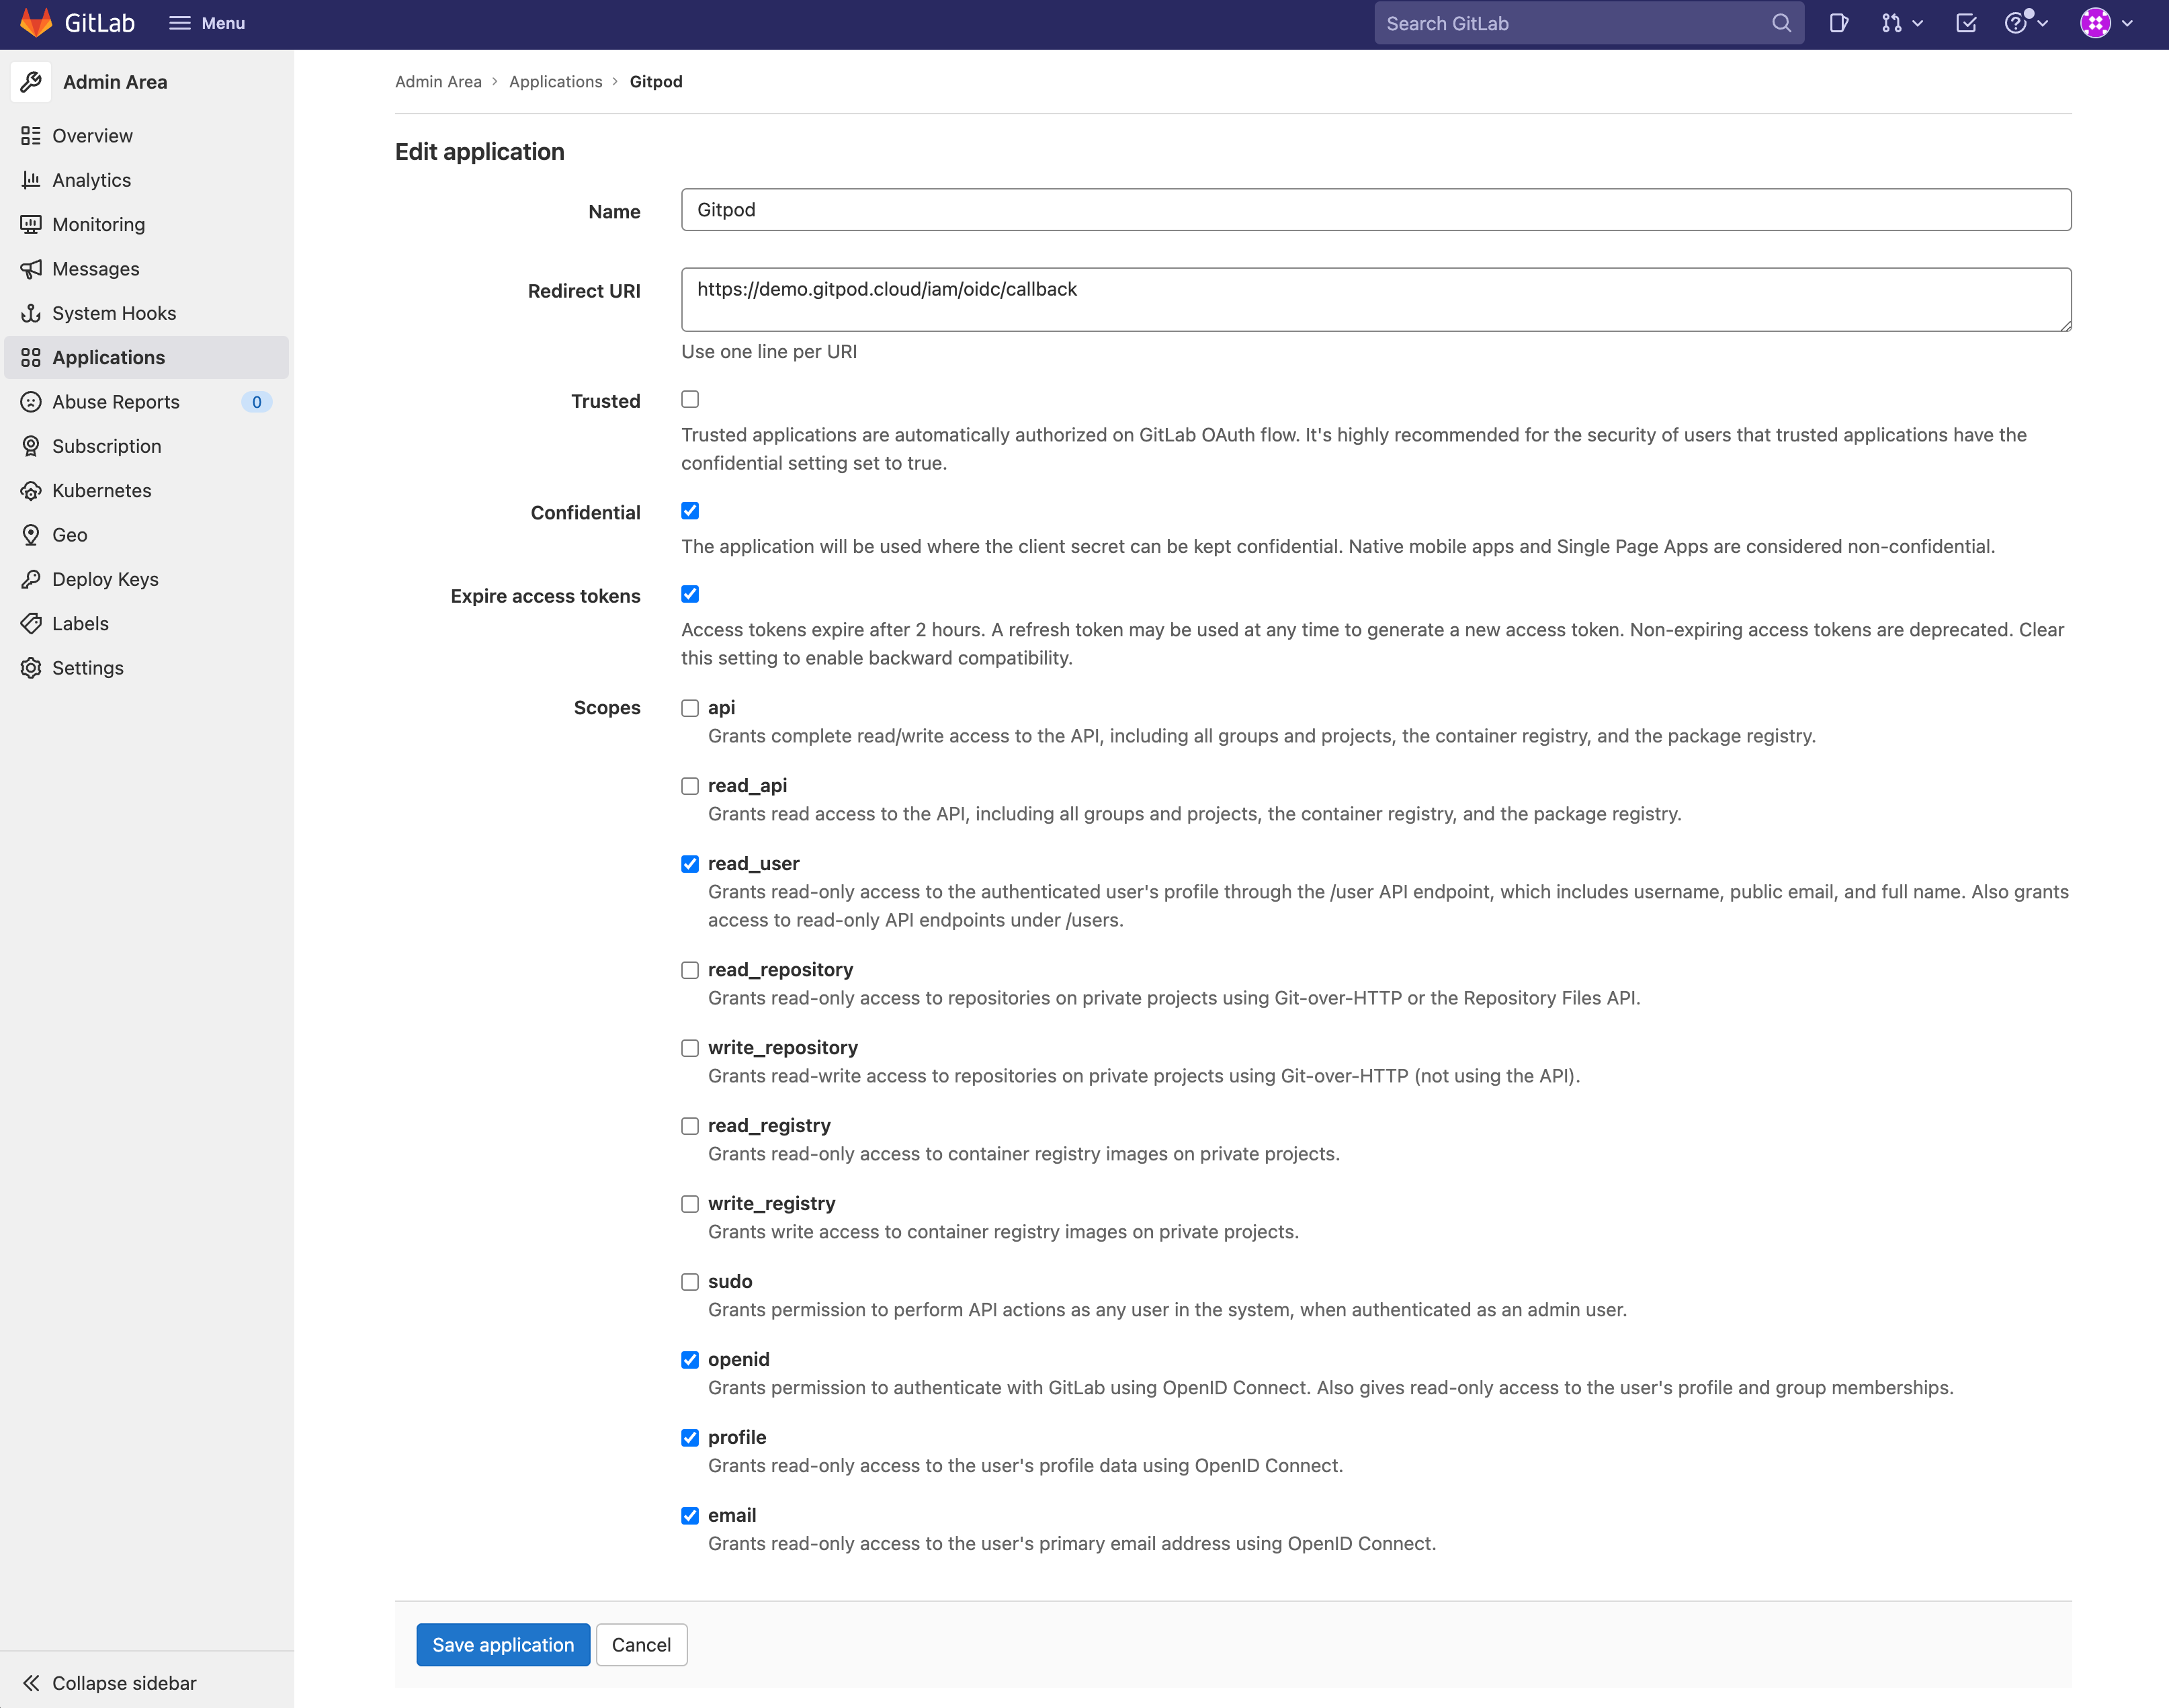
 3. Specify General Settings and Save application.
* Name: Gitpod
* Redirect URI: copy this value from your Gitpod setup screen (see [details](/classic/admin/setup-gitpod/configure-sso#general-instructions:~:text=on%20this%20screen.-,Clicking%20%E2%80%9CVerify%20SSO%20Configuration%E2%80%9D,-will%20ensure%20that) above under "General instructions")
* Confidential: Yes
* Expire access tokens: Yes
* Scopes: select `read_user`, `openid`, `profile` and `email`
3. Specify General Settings and Save application.
* Name: Gitpod
* Redirect URI: copy this value from your Gitpod setup screen (see [details](/classic/admin/setup-gitpod/configure-sso#general-instructions:~:text=on%20this%20screen.-,Clicking%20%E2%80%9CVerify%20SSO%20Configuration%E2%80%9D,-will%20ensure%20that) above under "General instructions")
* Confidential: Yes
* Expire access tokens: Yes
* Scopes: select `read_user`, `openid`, `profile` and `email`
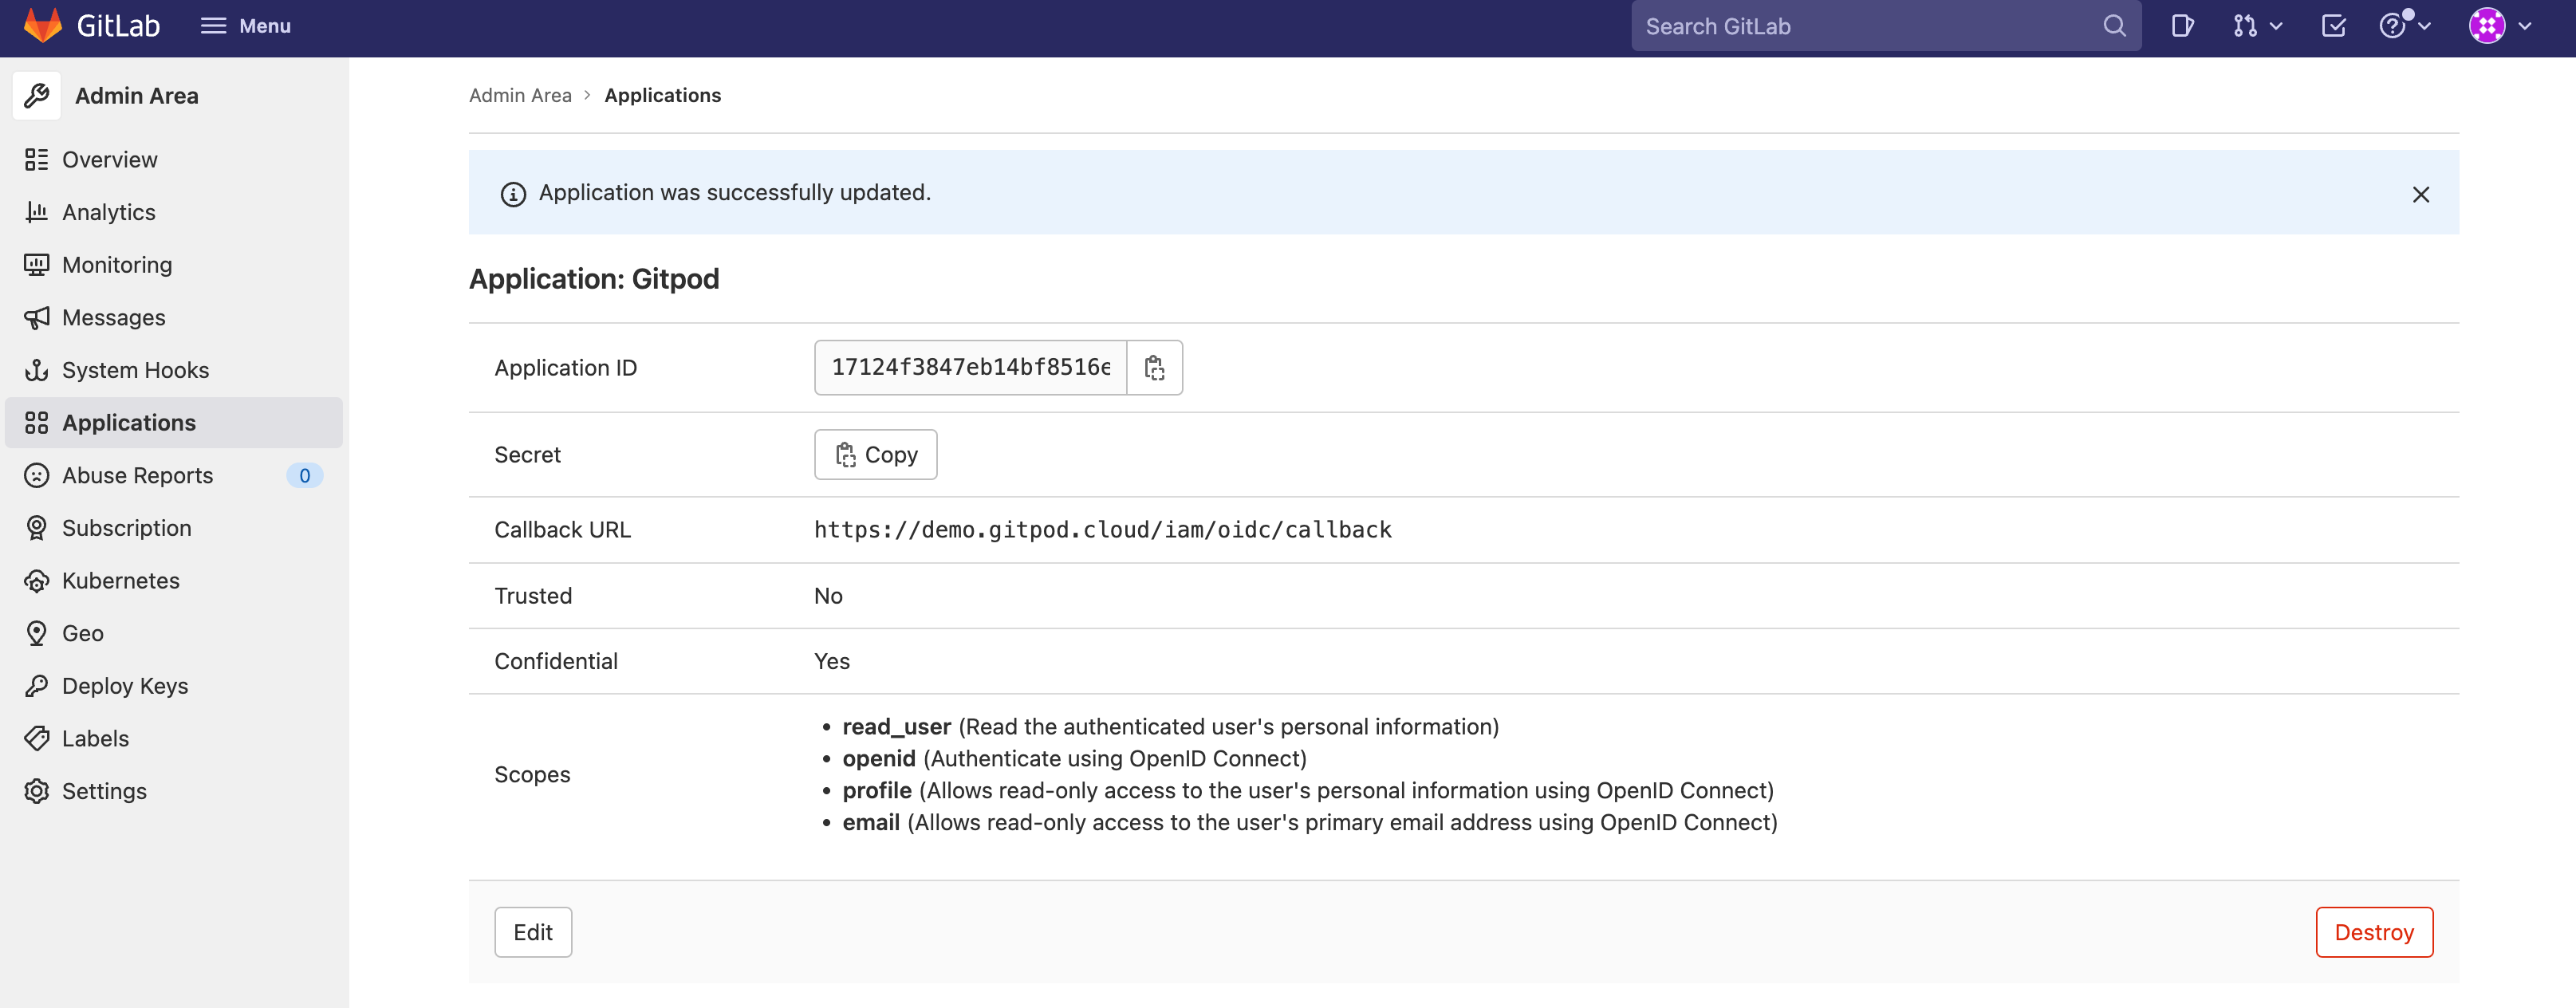
 4. Obtain Client ID & Client Secret
* Copy the Application ID and use it as input in Gitpod setup (see [details](/classic/admin/setup-gitpod/configure-sso#general-instructions:~:text=on%20this%20screen.-,Clicking%20%E2%80%9CVerify%20SSO%20Configuration%E2%80%9D,-will%20ensure%20that) above under "General instructions")
* Copy Secret and use it as input in Gitpod setup (see [details](/classic/admin/setup-gitpod/configure-sso#general-instructions:~:text=on%20this%20screen.-,Clicking%20%E2%80%9CVerify%20SSO%20Configuration%E2%80%9D,-will%20ensure%20that) above under "General instructions")
* Set the Issuer to your Gitlab instance, eg: `https://gitlab-demo.gitpod.io`
4. Obtain Client ID & Client Secret
* Copy the Application ID and use it as input in Gitpod setup (see [details](/classic/admin/setup-gitpod/configure-sso#general-instructions:~:text=on%20this%20screen.-,Clicking%20%E2%80%9CVerify%20SSO%20Configuration%E2%80%9D,-will%20ensure%20that) above under "General instructions")
* Copy Secret and use it as input in Gitpod setup (see [details](/classic/admin/setup-gitpod/configure-sso#general-instructions:~:text=on%20this%20screen.-,Clicking%20%E2%80%9CVerify%20SSO%20Configuration%E2%80%9D,-will%20ensure%20that) above under "General instructions")
* Set the Issuer to your Gitlab instance, eg: `https://gitlab-demo.gitpod.io`
 5. Continue with Gitpod SSO Configuration verification: [Clicking “Verify SSO Configuration”](/classic/admin/setup-gitpod/configure-sso#general-instructions:~:text=on%20this%20screen.-,Clicking%20%E2%80%9CVerify%20SSO%20Configuration%E2%80%9D,-will%20ensure%20that)
***
### SaaS GitLab
**Security note:** To avoid everyone has a GitLab account to sign up in your
Gitpod installation, you must restrict `claims` with CEL expression ([syntax
of CEL](https://github.com/google/cel-spec/blob/master/doc/langdef.md#syntax)).
More details see step 6.
*Creating a Gitpod SSO Integration*
1. Navigate to your SaaS GitLab group's applications settings page. eg: `https://gitlab.com/groups//-/settings/applications`.
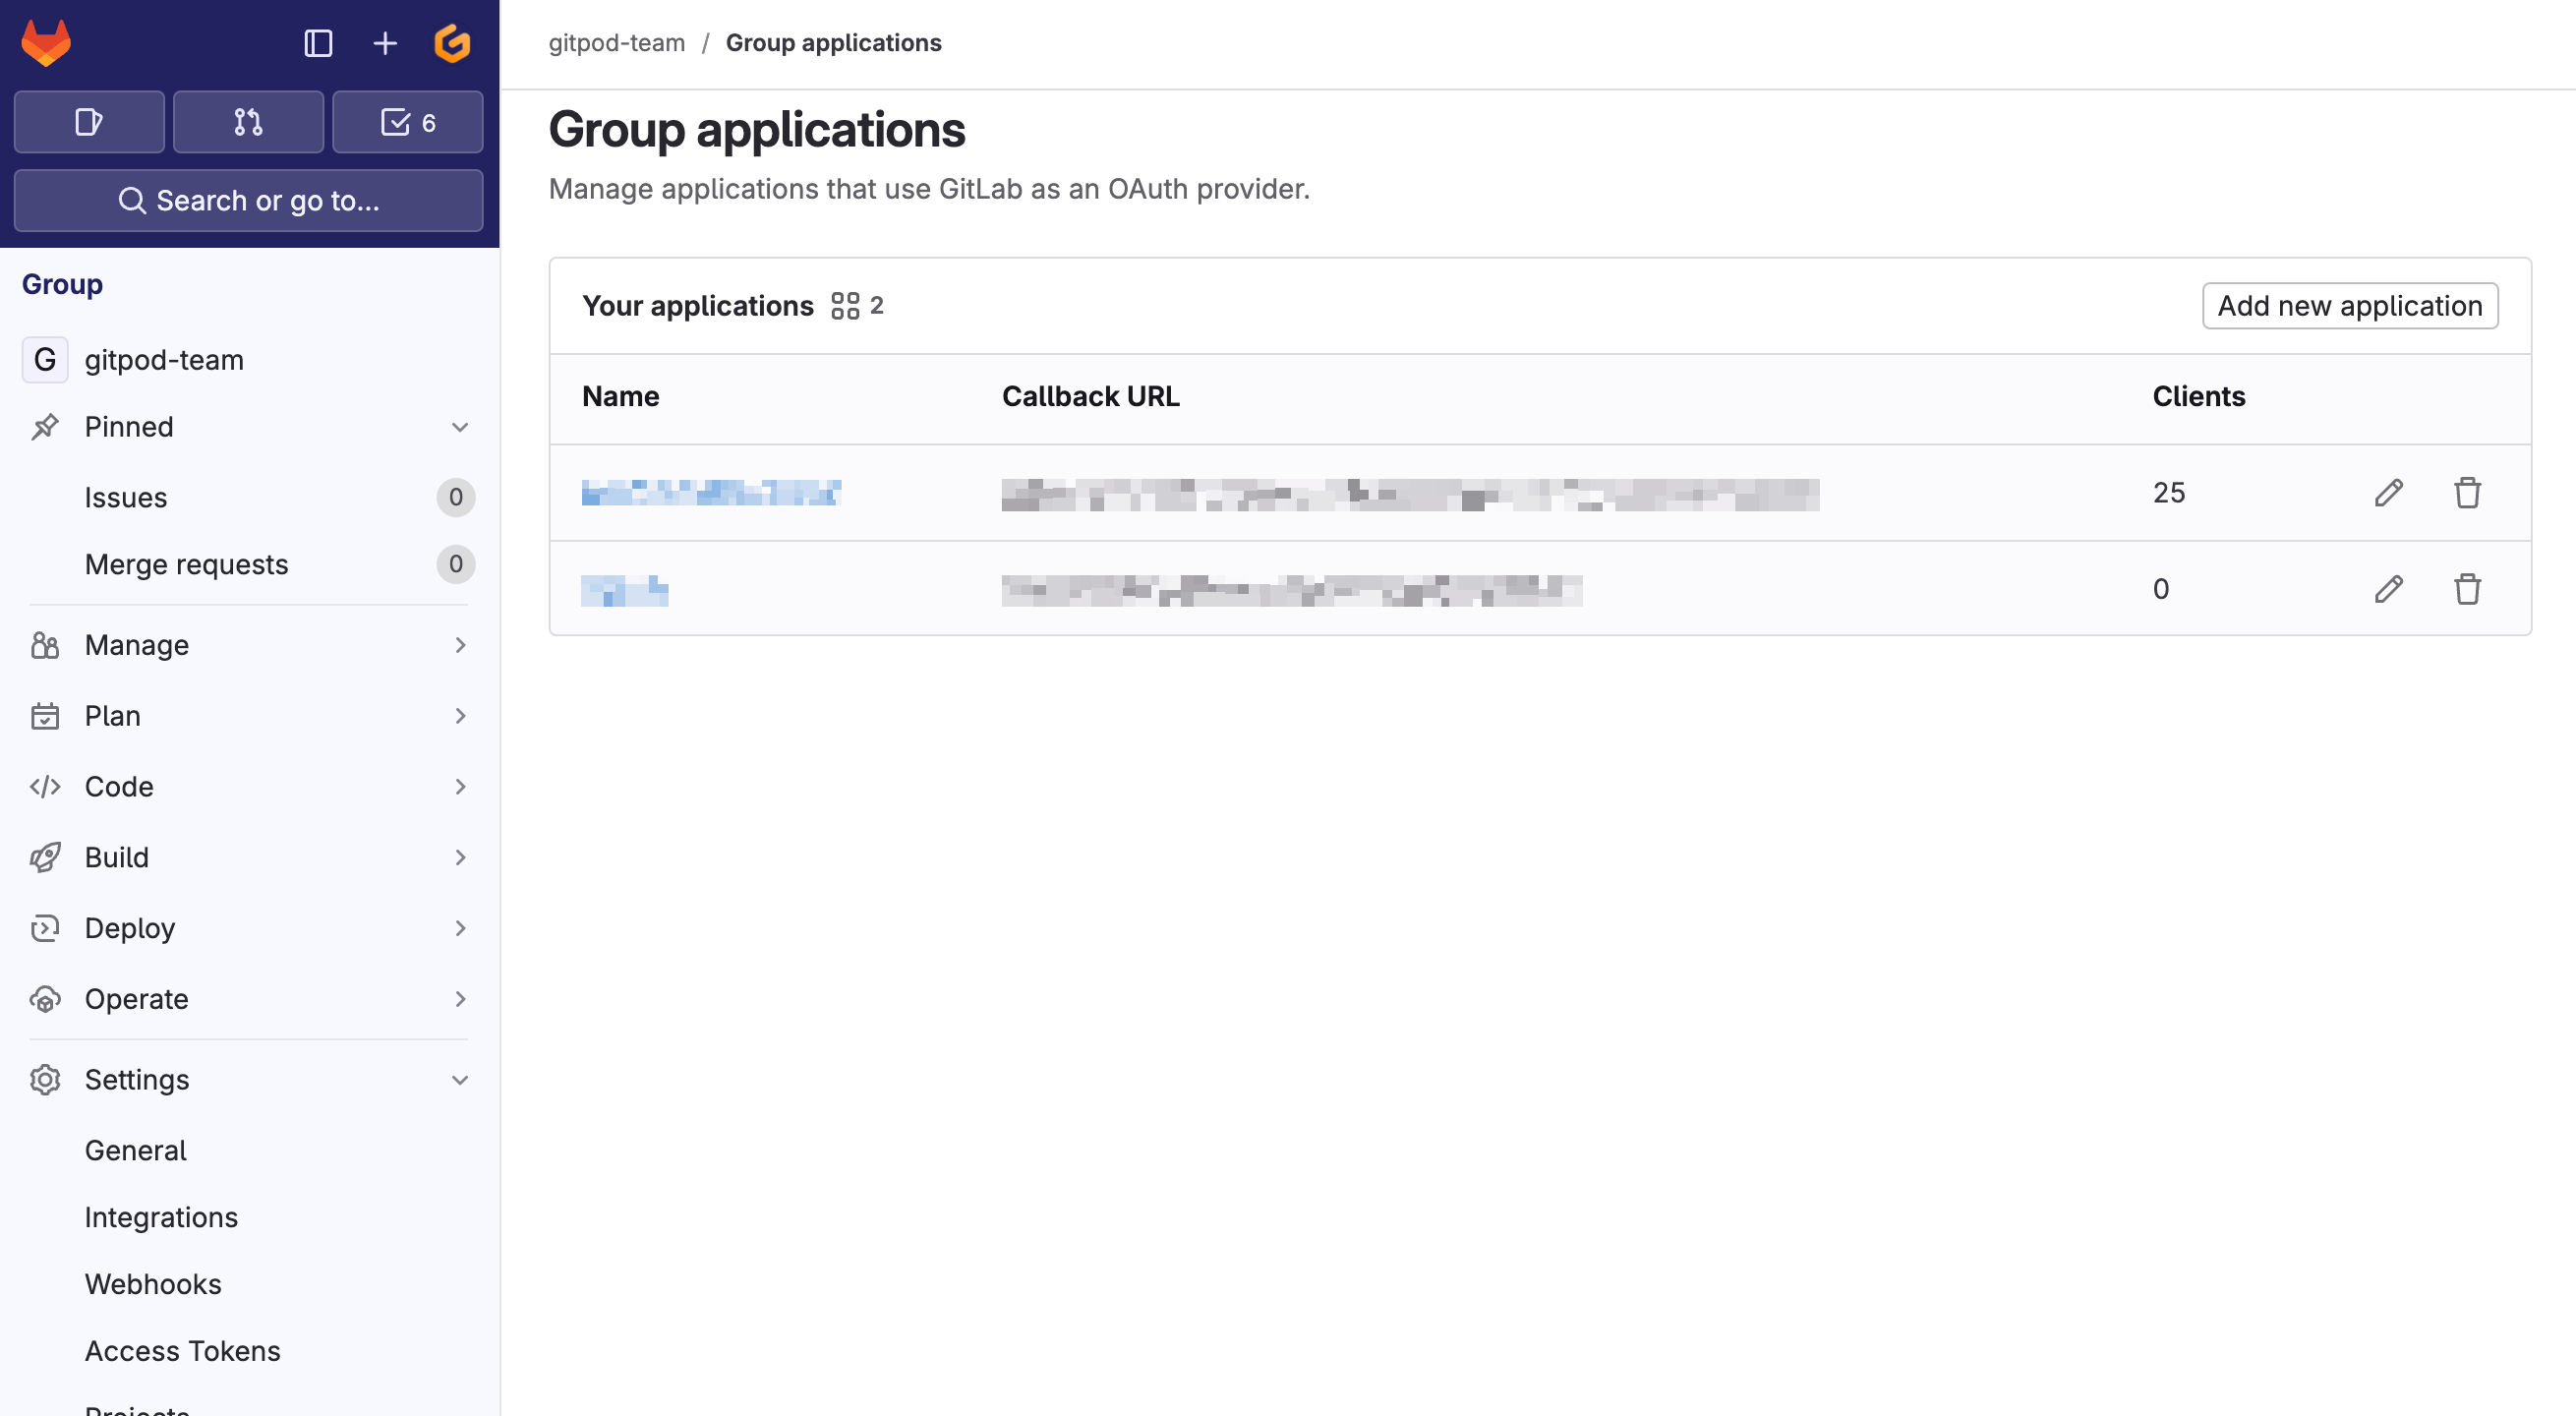
2. Click on the `Add new application` button.
5. Continue with Gitpod SSO Configuration verification: [Clicking “Verify SSO Configuration”](/classic/admin/setup-gitpod/configure-sso#general-instructions:~:text=on%20this%20screen.-,Clicking%20%E2%80%9CVerify%20SSO%20Configuration%E2%80%9D,-will%20ensure%20that)
***
### SaaS GitLab
**Security note:** To avoid everyone has a GitLab account to sign up in your
Gitpod installation, you must restrict `claims` with CEL expression ([syntax
of CEL](https://github.com/google/cel-spec/blob/master/doc/langdef.md#syntax)).
More details see step 6.
*Creating a Gitpod SSO Integration*
1. Navigate to your SaaS GitLab group's applications settings page. eg: `https://gitlab.com/groups//-/settings/applications`.
2. Click on the `Add new application` button.
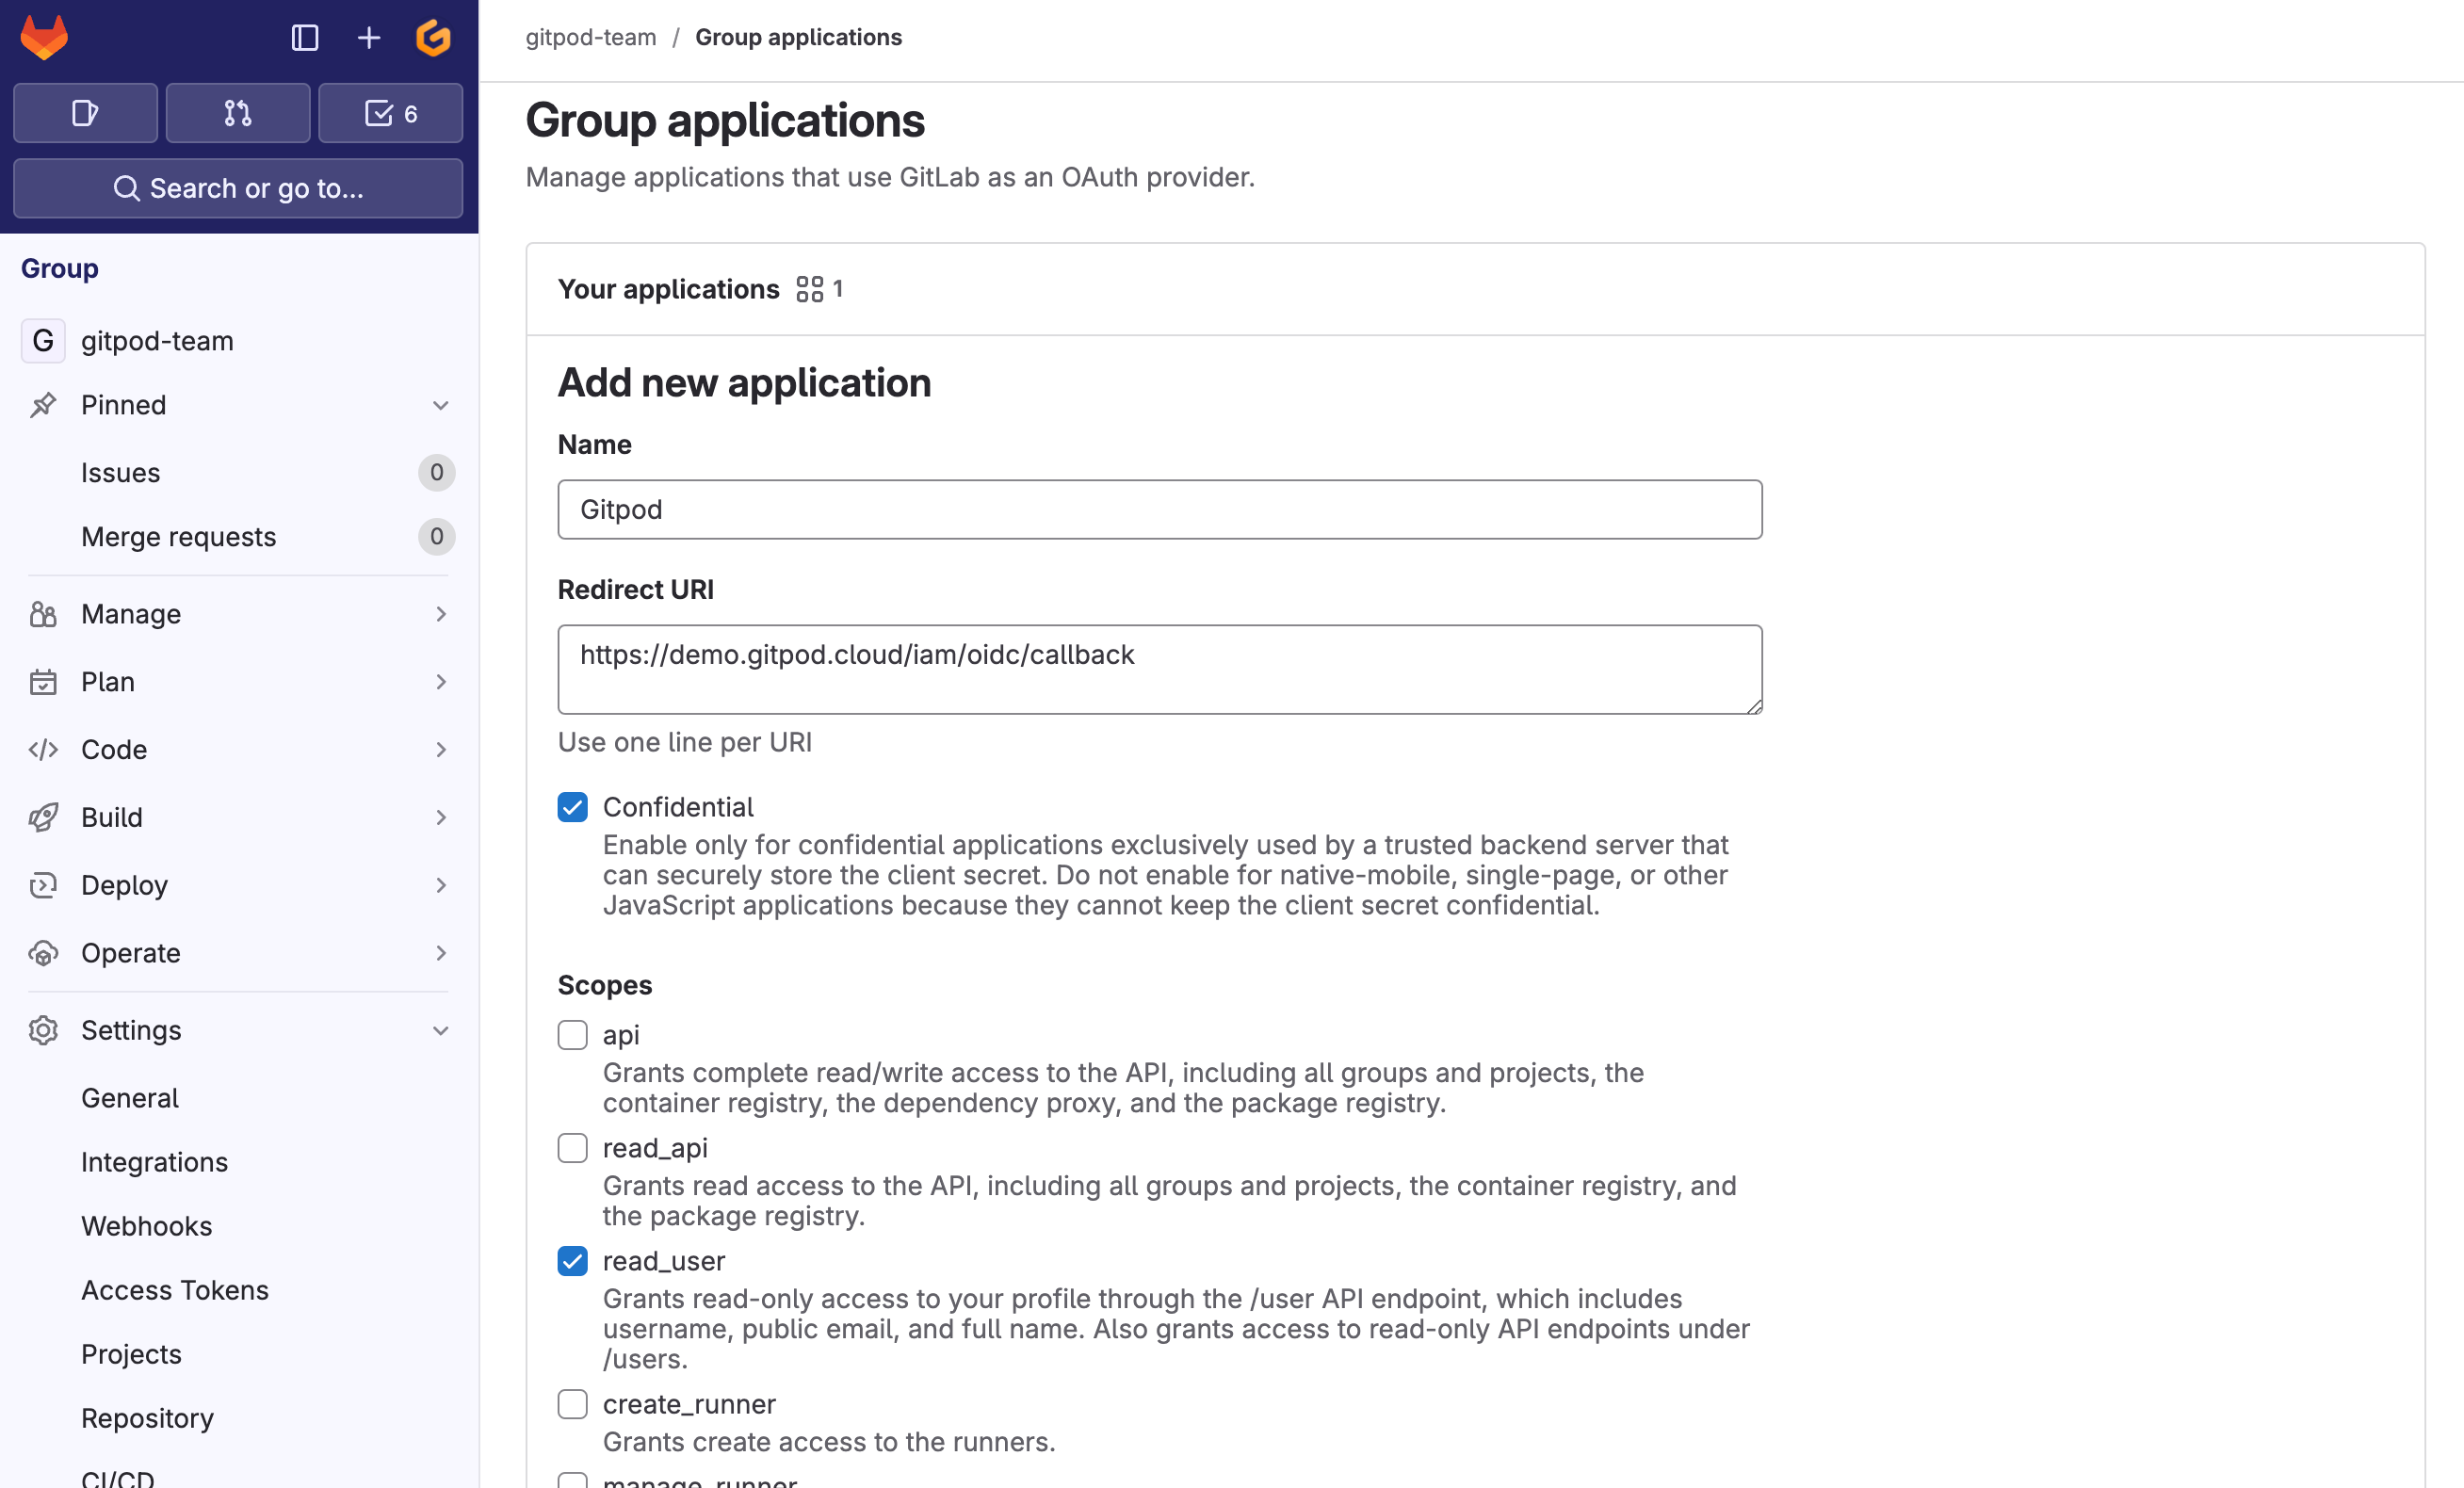
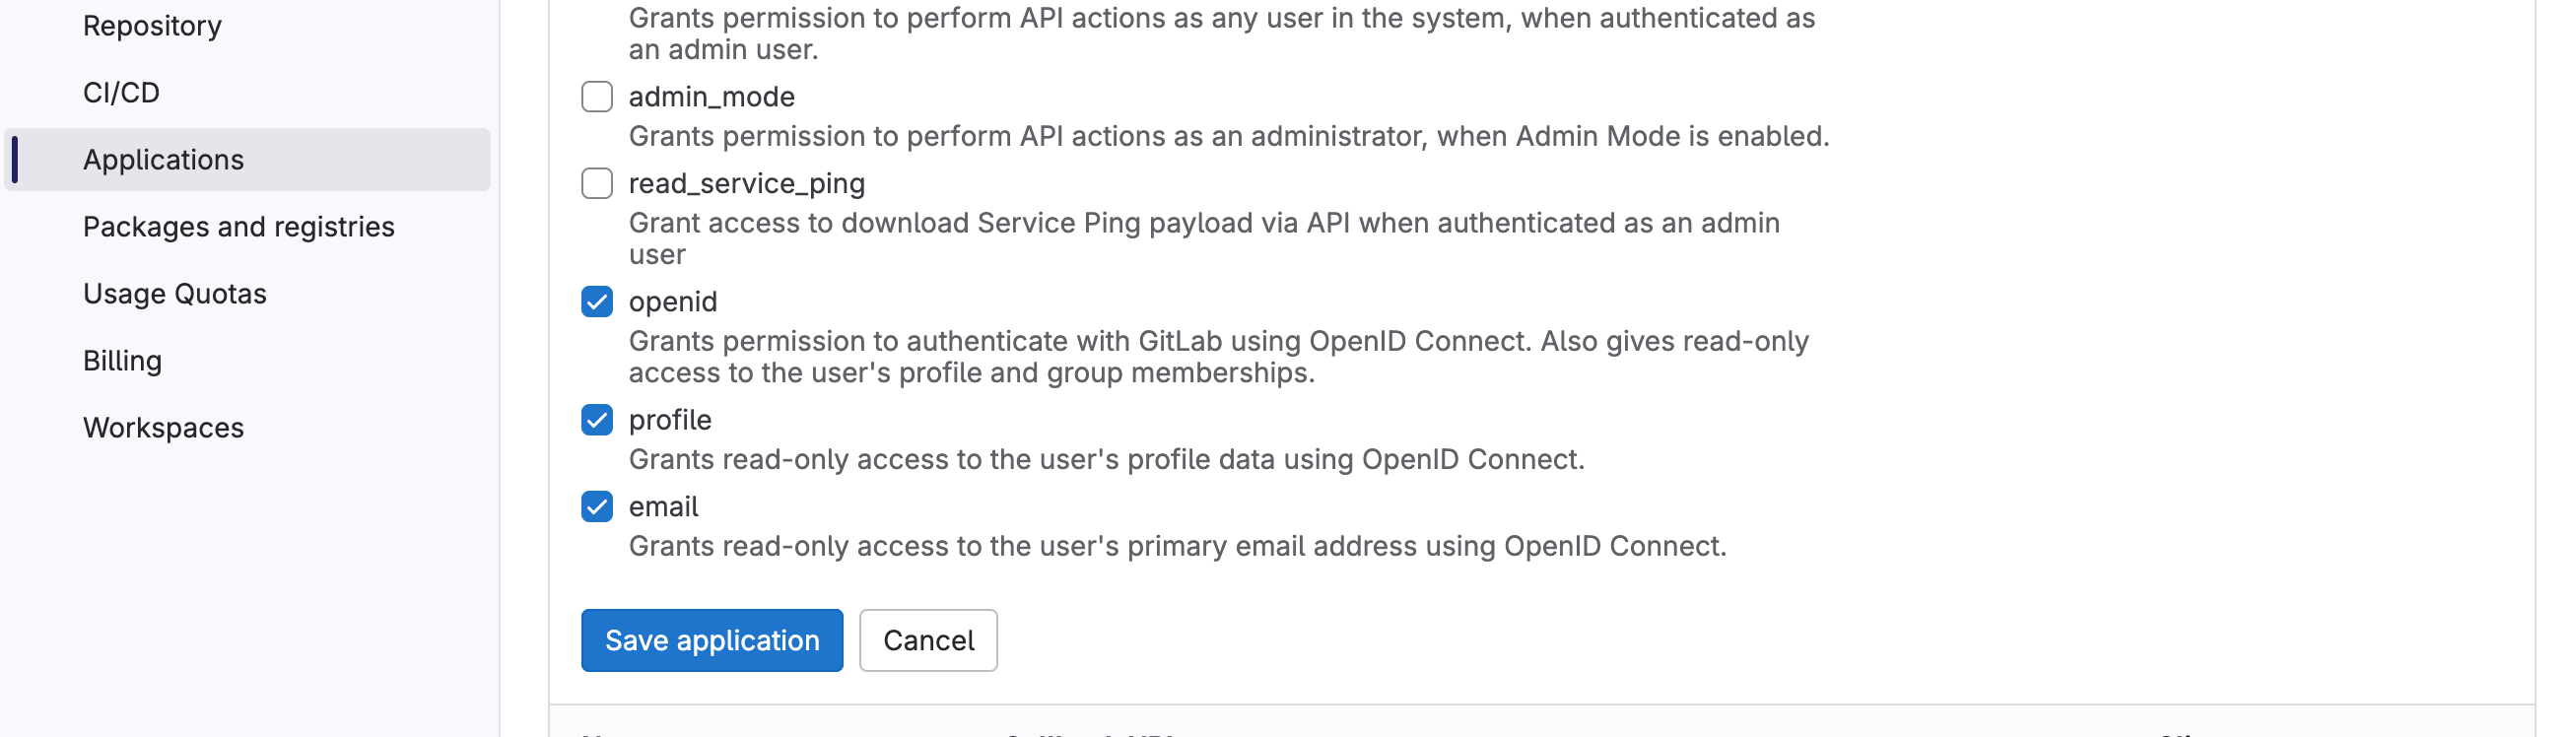
 3. Specify General Settings and Save application.
* Name: Gitpod
* Redirect URI: copy this value from your Gitpod setup screen (see [details](/classic/admin/setup-gitpod/configure-sso#general-instructions:~:text=on%20this%20screen.-,Clicking%20%E2%80%9CVerify%20SSO%20Configuration%E2%80%9D,-will%20ensure%20that) above under "General instructions")
* Confidential: Yes
* Expire access tokens: Yes
* Scopes: select `read_user`, `openid`, `profile` and `email`
3. Specify General Settings and Save application.
* Name: Gitpod
* Redirect URI: copy this value from your Gitpod setup screen (see [details](/classic/admin/setup-gitpod/configure-sso#general-instructions:~:text=on%20this%20screen.-,Clicking%20%E2%80%9CVerify%20SSO%20Configuration%E2%80%9D,-will%20ensure%20that) above under "General instructions")
* Confidential: Yes
* Expire access tokens: Yes
* Scopes: select `read_user`, `openid`, `profile` and `email`
 4. Obtain Client ID & Client Secret
* Copy the Application ID and use it as input in Gitpod setup (see [details](/classic/admin/setup-gitpod/configure-sso#general-instructions:~:text=on%20this%20screen.-,Clicking%20%E2%80%9CVerify%20SSO%20Configuration%E2%80%9D,-will%20ensure%20that) above under "General instructions")
* Copy Secret and use it as input in Gitpod setup (see [details](/classic/admin/setup-gitpod/configure-sso#general-instructions:~:text=on%20this%20screen.-,Clicking%20%E2%80%9CVerify%20SSO%20Configuration%E2%80%9D,-will%20ensure%20that) above under "General instructions")
* Set the Issuer to `https://gitlab.com`
4. Obtain Client ID & Client Secret
* Copy the Application ID and use it as input in Gitpod setup (see [details](/classic/admin/setup-gitpod/configure-sso#general-instructions:~:text=on%20this%20screen.-,Clicking%20%E2%80%9CVerify%20SSO%20Configuration%E2%80%9D,-will%20ensure%20that) above under "General instructions")
* Copy Secret and use it as input in Gitpod setup (see [details](/classic/admin/setup-gitpod/configure-sso#general-instructions:~:text=on%20this%20screen.-,Clicking%20%E2%80%9CVerify%20SSO%20Configuration%E2%80%9D,-will%20ensure%20that) above under "General instructions")
* Set the Issuer to `https://gitlab.com`
 5. Continue with Gitpod SSO Configuration verification: [Clicking “Verify SSO Configuration”](/classic/admin/setup-gitpod/configure-sso#general-instructions:~:text=on%20this%20screen.-,Clicking%20%E2%80%9CVerify%20SSO%20Configuration%E2%80%9D,-will%20ensure%20that)
6. Restrict with CEL expression. More available keys see [OIDC document on GitLab](https://docs.gitlab.com/ee/integration/openid_connect_provider.html#shared-information)
{' '}
**Security note:** To avoid everyone has a GitLab account to sign up in your
Gitpod installation, you must restrict `claims` with CEL expression ([syntax
of CEL](https://github.com/google/cel-spec/blob/master/doc/langdef.md#syntax))
* Limit users to people who is a direct member of group, example group name `gitpod-team`
```
'gitpod-team' in claims.groups_direct
```
* Limit users to people who is a direct member of multiple groups, example group name `gitpod-team` and `gitpod-team-2/sub_group`
```
'gitpod-team' in claims.groups_direct && 'gitpod-team-2/sub_group' in claims.groups_direct
```
* Limit users by email ends with `@gitpod.io`
```
claims.email_verified && claims.email.endsWith('@gitpod.io')
```
5. Continue with Gitpod SSO Configuration verification: [Clicking “Verify SSO Configuration”](/classic/admin/setup-gitpod/configure-sso#general-instructions:~:text=on%20this%20screen.-,Clicking%20%E2%80%9CVerify%20SSO%20Configuration%E2%80%9D,-will%20ensure%20that)
6. Restrict with CEL expression. More available keys see [OIDC document on GitLab](https://docs.gitlab.com/ee/integration/openid_connect_provider.html#shared-information)
{' '}
**Security note:** To avoid everyone has a GitLab account to sign up in your
Gitpod installation, you must restrict `claims` with CEL expression ([syntax
of CEL](https://github.com/google/cel-spec/blob/master/doc/langdef.md#syntax))
* Limit users to people who is a direct member of group, example group name `gitpod-team`
```
'gitpod-team' in claims.groups_direct
```
* Limit users to people who is a direct member of multiple groups, example group name `gitpod-team` and `gitpod-team-2/sub_group`
```
'gitpod-team' in claims.groups_direct && 'gitpod-team-2/sub_group' in claims.groups_direct
```
* Limit users by email ends with `@gitpod.io`
```
claims.email_verified && claims.email.endsWith('@gitpod.io')
```