> ## Documentation Index
> Fetch the complete documentation index at: https://ona.com/docs/llms.txt
> Use this file to discover all available pages before exploring further.
# Custom domain
> Set up a custom domain for your Ona management plane with TLS termination
Available on the Enterprise plan. [Contact sales](https://ona.com/contact/sales) to learn more.
This guide walks you through setting up a custom domain for your Ona management plane, enabling you to access Ona services through your own domain name with TLS termination.
## Overview
The setup involves two main steps:
1. **Register the custom domain** in your organization settings
2. **Configure cloud infrastructure** to route traffic to the Ona management plane
You can choose between **AWS** or **GCP** for your infrastructure:
* **AWS**: Uses VPC Endpoints and Network Load Balancer
* **GCP**: Uses Private Service Connect (PSC) and regional HTTPS Load Balancer
## Prerequisites
Before you begin, ensure you have:
* Admin access to your Ona organization settings
* **Single Sign-On (SSO) configured** - Custom domains require SSO to be set up. See the [SSO documentation](/ona/sso/overview) for setup instructions.
* A registered domain name (e.g., `ona.example.com`)
- An AWS account with appropriate permissions
- An AWS Certificate Manager (ACM) certificate with Subject Alternative Names (SANs) covering **both**:
* Main domain: `ona.example.com`
* VSCode subdomain: `vscode.ona.example.com`
* A GCP project with billing enabled
* A VPC network and routable subnet (recommended /28 CIDR)
* A regional proxy-only subnet in your VPC (required for regional HTTPS load balancers)
* A regional SSL certificate (can be GCP-managed, but must be regional)
* Terraform installed locally
**About the VSCode subdomain:** The `vscode` subdomain (e.g., `vscode.ona.example.com`) serves a static VS Code Web application. This static content has no access to user data, source code, or any other resources unless the user is authenticated. Authentication is required before any user-specific data becomes accessible.
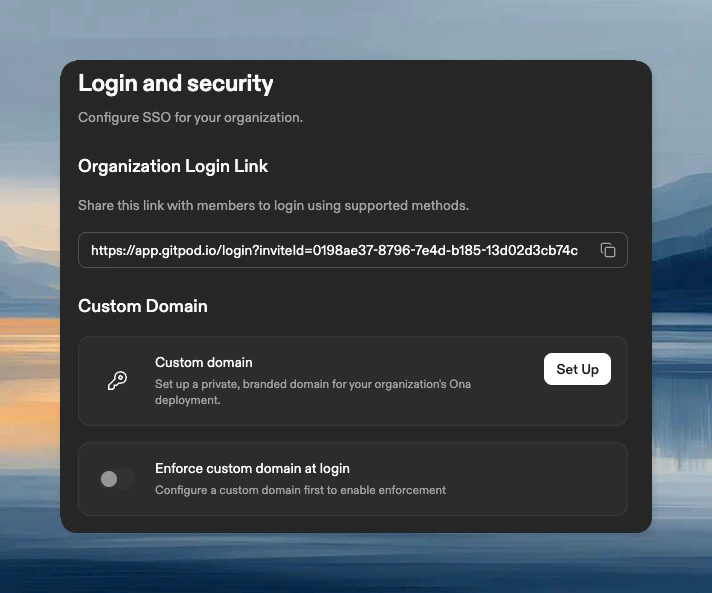
## Step 1: Register custom domain with Ona
Register your custom domain name with the management plane through the Ona dashboard.
1. Navigate to **Settings** → **Login & Identity** → **Login Configuration**
2. Click **Set Up** in the Custom Domain section
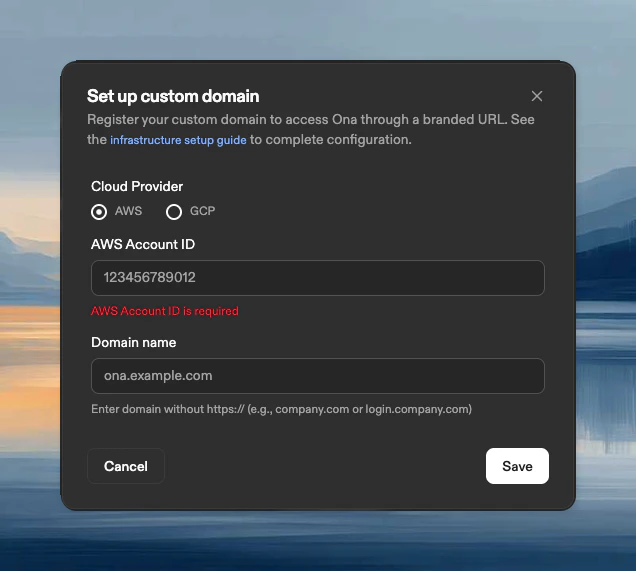
 ### Configure domain
Select your cloud provider (AWS or GCP) and enter the required information:
* **AWS Account ID**: The 12-digit AWS account ID where you will set up the infrastructure (Load Balancer, VPC Endpoint). Find this in the AWS Management Console under **My Account**.
* **Domain name**: Your custom domain (e.g., `ona.example.com`).
> Note: The AWS account ID you specify here must match the account where you create the VPC Endpoint. This is validated when requests come through your custom domain.
### Configure domain
Select your cloud provider (AWS or GCP) and enter the required information:
* **AWS Account ID**: The 12-digit AWS account ID where you will set up the infrastructure (Load Balancer, VPC Endpoint). Find this in the AWS Management Console under **My Account**.
* **Domain name**: Your custom domain (e.g., `ona.example.com`).
> Note: The AWS account ID you specify here must match the account where you create the VPC Endpoint. This is validated when requests come through your custom domain.
 * **GCP Project ID**: The GCP project ID where you will deploy the infrastructure. Find this in the GCP Console under **Project Info**.
* **Domain name**: Your custom domain (e.g., `ona.example.com`).
> Note: The GCP project ID you specify here must match the project where you create the PSC endpoint. This is validated when requests come through your custom domain.
* **GCP Project ID**: The GCP project ID where you will deploy the infrastructure. Find this in the GCP Console under **Project Info**.
* **Domain name**: Your custom domain (e.g., `ona.example.com`).
> Note: The GCP project ID you specify here must match the project where you create the PSC endpoint. This is validated when requests come through your custom domain.
 After registering your custom domain, you'll need to complete the cloud infrastructure setup below. **There is no automatic validation** - the configuration is verified only when requests are made through your custom domain.
## Step 2: Configure cloud infrastructure
Choose your cloud provider and follow the corresponding setup instructions.
Now that the domain is registered with Ona, you need to set up the AWS infrastructure to route traffic from your domain to the Ona management plane.
#### 2.1 Prepare your certificate
Ensure you have an AWS Certificate Manager (ACM) certificate that covers **both your custom domain and the VSCode subdomain**. This certificate will be used for TLS termination on the Load Balancer.
Your certificate must include both domains as Subject Alternative Names (SANs):
* `ona.example.com`
* `vscode.ona.example.com`
The certificate must be provisioned in the same AWS region where you'll create your Network Load Balancer.
If your certificate doesn't cover the VSCode subdomain, VS Code Browser integration will fail with certificate errors.
***
#### 2.2 Create security groups
Create two separate security groups: one for the Network Load Balancer and another for the VPC endpoint.
**Load Balancer security group**
Create a security group with the following rules:
* **Inbound**: HTTPS (443) from your desired source (e.g., your corporate network, internet).
* **Outbound**: HTTPS (443) to the VPC Endpoint security group (to be created below).
**VPC Endpoint security group**
Create a security group with the following rules:
* **Inbound**: HTTPS (443) from the Load Balancer security group (created above).
* **Outbound**: All traffic (or as per your security requirements).
Note the security group IDs for both; you'll need them for the following configuration.
***
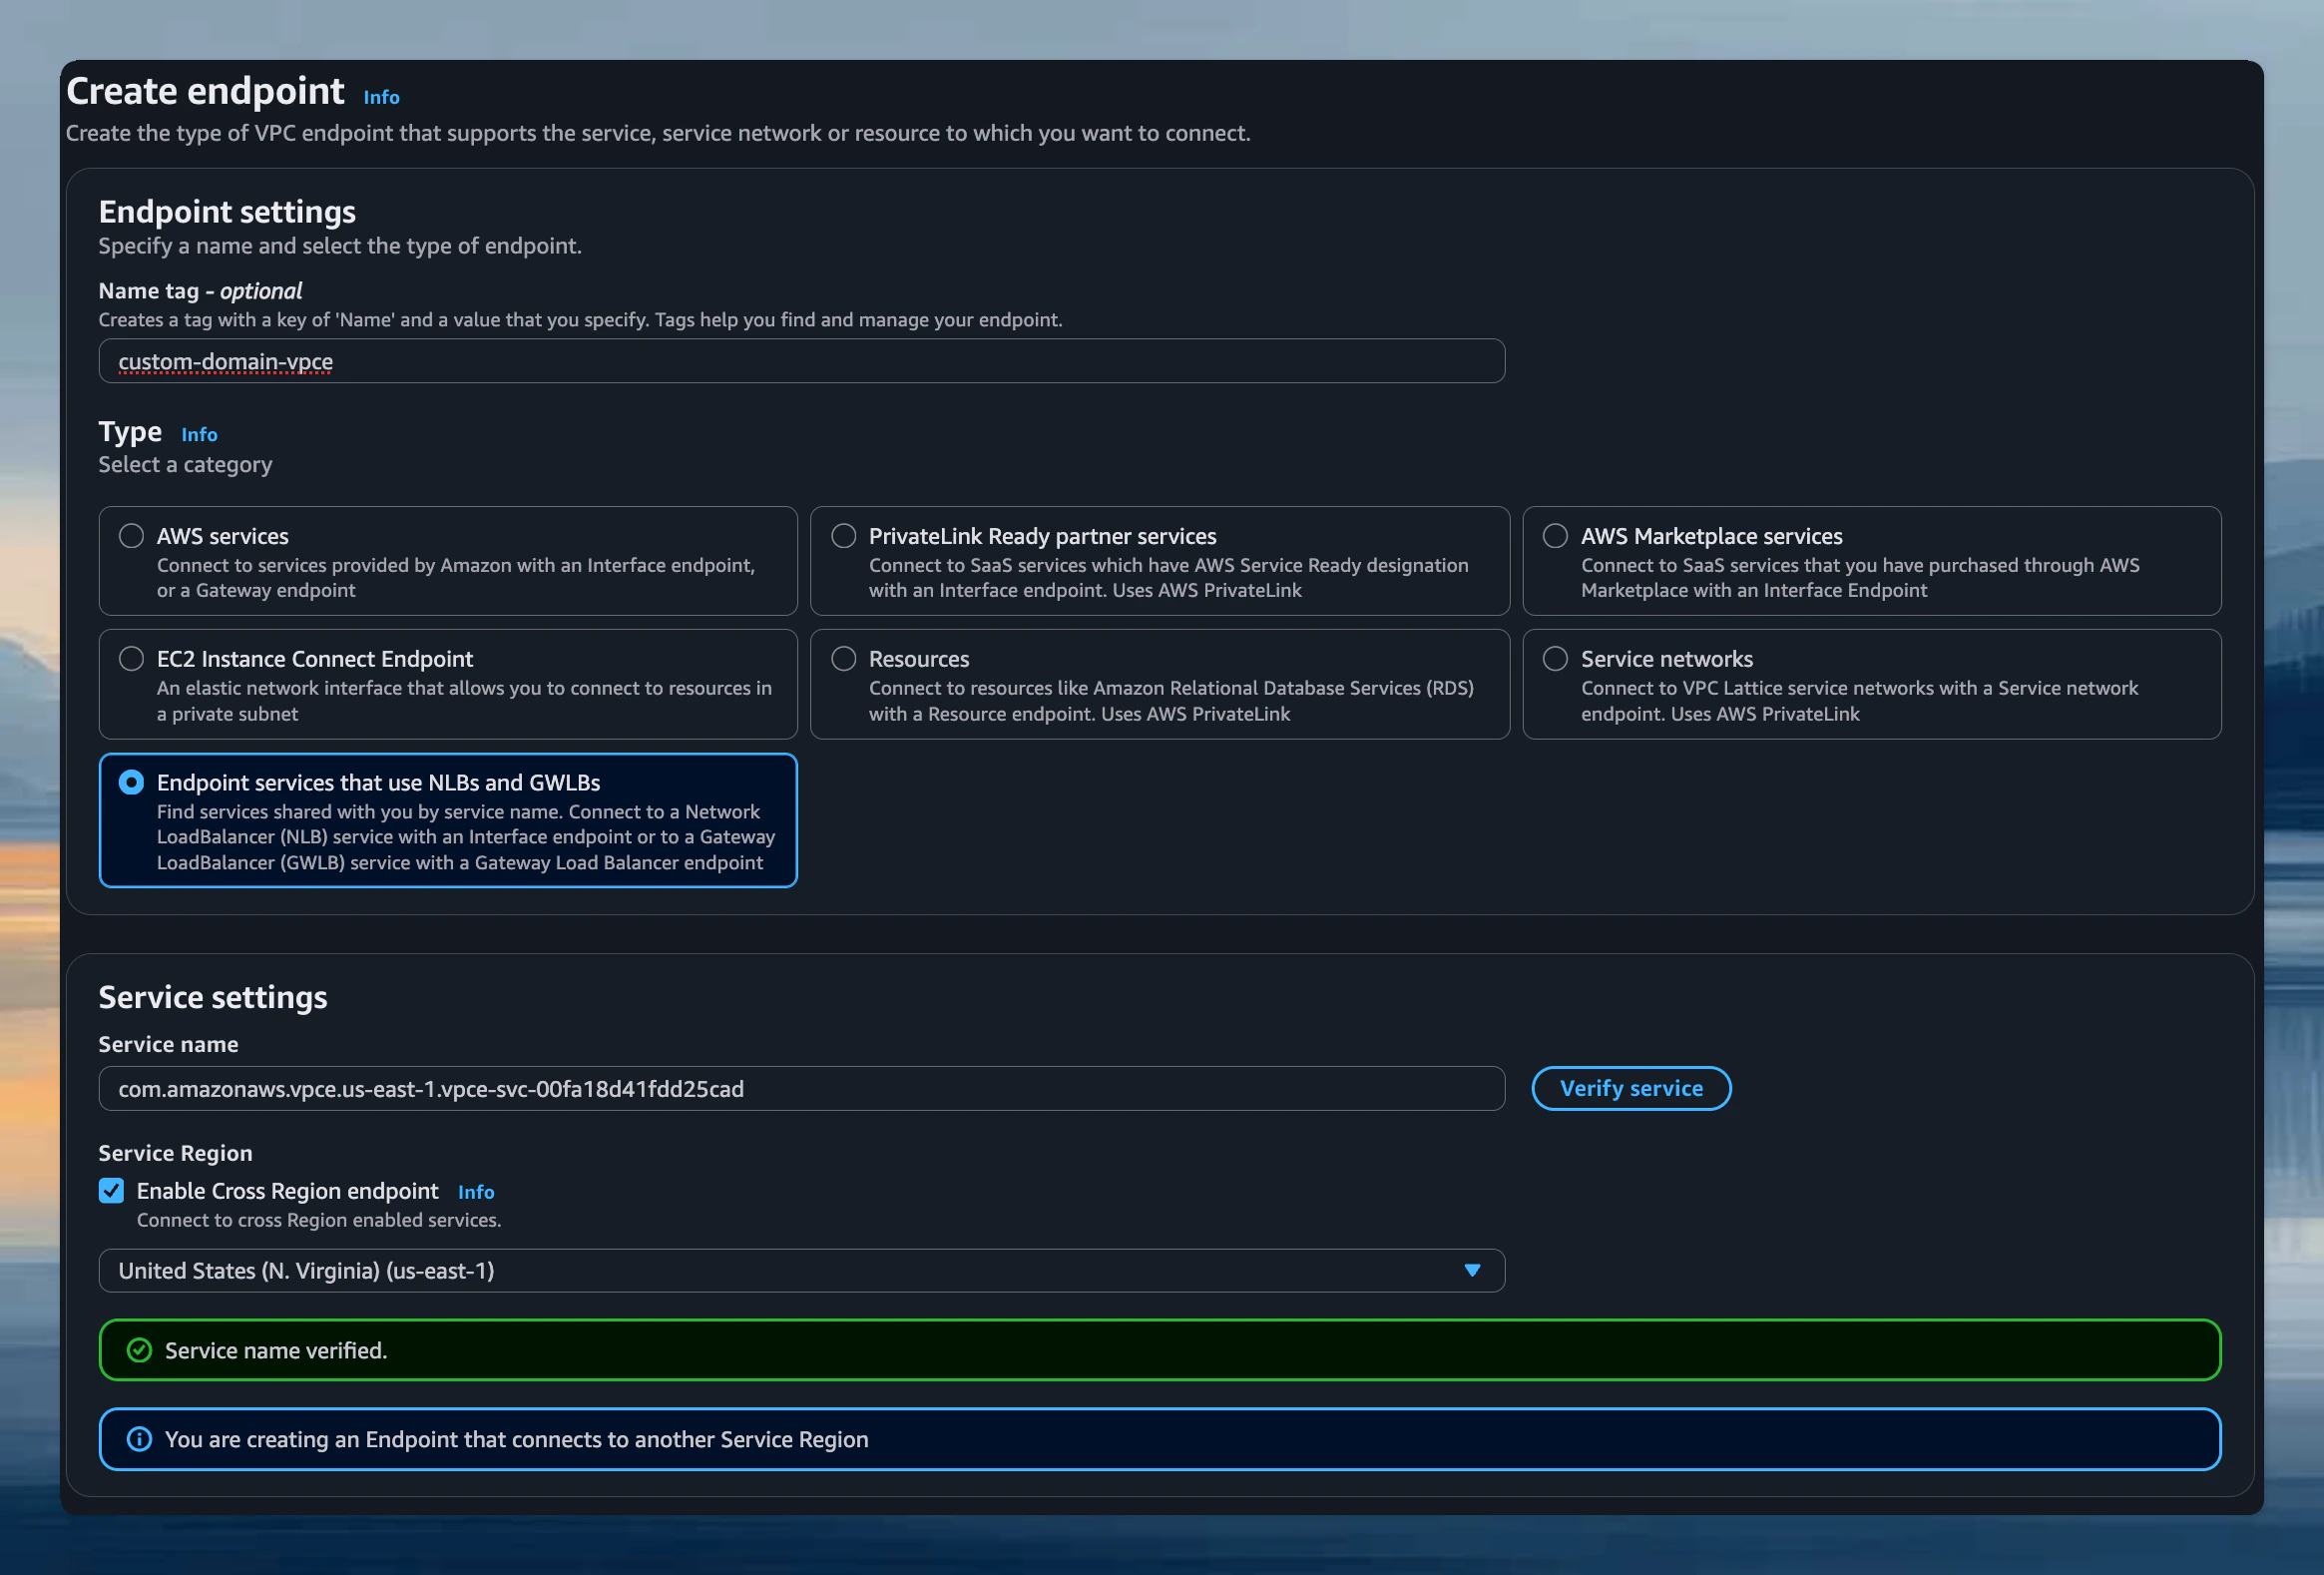
#### 2.3 Create VPC endpoint
Create a VPC Endpoint to connect to the Ona management plane service.
**Configuration**
1. **Navigate to VPC Console** → **Endpoints** → **Create Endpoint**
2. **Service Configuration**:
* **Service category**: Select `Endpoint services that use NLBs and GWLBs`.
* **Service name**: `com.amazonaws.vpce.us-east-1.vpce-svc-00fa18d41fdd25cad`.
* Click **Verify service**.
After registering your custom domain, you'll need to complete the cloud infrastructure setup below. **There is no automatic validation** - the configuration is verified only when requests are made through your custom domain.
## Step 2: Configure cloud infrastructure
Choose your cloud provider and follow the corresponding setup instructions.
Now that the domain is registered with Ona, you need to set up the AWS infrastructure to route traffic from your domain to the Ona management plane.
#### 2.1 Prepare your certificate
Ensure you have an AWS Certificate Manager (ACM) certificate that covers **both your custom domain and the VSCode subdomain**. This certificate will be used for TLS termination on the Load Balancer.
Your certificate must include both domains as Subject Alternative Names (SANs):
* `ona.example.com`
* `vscode.ona.example.com`
The certificate must be provisioned in the same AWS region where you'll create your Network Load Balancer.
If your certificate doesn't cover the VSCode subdomain, VS Code Browser integration will fail with certificate errors.
***
#### 2.2 Create security groups
Create two separate security groups: one for the Network Load Balancer and another for the VPC endpoint.
**Load Balancer security group**
Create a security group with the following rules:
* **Inbound**: HTTPS (443) from your desired source (e.g., your corporate network, internet).
* **Outbound**: HTTPS (443) to the VPC Endpoint security group (to be created below).
**VPC Endpoint security group**
Create a security group with the following rules:
* **Inbound**: HTTPS (443) from the Load Balancer security group (created above).
* **Outbound**: All traffic (or as per your security requirements).
Note the security group IDs for both; you'll need them for the following configuration.
***
#### 2.3 Create VPC endpoint
Create a VPC Endpoint to connect to the Ona management plane service.
**Configuration**
1. **Navigate to VPC Console** → **Endpoints** → **Create Endpoint**
2. **Service Configuration**:
* **Service category**: Select `Endpoint services that use NLBs and GWLBs`.
* **Service name**: `com.amazonaws.vpce.us-east-1.vpce-svc-00fa18d41fdd25cad`.
* Click **Verify service**.
 *Create VPC Endpoint*
> ⚠️ Important: If you are in a region other than `us-east-1`, you must:
>
> * Enable **cross-region VPC endpoint**.
> * Specify `us-east-1` as the service region.
> * The VPC endpoint service is available in the following Availability Zone IDs:
>
> ```
> use1-az1
> use1-az2
> ```
>
> Note: AWS maps Availability Zone names (e.g., `us-east-1a`, `us-east-1b`) differently per account, so the name shown in your console may vary. Use the **AZ ID** (e.g., `use1-az1`) to identify the correct zone. You can find the AZ ID mapping for your account in the **EC2 > Subnets** console or by running `aws ec2 describe-availability-zones --region us-east-1`.
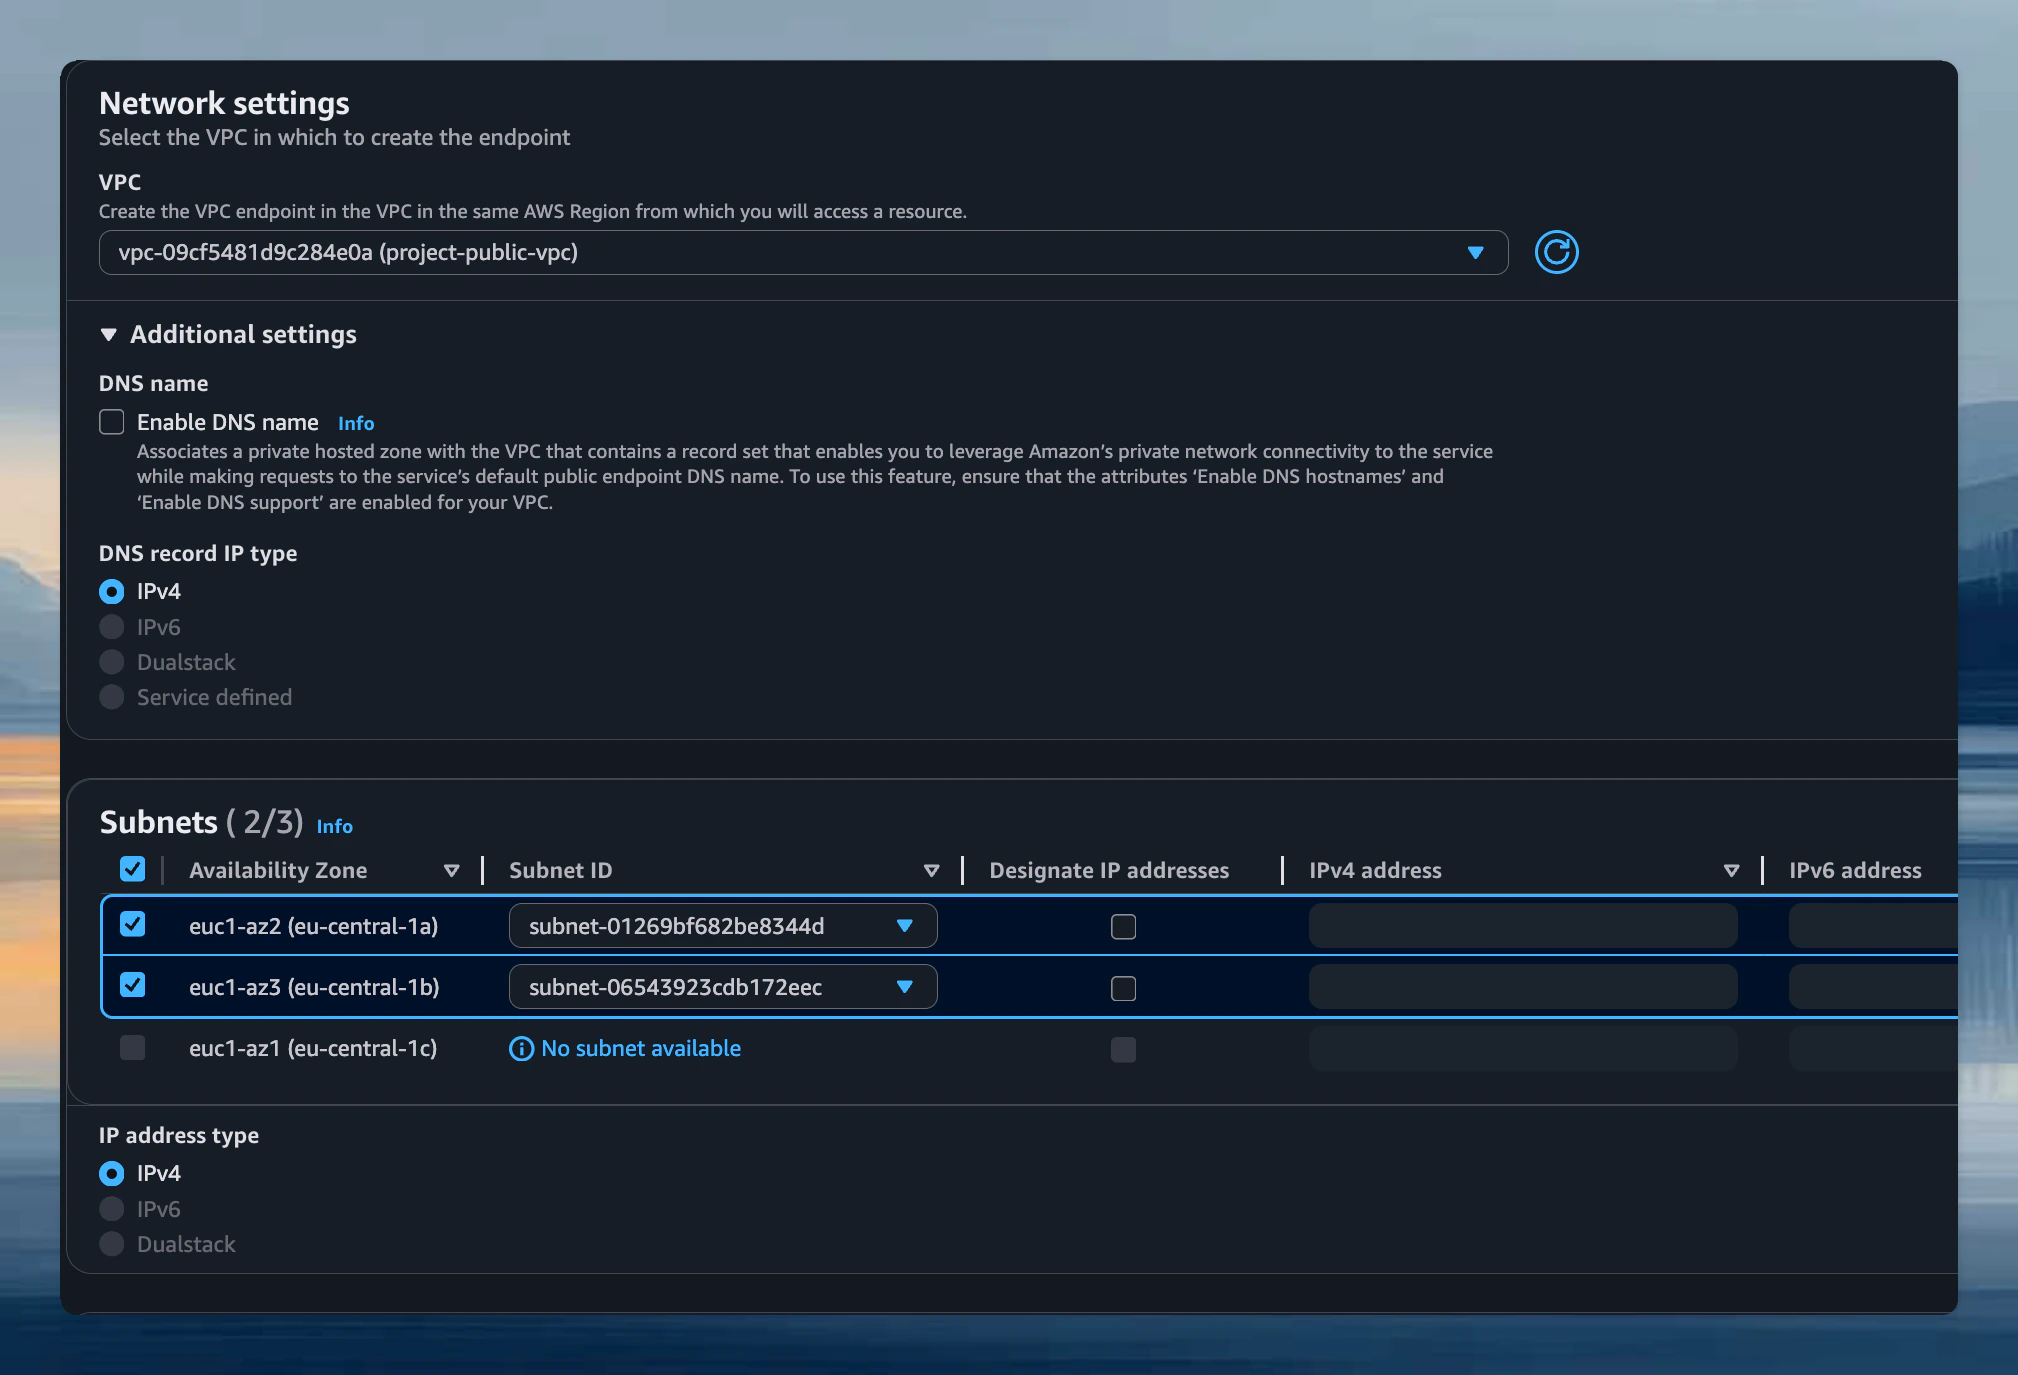
3. **VPC and Subnets**:
* Select the VPC and subnets where you want your VPC endpoint to be created.
* Select at least 2 Availability Zones for high availability.
*Create VPC Endpoint*
> ⚠️ Important: If you are in a region other than `us-east-1`, you must:
>
> * Enable **cross-region VPC endpoint**.
> * Specify `us-east-1` as the service region.
> * The VPC endpoint service is available in the following Availability Zone IDs:
>
> ```
> use1-az1
> use1-az2
> ```
>
> Note: AWS maps Availability Zone names (e.g., `us-east-1a`, `us-east-1b`) differently per account, so the name shown in your console may vary. Use the **AZ ID** (e.g., `use1-az1`) to identify the correct zone. You can find the AZ ID mapping for your account in the **EC2 > Subnets** console or by running `aws ec2 describe-availability-zones --region us-east-1`.
3. **VPC and Subnets**:
* Select the VPC and subnets where you want your VPC endpoint to be created.
* Select at least 2 Availability Zones for high availability.
 *VPC Endpoint Network Settings*
4. **Security Groups**:
* Select the security group created earlier for the VPC endpoint.
5. **Create Endpoint** and wait for it to become **Available**.
6. **Note the Private IP Addresses**:
* Once the VPC Endpoint is available, navigate to the **Subnets** tab.
* Note down all the private IP addresses assigned to the endpoint (one per subnet/AZ).
*VPC Endpoint Network Settings*
4. **Security Groups**:
* Select the security group created earlier for the VPC endpoint.
5. **Create Endpoint** and wait for it to become **Available**.
6. **Note the Private IP Addresses**:
* Once the VPC Endpoint is available, navigate to the **Subnets** tab.
* Note down all the private IP addresses assigned to the endpoint (one per subnet/AZ).
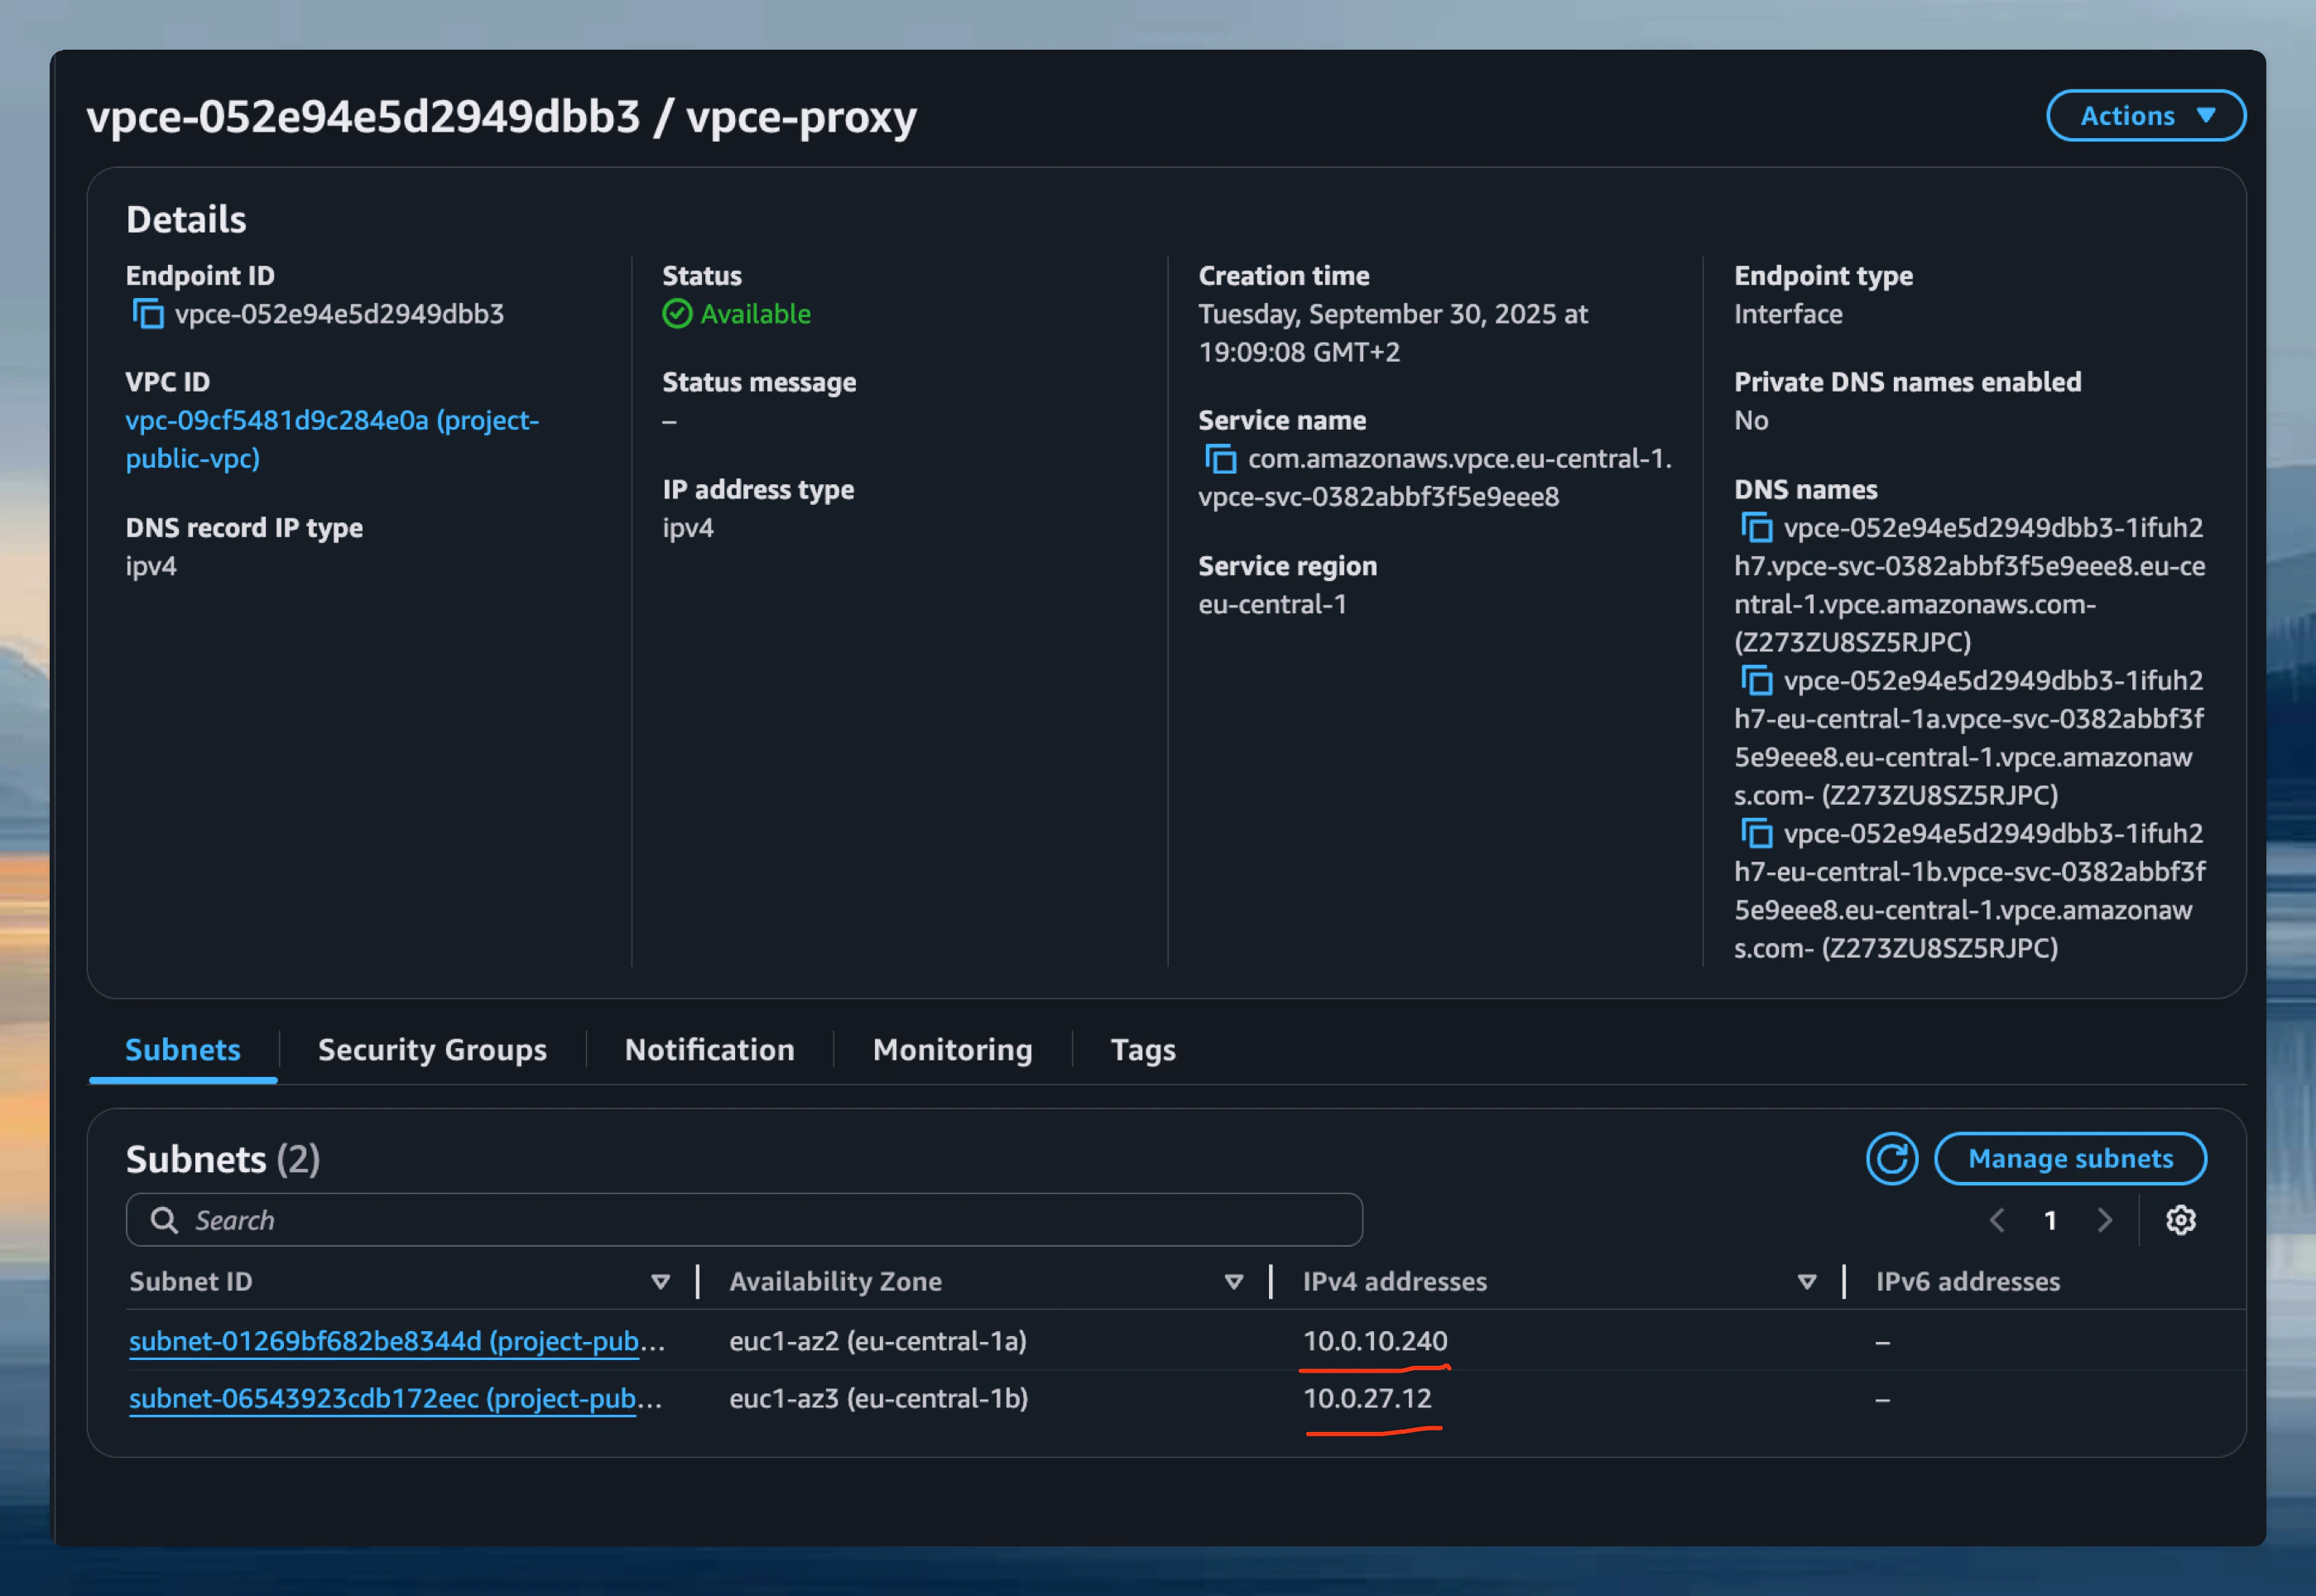 *VPC Endpoint Private IPs*
***
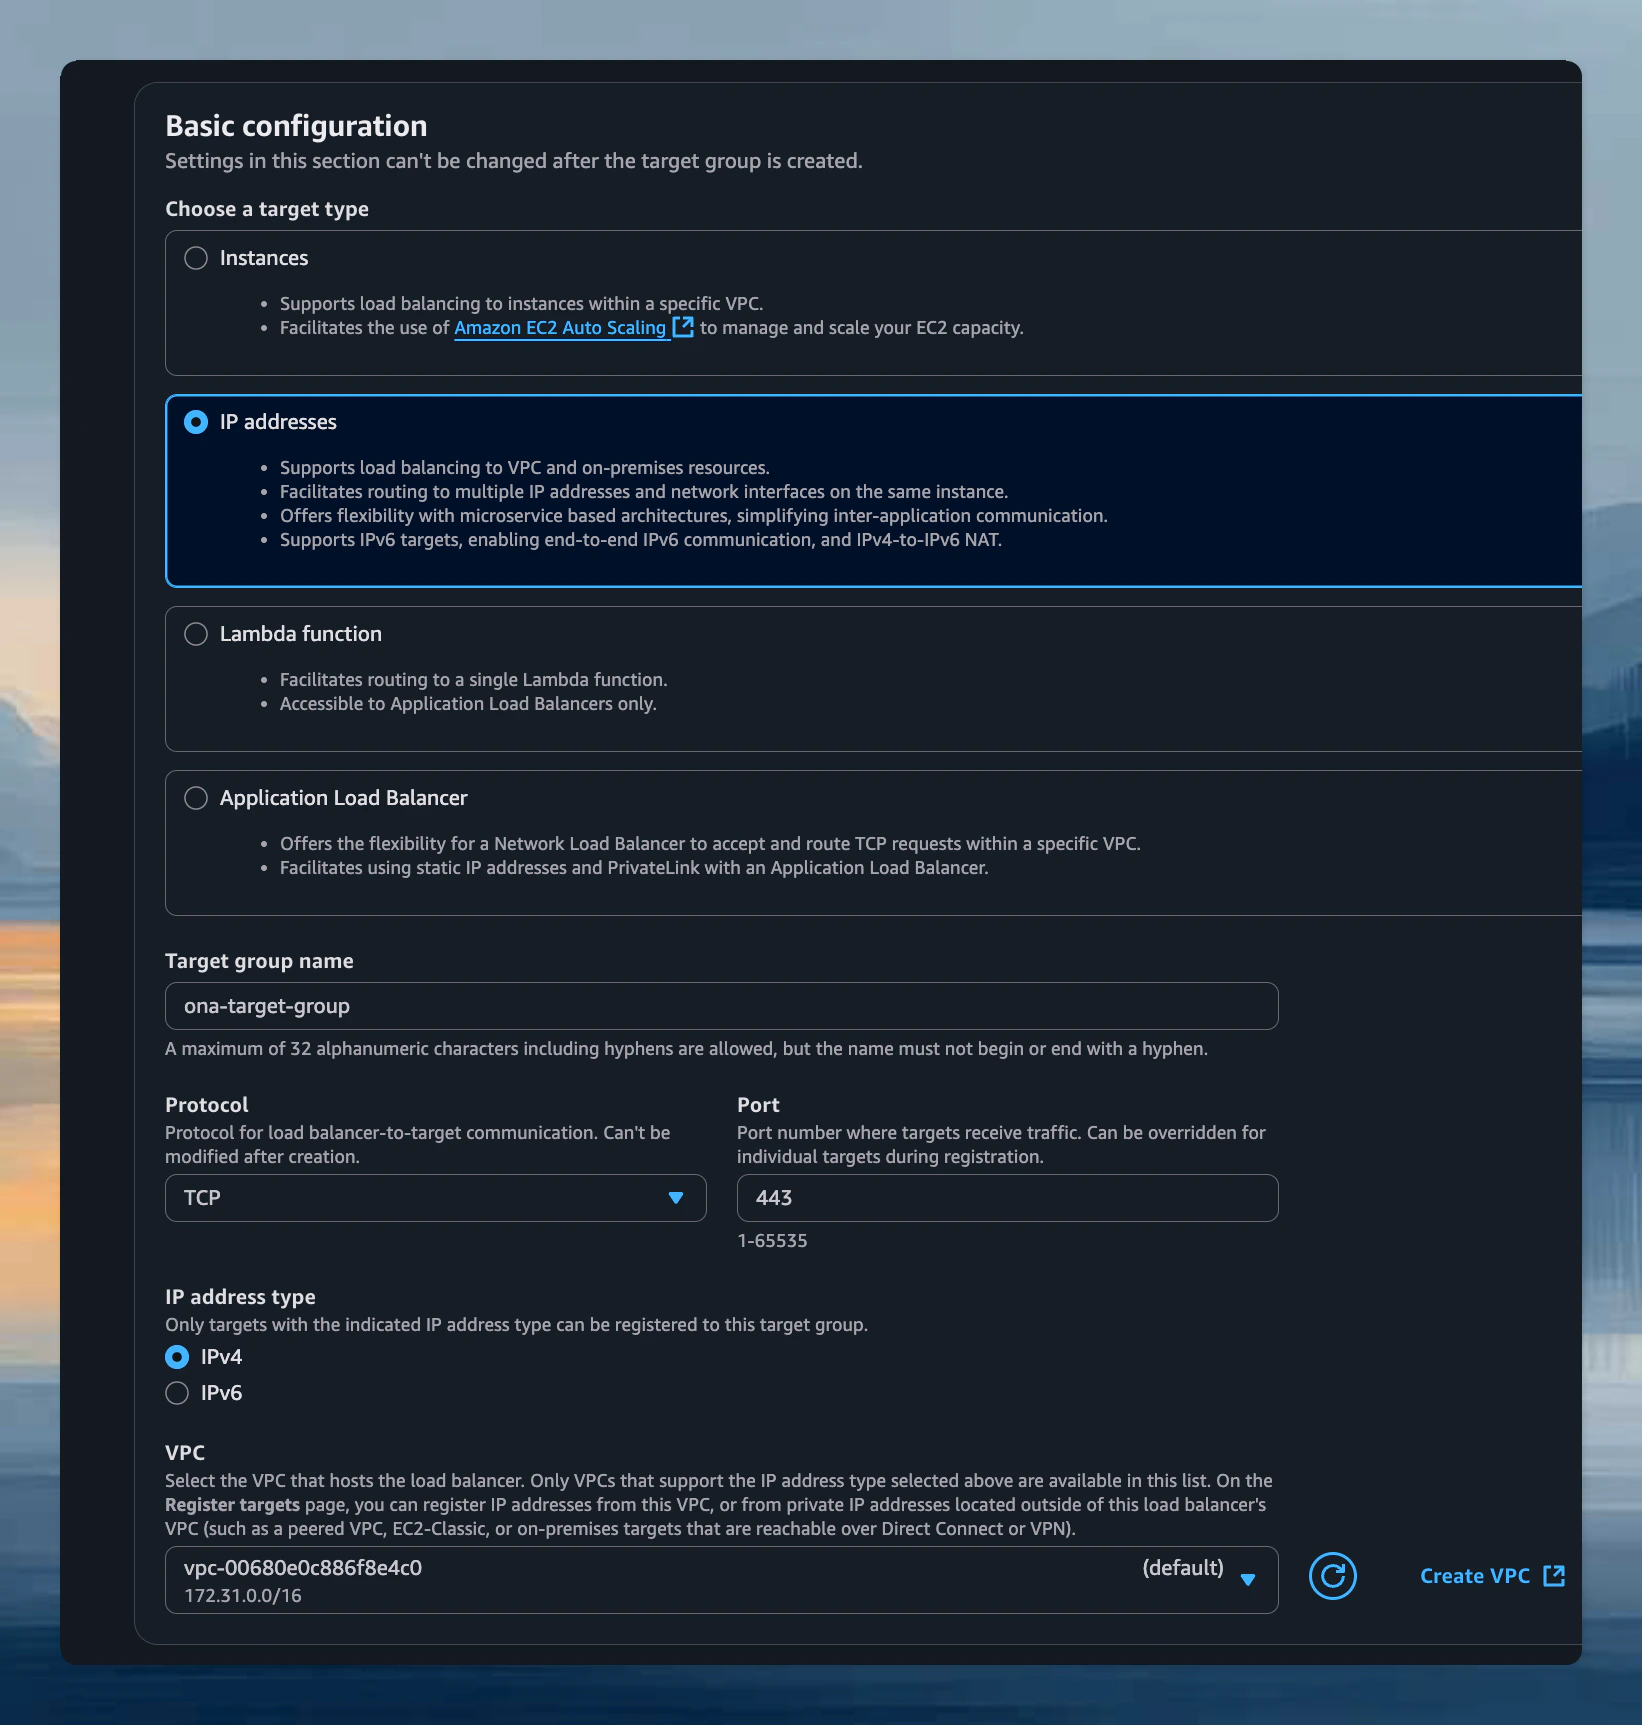
#### 2.4 Create target group
Create a Target Group to route traffic from the Load Balancer to the VPC Endpoint.
**Configuration**
1. **Navigate to EC2 Console** → **Target Groups** → **Create Target Group**
2. **Basic Configuration**:
* **Target type**: IP addresses.
* **Target group name**: Give it a descriptive name (e.g., `ona-vpce-targets`).
* **Protocol**: TCP.
* **Port**: 443.
* **VPC**: Select the same VPC.
*VPC Endpoint Private IPs*
***
#### 2.4 Create target group
Create a Target Group to route traffic from the Load Balancer to the VPC Endpoint.
**Configuration**
1. **Navigate to EC2 Console** → **Target Groups** → **Create Target Group**
2. **Basic Configuration**:
* **Target type**: IP addresses.
* **Target group name**: Give it a descriptive name (e.g., `ona-vpce-targets`).
* **Protocol**: TCP.
* **Port**: 443.
* **VPC**: Select the same VPC.
 *Target Group Configuration*
3. **Health Checks**:
* **Protocol**: TCP.
* Leave the default health check settings.
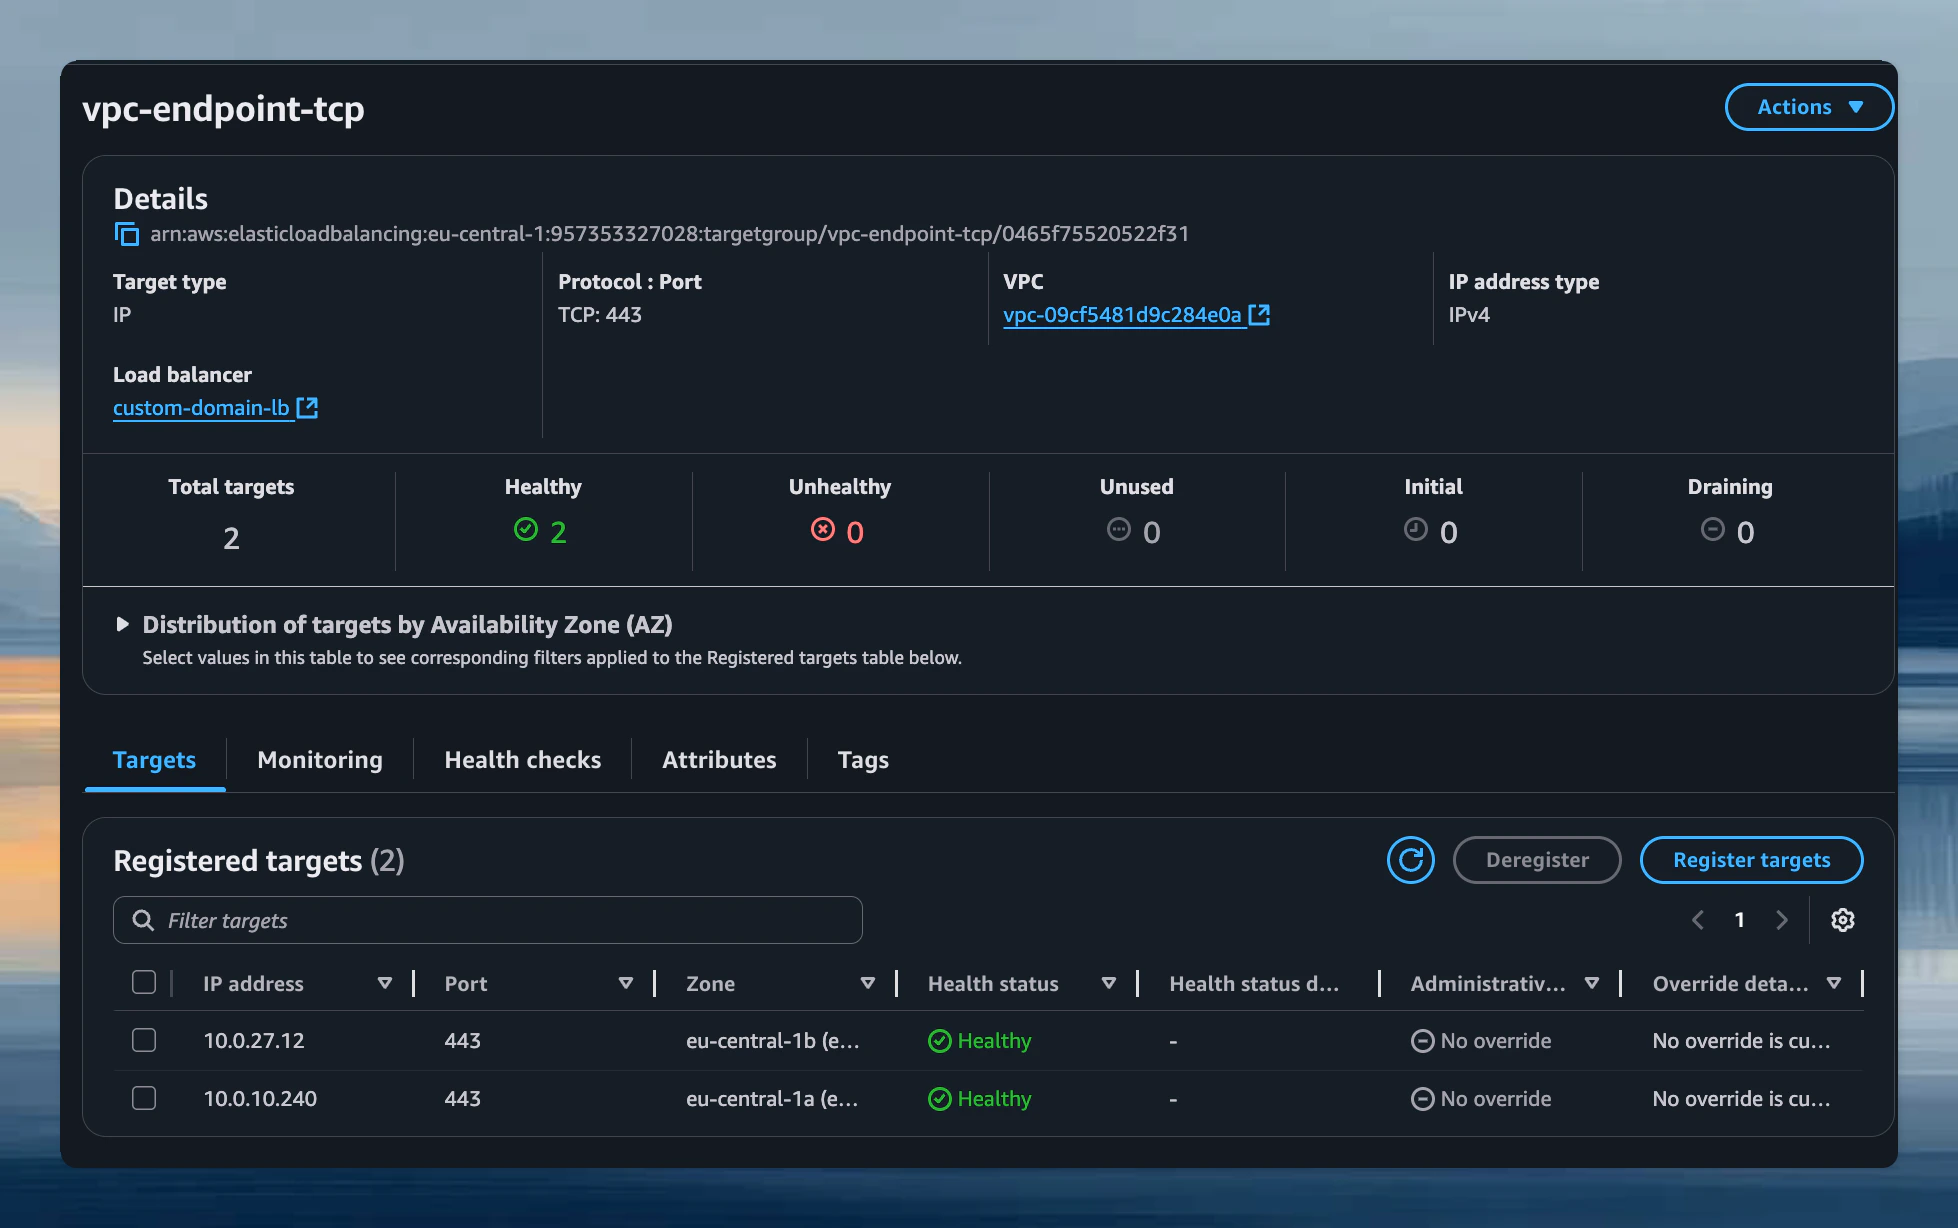
4. **Register Targets**:
* Click **Next**.
* Add each private IP address from the VPC Endpoint (noted in step 2.3).
* **Port**: 443 for each IP.
* Click **Include as pending below**.
* Click **Create target group**.
*Target Group Configuration*
3. **Health Checks**:
* **Protocol**: TCP.
* Leave the default health check settings.
4. **Register Targets**:
* Click **Next**.
* Add each private IP address from the VPC Endpoint (noted in step 2.3).
* **Port**: 443 for each IP.
* Click **Include as pending below**.
* Click **Create target group**.
 *Register Target IPs*
***
#### 2.5 Create Network Load Balancer
Create a Network Load Balancer (NLB) to handle incoming traffic.
**Configuration**
1. **Navigate to EC2 Console** → **Load Balancers** → **Create Load Balancer**
2. **Choose Load Balancer Type**:
* Select **Network Load Balancer**.
*Register Target IPs*
***
#### 2.5 Create Network Load Balancer
Create a Network Load Balancer (NLB) to handle incoming traffic.
**Configuration**
1. **Navigate to EC2 Console** → **Load Balancers** → **Create Load Balancer**
2. **Choose Load Balancer Type**:
* Select **Network Load Balancer**.
 *Choose Load Balancer Type*
3. **Configure Load Balancer**:
* **Name**: Give it a descriptive name (e.g., `ona-custom-domain-lb`).
* **Scheme**: Choose **Internal** or **Internet-facing** based on your access requirements.
* **IP address type**: IPv4.
* **VPC**: Select the VPC of your VPC endpoint.
* **Availability Zones**: Select the same Availability Zones chosen for the VPC endpoint (must be at least 2).
4. **Select the Security Group**:
*Choose Load Balancer Type*
3. **Configure Load Balancer**:
* **Name**: Give it a descriptive name (e.g., `ona-custom-domain-lb`).
* **Scheme**: Choose **Internal** or **Internet-facing** based on your access requirements.
* **IP address type**: IPv4.
* **VPC**: Select the VPC of your VPC endpoint.
* **Availability Zones**: Select the same Availability Zones chosen for the VPC endpoint (must be at least 2).
4. **Select the Security Group**:
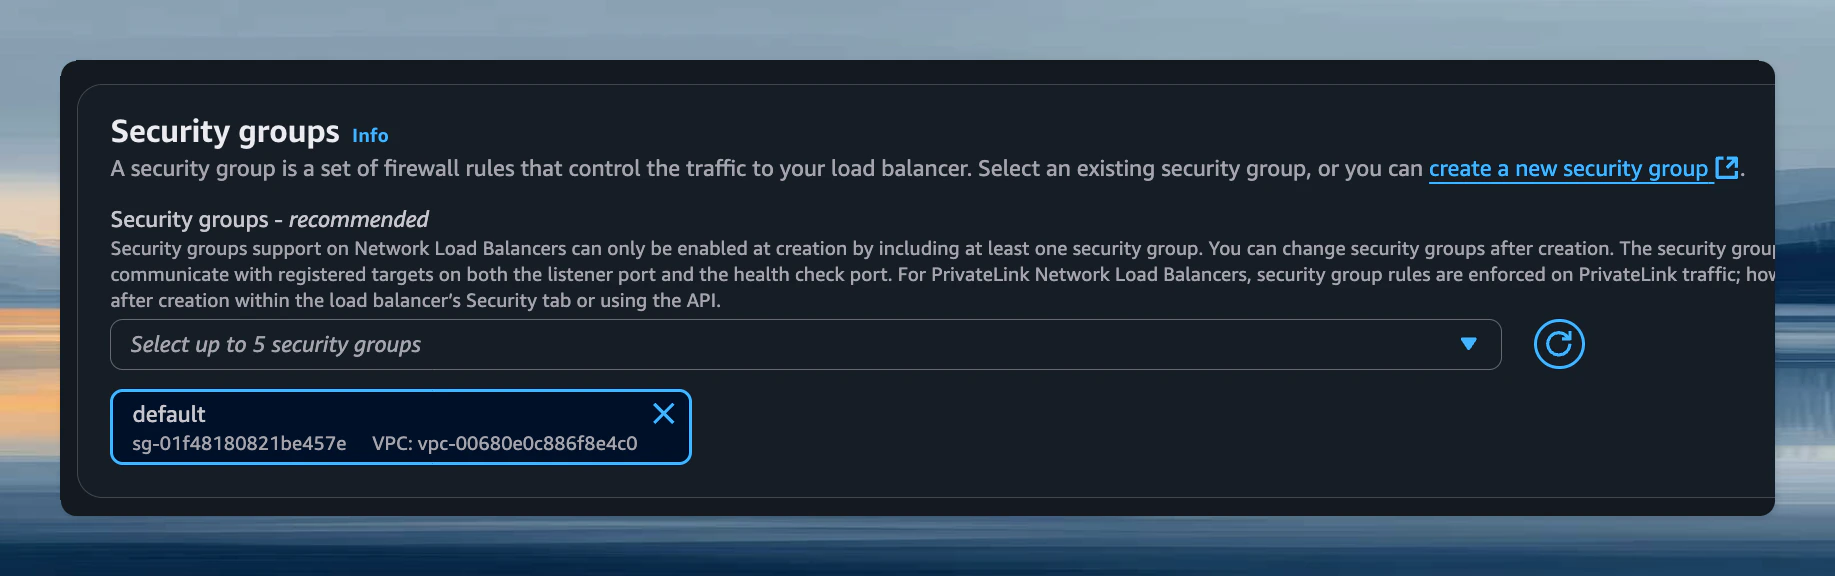 *Load Balancer Security Groups*
* Select the security group created earlier for the load balancer.
5. **Configure Listener**:
* **Protocol**: TLS.
* **Port**: 443.
* **Default action**: Forward to the target group created in step 2.4.
* **Default SSL/TLS server certificate**: Select the ACM certificate you prepared.
* ⚠️ **ALPN policy**: Select **HTTP/2 preferred** as the ALPN policy. This is important for optimal performance when connecting to the management plane.
*Load Balancer Security Groups*
* Select the security group created earlier for the load balancer.
5. **Configure Listener**:
* **Protocol**: TLS.
* **Port**: 443.
* **Default action**: Forward to the target group created in step 2.4.
* **Default SSL/TLS server certificate**: Select the ACM certificate you prepared.
* ⚠️ **ALPN policy**: Select **HTTP/2 preferred** as the ALPN policy. This is important for optimal performance when connecting to the management plane.
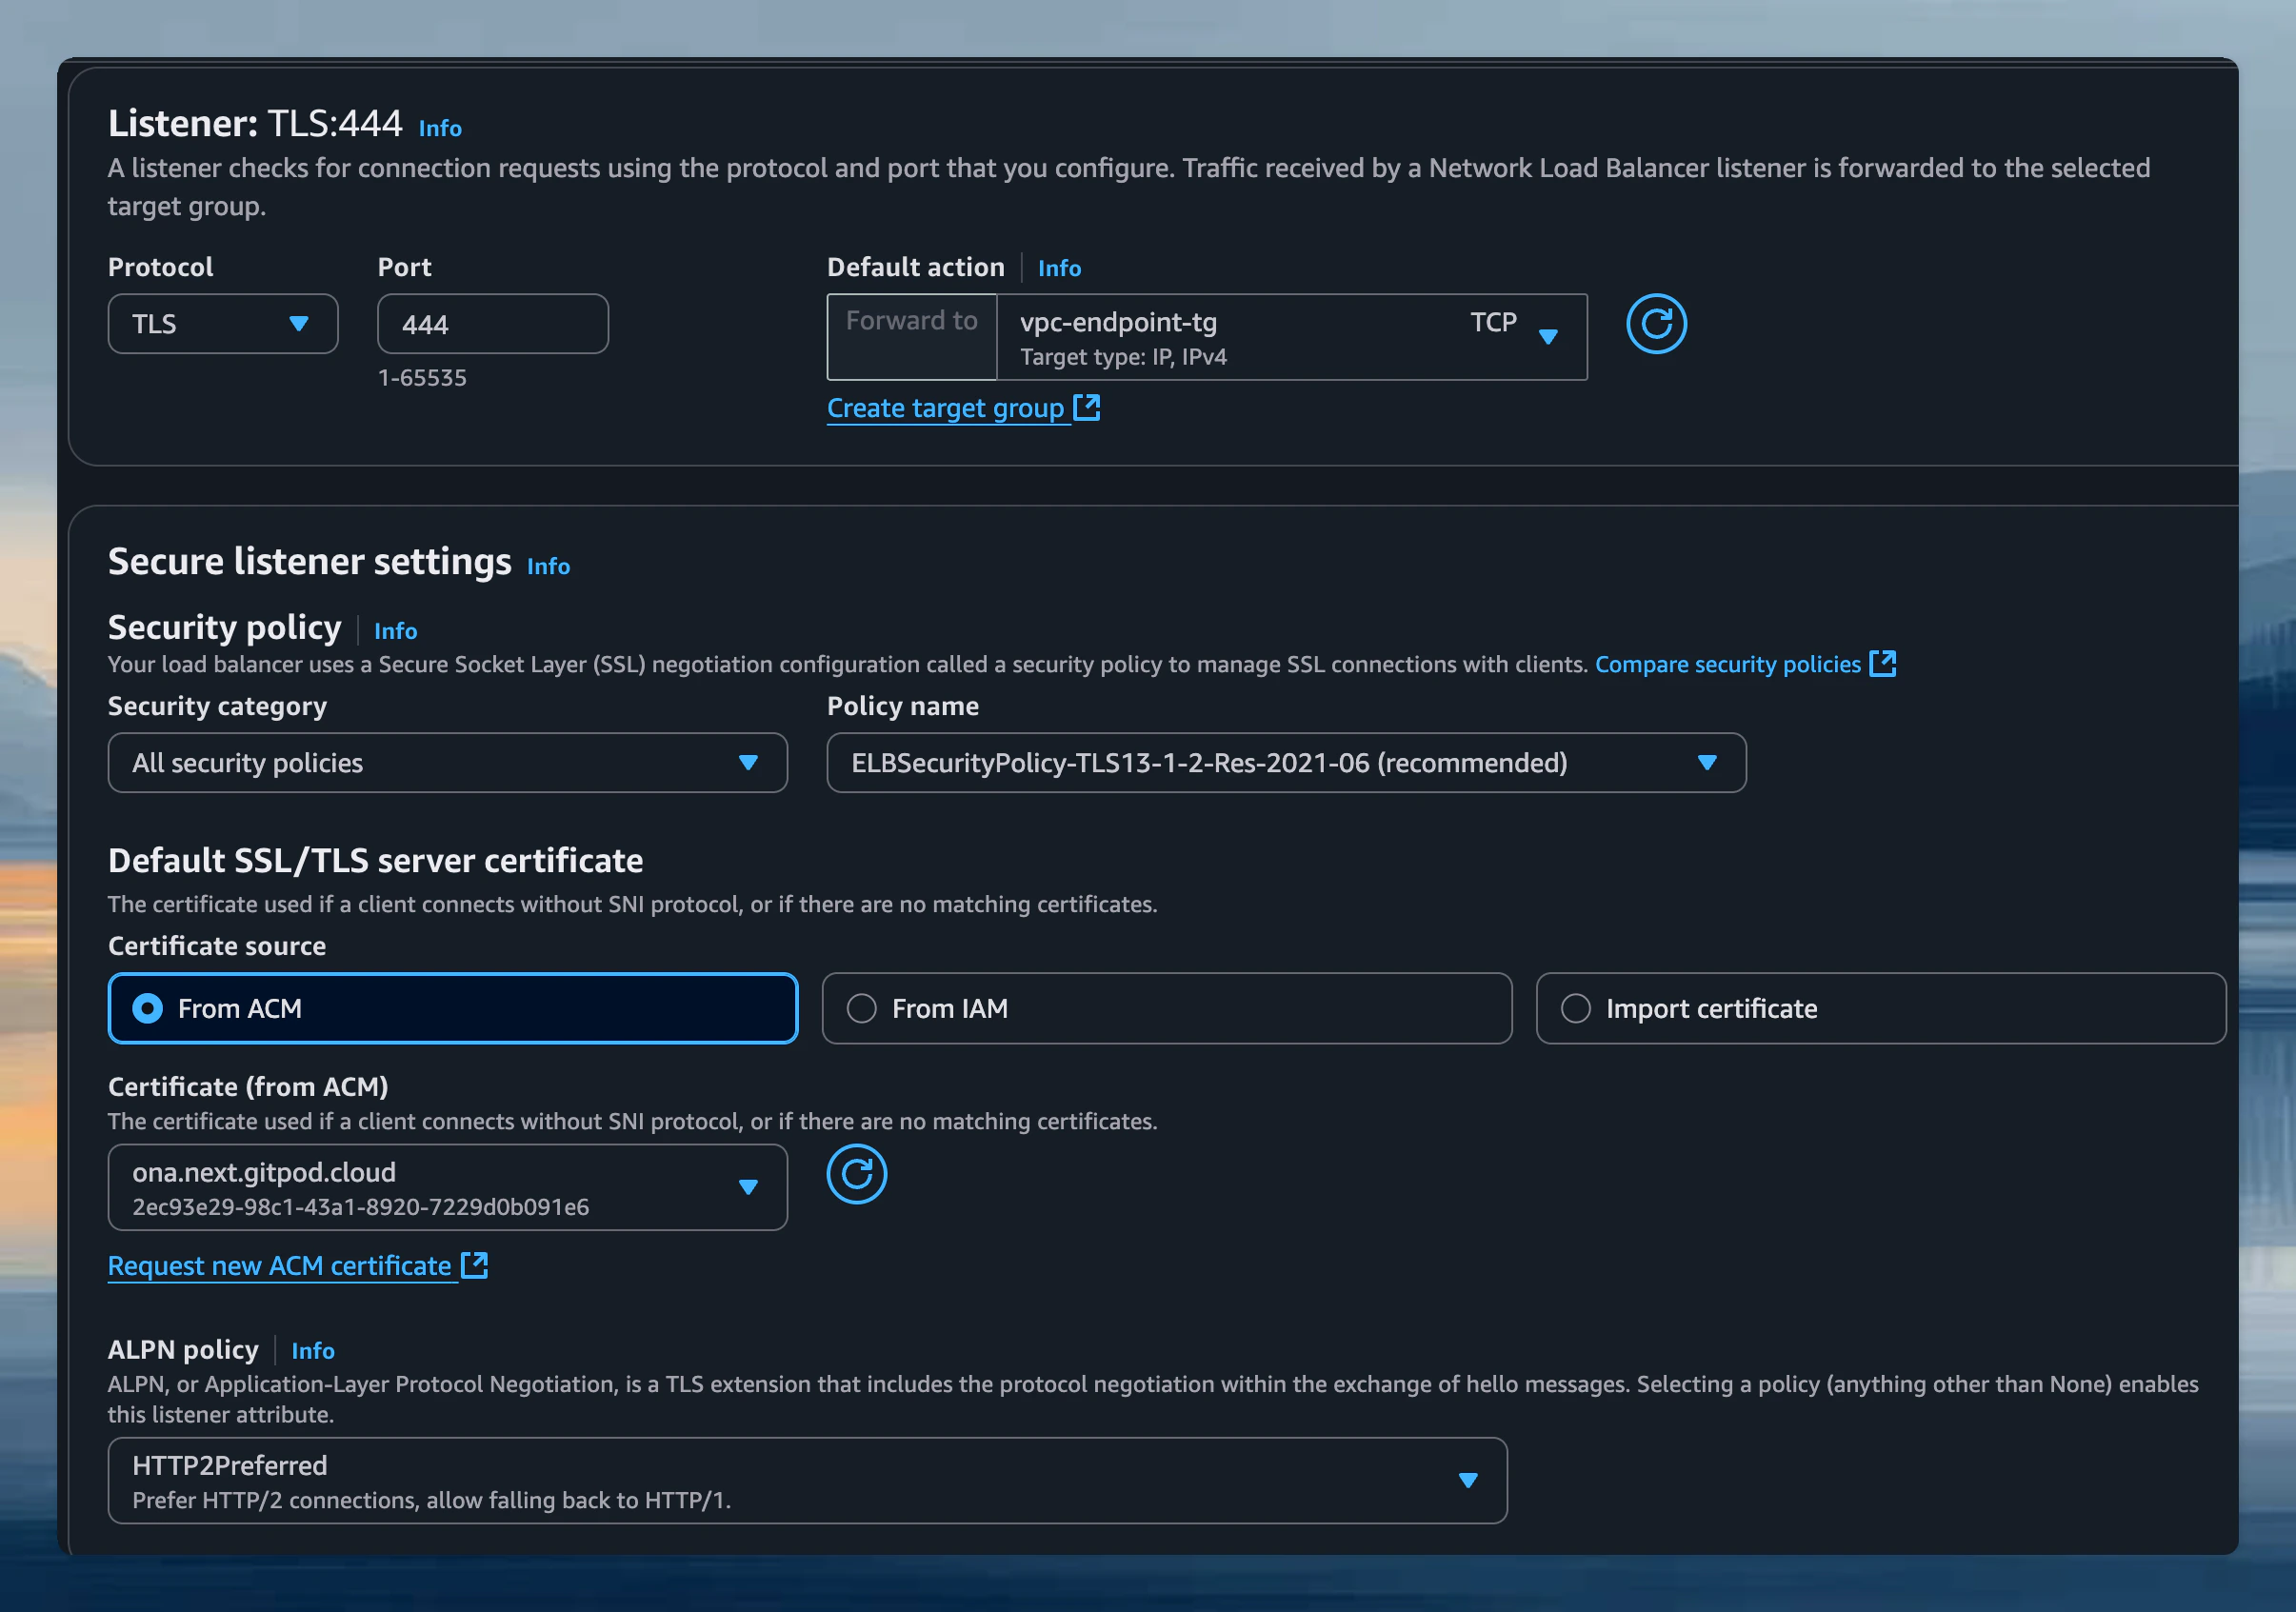 *Listener Configuration*
6. **Create Load Balancer**.
#### 2.6 Route runner API traffic privately
If you create AWS runners from your custom domain, the runner connects back to the management plane URL it receives during setup, for example `https://ona.example.com/api`. The custom-domain path already goes through your Network Load Balancer. To keep runner API traffic private, use split-horizon DNS so the runner VPC resolves your custom domain to the private load-balancer endpoint instead of the public DNS record or external proxy path.
Do not point `ona.example.com` directly at the custom-domain VPC endpoint. The AWS custom-domain endpoint expects traffic from your Network Load Balancer after TLS termination and Proxy Protocol v2 handling. A runner connects with HTTPS, so bypassing the load balancer would skip the certificate you manage in ACM and the request would not be handled correctly.
Use one of these DNS patterns:
* **Runner in the same VPC**: create a private DNS record for `ona.example.com` that aliases to the internal Network Load Balancer DNS name.
* **Runner in a different VPC**: associate the private hosted zone with the runner VPC, or configure Route 53 Resolver forwarding so the runner VPC resolves `ona.example.com` to the internal Network Load Balancer DNS name.
This keeps the same load-balancer and VPC endpoint architecture as user traffic, but makes runners reach it through private DNS and private routing. Ensure the runner subnets can route to the internal Network Load Balancer and that the load balancer security group allows HTTPS (443) from the runner security group or runner subnet CIDR.
Now that the domain is registered with Ona, you need to set up the GCP infrastructure to route traffic from your domain to the Ona management plane using Private Service Connect (PSC).
The GCP setup uses a Terraform module that creates:
* A Private Service Connect (PSC) endpoint to connect to the Ona service
* A regional HTTPS Load Balancer with TLS termination
* Automatic project ID header injection for authentication
#### 2.1 Prepare your certificate
Create a regional SSL certificate in GCP Certificate Manager. The certificate must be regional (not global) to work with the regional HTTPS load balancer.
Your certificate must cover **both your custom domain and the VSCode subdomain**:
* `ona.example.com`
* `vscode.ona.example.com`
```bash theme={null}
# Example: Create a GCP-managed regional certificate with both domains
gcloud certificate-manager certificates create ona-custom-domain-cert \
--domains="ona.example.com,vscode.ona.example.com" \
--location=us-central1
```
If your certificate doesn't cover the VSCode subdomain, VS Code Browser integration will fail with certificate errors.
Note the full certificate resource ID, which follows this format:
```
projects/YOUR_PROJECT_ID/locations/REGION/certificates/CERT_NAME
```
***
#### 2.2 Prepare network prerequisites
Ensure your VPC has the following:
1. **A routable subnet** with available IP addresses (recommended /28 CIDR minimum)
2. **A regional proxy-only subnet** - required for regional HTTPS load balancers
To create a proxy-only subnet if you don't have one:
```bash theme={null}
gcloud compute networks subnets create proxy-only-subnet \
--purpose=REGIONAL_MANAGED_PROXY \
--role=ACTIVE \
--region=us-central1 \
--network=YOUR_VPC_NAME \
--range=10.129.0.0/23
```
***
#### 2.3 Deploy with Terraform
Use the Ona GCP Terraform module to deploy the infrastructure.
The custom domain sub-module is available at: [gitpod-io/terraform-google-ona-runner](https://github.com/gitpod-io/terraform-google-ona-runner/tree/main/modules/custom-domain-client-infra)
**Configure authentication**
```bash theme={null}
gcloud auth application-default login
```
**Create a Terraform configuration**
Create a new directory for the custom domain configuration:
```bash theme={null}
mkdir ona-custom-domain && cd ona-custom-domain
```
Create a `main.tf` that references the custom domain sub-module and wires variables through:
```hcl theme={null}
# main.tf
module "custom_domain" {
source = "gitpod-io/ona-runner/google//modules/custom-domain-client-infra"
version = "~> 1.0"
project_id = var.project_id
region = var.region
vpc_network = var.vpc_network
subnet_name = var.subnet_name
domain_name = var.domain_name
certificate_manager_cert_id = var.certificate_manager_cert_id
load_balancer_type = var.load_balancer_type
}
```
Create a `variables.tf`:
```hcl theme={null}
# variables.tf
variable "project_id" {
type = string
}
variable "region" {
type = string
}
variable "vpc_network" {
type = string
}
variable "subnet_name" {
type = string
}
variable "domain_name" {
type = string
}
variable "certificate_manager_cert_id" {
type = string
}
variable "load_balancer_type" {
type = string
}
```
Create a `terraform.tfvars` and fill in your values:
```hcl theme={null}
# terraform.tfvars
project_id = "your-gcp-project-id"
region = "us-central1"
# Network Configuration
vpc_network = "default"
subnet_name = "default"
# Domain and SSL Configuration
domain_name = "ona.example.com"
certificate_manager_cert_id = "projects/your-gcp-project-id/locations/us-central1/certificates/ona-custom-domain-cert"
# Load Balancer Type: "internal" (private) or "external" (public)
load_balancer_type = "internal"
```
**Deploy the infrastructure**
```bash theme={null}
terraform init
terraform plan
terraform apply
```
**Verify the deployment**
```bash theme={null}
# Get the load balancer IP
terraform output load_balancer_ip
# Check PSC connection status
gcloud compute forwarding-rules describe gitpod-custom-domain-psc \
--region=us-central1 \
--format="get(pscConnectionStatus)"
```
The PSC connection status should show `ACCEPTED` once the connection is established.
***
## Step 3: Configure DNS
Point your custom domain to the Load Balancer.
You need to create **two DNS records**: one for the main custom domain and one for the VSCode subdomain.
1. **Get Load Balancer DNS Name**:
* In the Load Balancer details, copy the **DNS name**.
*Listener Configuration*
6. **Create Load Balancer**.
#### 2.6 Route runner API traffic privately
If you create AWS runners from your custom domain, the runner connects back to the management plane URL it receives during setup, for example `https://ona.example.com/api`. The custom-domain path already goes through your Network Load Balancer. To keep runner API traffic private, use split-horizon DNS so the runner VPC resolves your custom domain to the private load-balancer endpoint instead of the public DNS record or external proxy path.
Do not point `ona.example.com` directly at the custom-domain VPC endpoint. The AWS custom-domain endpoint expects traffic from your Network Load Balancer after TLS termination and Proxy Protocol v2 handling. A runner connects with HTTPS, so bypassing the load balancer would skip the certificate you manage in ACM and the request would not be handled correctly.
Use one of these DNS patterns:
* **Runner in the same VPC**: create a private DNS record for `ona.example.com` that aliases to the internal Network Load Balancer DNS name.
* **Runner in a different VPC**: associate the private hosted zone with the runner VPC, or configure Route 53 Resolver forwarding so the runner VPC resolves `ona.example.com` to the internal Network Load Balancer DNS name.
This keeps the same load-balancer and VPC endpoint architecture as user traffic, but makes runners reach it through private DNS and private routing. Ensure the runner subnets can route to the internal Network Load Balancer and that the load balancer security group allows HTTPS (443) from the runner security group or runner subnet CIDR.
Now that the domain is registered with Ona, you need to set up the GCP infrastructure to route traffic from your domain to the Ona management plane using Private Service Connect (PSC).
The GCP setup uses a Terraform module that creates:
* A Private Service Connect (PSC) endpoint to connect to the Ona service
* A regional HTTPS Load Balancer with TLS termination
* Automatic project ID header injection for authentication
#### 2.1 Prepare your certificate
Create a regional SSL certificate in GCP Certificate Manager. The certificate must be regional (not global) to work with the regional HTTPS load balancer.
Your certificate must cover **both your custom domain and the VSCode subdomain**:
* `ona.example.com`
* `vscode.ona.example.com`
```bash theme={null}
# Example: Create a GCP-managed regional certificate with both domains
gcloud certificate-manager certificates create ona-custom-domain-cert \
--domains="ona.example.com,vscode.ona.example.com" \
--location=us-central1
```
If your certificate doesn't cover the VSCode subdomain, VS Code Browser integration will fail with certificate errors.
Note the full certificate resource ID, which follows this format:
```
projects/YOUR_PROJECT_ID/locations/REGION/certificates/CERT_NAME
```
***
#### 2.2 Prepare network prerequisites
Ensure your VPC has the following:
1. **A routable subnet** with available IP addresses (recommended /28 CIDR minimum)
2. **A regional proxy-only subnet** - required for regional HTTPS load balancers
To create a proxy-only subnet if you don't have one:
```bash theme={null}
gcloud compute networks subnets create proxy-only-subnet \
--purpose=REGIONAL_MANAGED_PROXY \
--role=ACTIVE \
--region=us-central1 \
--network=YOUR_VPC_NAME \
--range=10.129.0.0/23
```
***
#### 2.3 Deploy with Terraform
Use the Ona GCP Terraform module to deploy the infrastructure.
The custom domain sub-module is available at: [gitpod-io/terraform-google-ona-runner](https://github.com/gitpod-io/terraform-google-ona-runner/tree/main/modules/custom-domain-client-infra)
**Configure authentication**
```bash theme={null}
gcloud auth application-default login
```
**Create a Terraform configuration**
Create a new directory for the custom domain configuration:
```bash theme={null}
mkdir ona-custom-domain && cd ona-custom-domain
```
Create a `main.tf` that references the custom domain sub-module and wires variables through:
```hcl theme={null}
# main.tf
module "custom_domain" {
source = "gitpod-io/ona-runner/google//modules/custom-domain-client-infra"
version = "~> 1.0"
project_id = var.project_id
region = var.region
vpc_network = var.vpc_network
subnet_name = var.subnet_name
domain_name = var.domain_name
certificate_manager_cert_id = var.certificate_manager_cert_id
load_balancer_type = var.load_balancer_type
}
```
Create a `variables.tf`:
```hcl theme={null}
# variables.tf
variable "project_id" {
type = string
}
variable "region" {
type = string
}
variable "vpc_network" {
type = string
}
variable "subnet_name" {
type = string
}
variable "domain_name" {
type = string
}
variable "certificate_manager_cert_id" {
type = string
}
variable "load_balancer_type" {
type = string
}
```
Create a `terraform.tfvars` and fill in your values:
```hcl theme={null}
# terraform.tfvars
project_id = "your-gcp-project-id"
region = "us-central1"
# Network Configuration
vpc_network = "default"
subnet_name = "default"
# Domain and SSL Configuration
domain_name = "ona.example.com"
certificate_manager_cert_id = "projects/your-gcp-project-id/locations/us-central1/certificates/ona-custom-domain-cert"
# Load Balancer Type: "internal" (private) or "external" (public)
load_balancer_type = "internal"
```
**Deploy the infrastructure**
```bash theme={null}
terraform init
terraform plan
terraform apply
```
**Verify the deployment**
```bash theme={null}
# Get the load balancer IP
terraform output load_balancer_ip
# Check PSC connection status
gcloud compute forwarding-rules describe gitpod-custom-domain-psc \
--region=us-central1 \
--format="get(pscConnectionStatus)"
```
The PSC connection status should show `ACCEPTED` once the connection is established.
***
## Step 3: Configure DNS
Point your custom domain to the Load Balancer.
You need to create **two DNS records**: one for the main custom domain and one for the VSCode subdomain.
1. **Get Load Balancer DNS Name**:
* In the Load Balancer details, copy the **DNS name**.
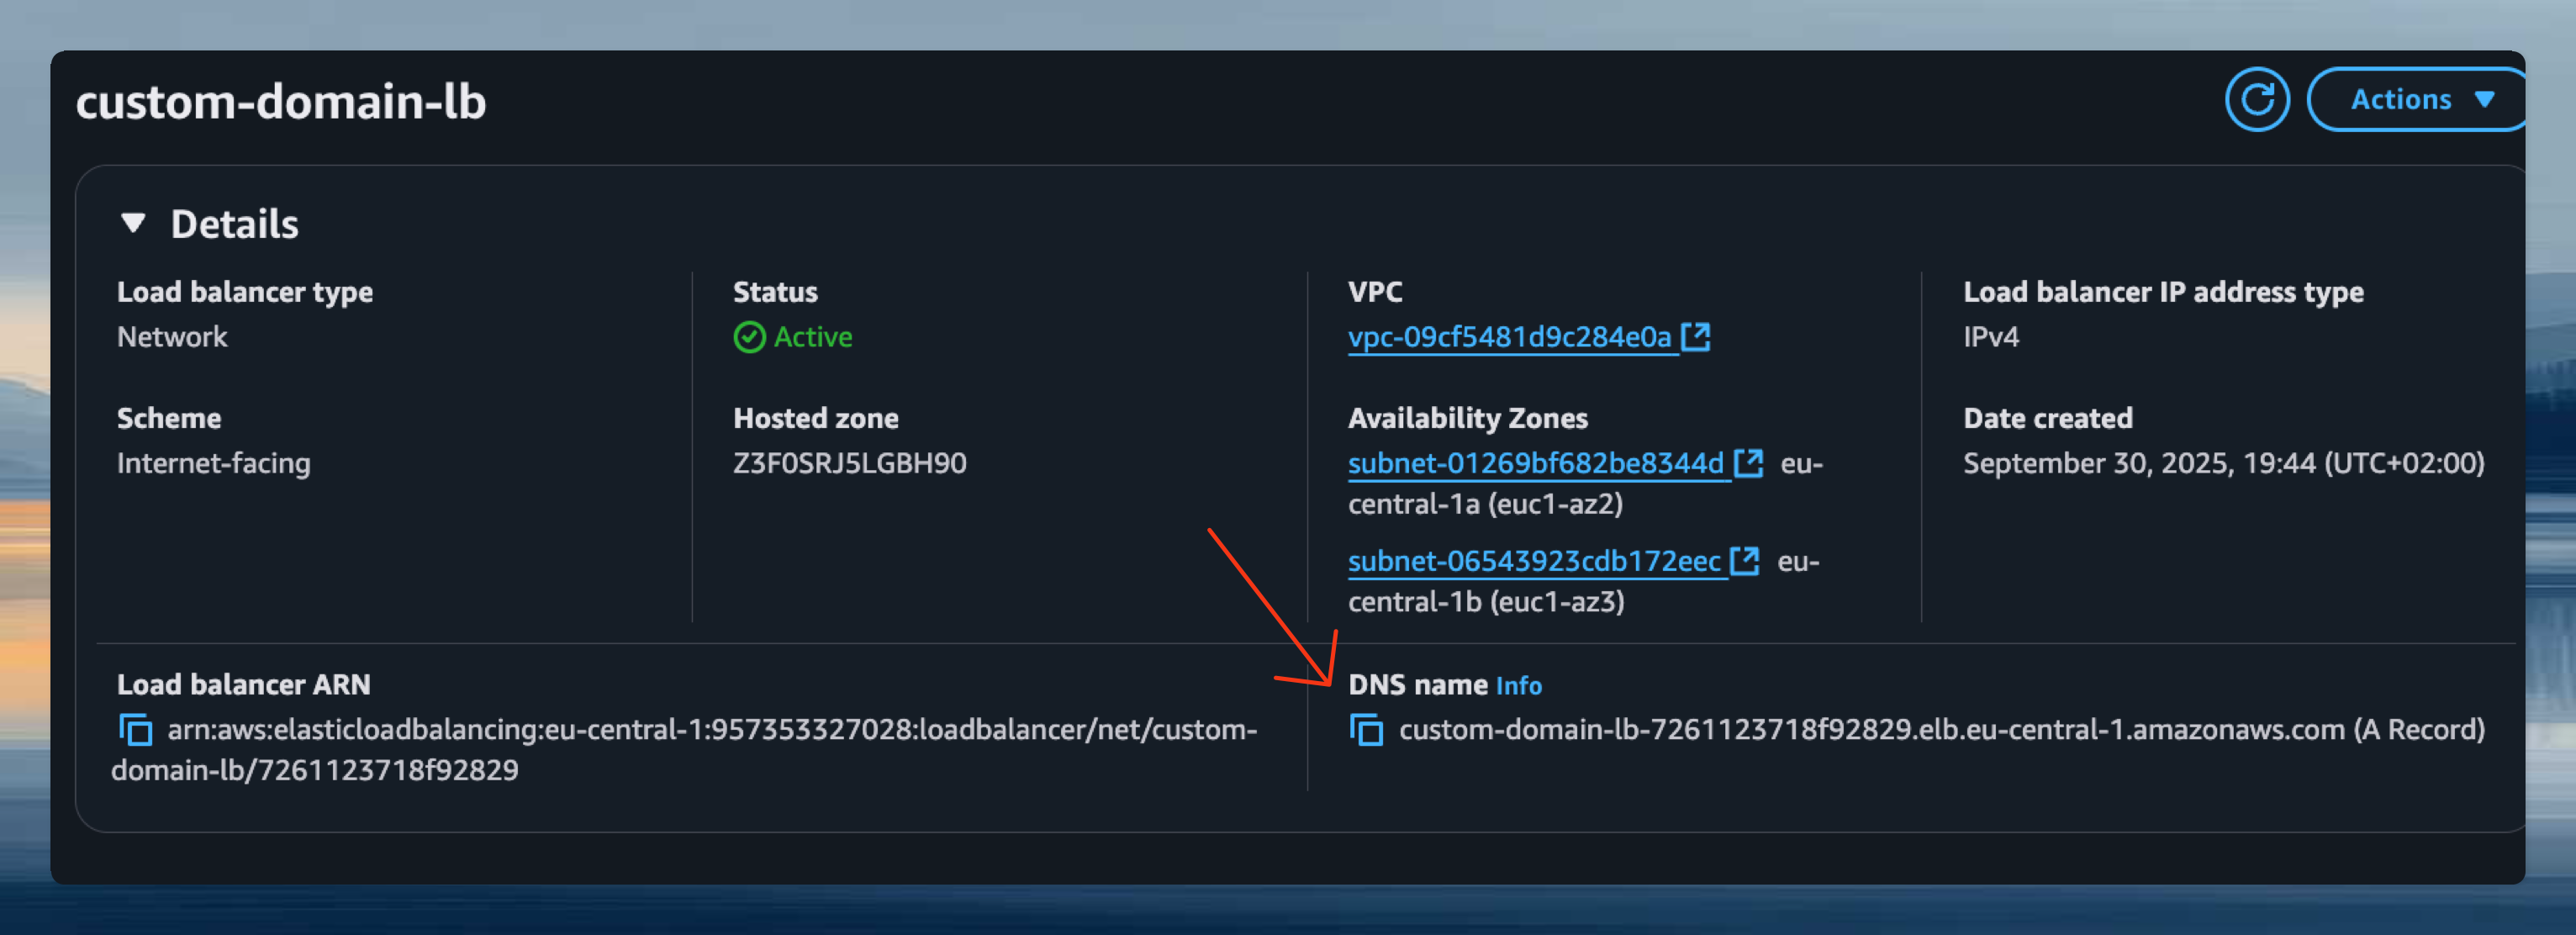 *Load Balancer DNS Name*
2. **Create DNS Records**:
* In your DNS provider (Route 53, Cloudflare, etc.), create the following records:
**Main custom domain record:**
* **Name**: Your custom domain (e.g., `ona.example.com`).
* **Type**: CNAME (or ALIAS if using Route 53).
* **Value**: Load Balancer DNS name.
**VSCode subdomain record:**
* **Name**: `vscode.` prefix with your custom domain (e.g., `vscode.ona.example.com`).
* **Type**: CNAME (or ALIAS if using Route 53).
* **Value**: Load Balancer DNS name (same as above).
> Note: Both DNS records must point to the same Load Balancer. The VSCode subdomain is required for VS Code Browser integration to work properly with your custom domain.
If the Network Load Balancer is internal, create these records in private DNS that is reachable from your users' networks and runner VPCs. Do not publish records that point users to an internal load balancer unless those users resolve DNS and route traffic from connected private networks.
Configure your DNS to point your domain to the load balancer IP address.
1. **Get Load Balancer IP**:
```bash theme={null}
terraform output load_balancer_ip
```
2. **Create DNS Record**:
* In your DNS provider, create an A record:
**Main custom domain record:**
* **Name**: Your custom domain (e.g., `ona.example.com`).
* **Type**: A.
* **Value**: Load Balancer IP address.
**Example using Cloud DNS:**
```bash theme={null}
gcloud dns record-sets create ona.example.com. \
--zone=your-dns-zone \
--type=A \
--ttl=300 \
--rrdatas="LOAD_BALANCER_IP"
```
> Note: If using an internal load balancer (`load_balancer_type = "internal"`), ensure your DNS is accessible from within your VPC or configure appropriate DNS forwarding. For external load balancers, use your public DNS provider.
***
## Step 4: Verify setup
1. Wait for DNS propagation (typically 5-15 minutes).
2. Access your custom domain in a browser: `https://ona.example.com`.
3. Verify that:
* TLS certificate is valid.
* You can reach the Ona management plane.
* No certificate warnings appear.
***
## Step 5: Update your SSO configuration
Update your SSO configuration to allow the new redirect URL using your custom domain:
```
https://ona.example.com/auth/oidc/callback
```
This step is **required** - authentication will fail without updating the SSO callback URL. See the [SSO documentation](/ona/sso/overview) for provider-specific instructions.
***
## Step 6: Recreate your runner
Destroy any existing runners and create a new one by accessing the management plane from your custom domain. Follow the usual runner creation setup for [AWS](/ona/runners/aws/setup) or for [GCP](/ona/runners/gcp/setup).
**Why this is necessary:** Runners are configured during creation with the management plane URL they should connect to. Existing runners will continue trying to connect via the old domain. Creating a new runner from your custom domain ensures it's configured with the correct endpoint and can properly communicate with the management plane through your infrastructure.
***
## Step 7: Enforce custom domain access (Optional)
After completing the setup, you can optionally enable a policy to require all users to access Ona exclusively through your custom domain:
1. Navigate to **Settings** → **Login & Identity** → **Login Configuration**.
2. Enable **Enforce custom domain access**.
When enabled:
* All users, including organization admins, will be blocked from accessing via the default domain (`app.gitpod.io`).
* This ensures all traffic goes through your controlled infrastructure.
Users who are currently logged in with an active session can continue using the default domain until their session expires. The enforcement only applies to new login attempts.
Before enabling this policy, verify that your custom domain setup is fully functional.
***
## Troubleshooting
If you cannot connect to your custom domain:
1. Verify DNS propagation using `dig` or `nslookup`.
2. Check that the Load Balancer is in an **Active** state.
3. Verify the target group or backend service shows healthy targets.
4. Ensure security group rules (AWS) or firewall rules (GCP) allow traffic from your source.
If you see certificate warnings:
1. Verify the ACM certificate covers **both** your main domain and the VSCode subdomain (`ona.example.com` and `vscode.ona.example.com`).
2. Check that the certificate is attached to the Load Balancer listener.
3. Ensure the certificate is valid and not expired.
4. If using VS Code Browser, verify the certificate includes both the main domain and the VSCode subdomain in its Subject Alternative Names (SANs).
1. Verify the Certificate Manager certificate covers your custom domain.
2. Ensure the certificate is regional (not global) and in the same region as your load balancer.
3. Check that the certificate is attached to the HTTPS proxy.
4. Verify the certificate status is `ACTIVE`:
```bash theme={null}
gcloud certificate-manager certificates describe YOUR_CERT_NAME \
--location=REGION
```
If you experience slow connections:
1. Verify the ALPN policy is set to **HTTP/2 preferred** on the Load Balancer listener.
2. Check that you've selected at least 2 Availability Zones for high availability.
3. Verify the VPC Endpoint is in an **Available** state.
1. Check the backend service health status:
```bash theme={null}
gcloud compute backend-services get-health ona-custom-domain-backend \
--region=REGION
```
2. Verify the PSC endpoint is in an **ACCEPTED** state.
3. Check load balancer logs for any errors.
**AWS Account ID mismatch**
If you see "AWS account ID mismatch" errors:
1. Verify the VPC Endpoint was created in the same AWS account registered in your custom domain settings.
2. Check the AWS account ID in **Settings** → **Login & Identity** → **Login Configuration** → **Domain & Access**.
3. If the account ID is incorrect, edit the custom domain configuration to update it.
**VPC Endpoint connection issues**
If you see "Failed to resolve VPC Endpoint ID" errors:
1. Verify the VPC Endpoint is connected to the Ona VPC Endpoint Service.
2. Check that **Proxy Protocol v2** is enabled on the Network Load Balancer target group.
3. Ensure the VPC Endpoint is in an **Available** state.
4. Verify the target group shows healthy targets.
**PSC connection not accepted**
If the PSC connection status is not `ACCEPTED`:
1. Check that your GCP project ID matches what was registered in the custom domain settings.
2. Contact [Ona support](https://ona.com/support) or reach out to your account executive to verify the service attachment is configured to accept connections from your project.
**GCP Project ID mismatch**
If you see "GCP project ID mismatch" errors:
1. Verify the infrastructure was deployed in the same GCP project registered in your custom domain settings.
2. Check the GCP project ID in **Settings** → **Login & Identity** → **Login Configuration** → **Domain & Access**.
3. The `X-Gitpod-GCP-ID` header is automatically injected by the load balancer - ensure the Terraform configuration uses the correct `project_id` variable.
**Proxy-only subnet issues**
If the load balancer fails to create:
1. Verify you have a regional proxy-only subnet in your VPC:
```bash theme={null}
gcloud compute networks subnets list \
--filter="purpose=REGIONAL_MANAGED_PROXY" \
--regions=REGION
```
2. If missing, create one as described in the prerequisites.
For additional support, Enterprise customers can reach out to your account manager.
*Load Balancer DNS Name*
2. **Create DNS Records**:
* In your DNS provider (Route 53, Cloudflare, etc.), create the following records:
**Main custom domain record:**
* **Name**: Your custom domain (e.g., `ona.example.com`).
* **Type**: CNAME (or ALIAS if using Route 53).
* **Value**: Load Balancer DNS name.
**VSCode subdomain record:**
* **Name**: `vscode.` prefix with your custom domain (e.g., `vscode.ona.example.com`).
* **Type**: CNAME (or ALIAS if using Route 53).
* **Value**: Load Balancer DNS name (same as above).
> Note: Both DNS records must point to the same Load Balancer. The VSCode subdomain is required for VS Code Browser integration to work properly with your custom domain.
If the Network Load Balancer is internal, create these records in private DNS that is reachable from your users' networks and runner VPCs. Do not publish records that point users to an internal load balancer unless those users resolve DNS and route traffic from connected private networks.
Configure your DNS to point your domain to the load balancer IP address.
1. **Get Load Balancer IP**:
```bash theme={null}
terraform output load_balancer_ip
```
2. **Create DNS Record**:
* In your DNS provider, create an A record:
**Main custom domain record:**
* **Name**: Your custom domain (e.g., `ona.example.com`).
* **Type**: A.
* **Value**: Load Balancer IP address.
**Example using Cloud DNS:**
```bash theme={null}
gcloud dns record-sets create ona.example.com. \
--zone=your-dns-zone \
--type=A \
--ttl=300 \
--rrdatas="LOAD_BALANCER_IP"
```
> Note: If using an internal load balancer (`load_balancer_type = "internal"`), ensure your DNS is accessible from within your VPC or configure appropriate DNS forwarding. For external load balancers, use your public DNS provider.
***
## Step 4: Verify setup
1. Wait for DNS propagation (typically 5-15 minutes).
2. Access your custom domain in a browser: `https://ona.example.com`.
3. Verify that:
* TLS certificate is valid.
* You can reach the Ona management plane.
* No certificate warnings appear.
***
## Step 5: Update your SSO configuration
Update your SSO configuration to allow the new redirect URL using your custom domain:
```
https://ona.example.com/auth/oidc/callback
```
This step is **required** - authentication will fail without updating the SSO callback URL. See the [SSO documentation](/ona/sso/overview) for provider-specific instructions.
***
## Step 6: Recreate your runner
Destroy any existing runners and create a new one by accessing the management plane from your custom domain. Follow the usual runner creation setup for [AWS](/ona/runners/aws/setup) or for [GCP](/ona/runners/gcp/setup).
**Why this is necessary:** Runners are configured during creation with the management plane URL they should connect to. Existing runners will continue trying to connect via the old domain. Creating a new runner from your custom domain ensures it's configured with the correct endpoint and can properly communicate with the management plane through your infrastructure.
***
## Step 7: Enforce custom domain access (Optional)
After completing the setup, you can optionally enable a policy to require all users to access Ona exclusively through your custom domain:
1. Navigate to **Settings** → **Login & Identity** → **Login Configuration**.
2. Enable **Enforce custom domain access**.
When enabled:
* All users, including organization admins, will be blocked from accessing via the default domain (`app.gitpod.io`).
* This ensures all traffic goes through your controlled infrastructure.
Users who are currently logged in with an active session can continue using the default domain until their session expires. The enforcement only applies to new login attempts.
Before enabling this policy, verify that your custom domain setup is fully functional.
***
## Troubleshooting
If you cannot connect to your custom domain:
1. Verify DNS propagation using `dig` or `nslookup`.
2. Check that the Load Balancer is in an **Active** state.
3. Verify the target group or backend service shows healthy targets.
4. Ensure security group rules (AWS) or firewall rules (GCP) allow traffic from your source.
If you see certificate warnings:
1. Verify the ACM certificate covers **both** your main domain and the VSCode subdomain (`ona.example.com` and `vscode.ona.example.com`).
2. Check that the certificate is attached to the Load Balancer listener.
3. Ensure the certificate is valid and not expired.
4. If using VS Code Browser, verify the certificate includes both the main domain and the VSCode subdomain in its Subject Alternative Names (SANs).
1. Verify the Certificate Manager certificate covers your custom domain.
2. Ensure the certificate is regional (not global) and in the same region as your load balancer.
3. Check that the certificate is attached to the HTTPS proxy.
4. Verify the certificate status is `ACTIVE`:
```bash theme={null}
gcloud certificate-manager certificates describe YOUR_CERT_NAME \
--location=REGION
```
If you experience slow connections:
1. Verify the ALPN policy is set to **HTTP/2 preferred** on the Load Balancer listener.
2. Check that you've selected at least 2 Availability Zones for high availability.
3. Verify the VPC Endpoint is in an **Available** state.
1. Check the backend service health status:
```bash theme={null}
gcloud compute backend-services get-health ona-custom-domain-backend \
--region=REGION
```
2. Verify the PSC endpoint is in an **ACCEPTED** state.
3. Check load balancer logs for any errors.
**AWS Account ID mismatch**
If you see "AWS account ID mismatch" errors:
1. Verify the VPC Endpoint was created in the same AWS account registered in your custom domain settings.
2. Check the AWS account ID in **Settings** → **Login & Identity** → **Login Configuration** → **Domain & Access**.
3. If the account ID is incorrect, edit the custom domain configuration to update it.
**VPC Endpoint connection issues**
If you see "Failed to resolve VPC Endpoint ID" errors:
1. Verify the VPC Endpoint is connected to the Ona VPC Endpoint Service.
2. Check that **Proxy Protocol v2** is enabled on the Network Load Balancer target group.
3. Ensure the VPC Endpoint is in an **Available** state.
4. Verify the target group shows healthy targets.
**PSC connection not accepted**
If the PSC connection status is not `ACCEPTED`:
1. Check that your GCP project ID matches what was registered in the custom domain settings.
2. Contact [Ona support](https://ona.com/support) or reach out to your account executive to verify the service attachment is configured to accept connections from your project.
**GCP Project ID mismatch**
If you see "GCP project ID mismatch" errors:
1. Verify the infrastructure was deployed in the same GCP project registered in your custom domain settings.
2. Check the GCP project ID in **Settings** → **Login & Identity** → **Login Configuration** → **Domain & Access**.
3. The `X-Gitpod-GCP-ID` header is automatically injected by the load balancer - ensure the Terraform configuration uses the correct `project_id` variable.
**Proxy-only subnet issues**
If the load balancer fails to create:
1. Verify you have a regional proxy-only subnet in your VPC:
```bash theme={null}
gcloud compute networks subnets list \
--filter="purpose=REGIONAL_MANAGED_PROXY" \
--regions=REGION
```
2. If missing, create one as described in the prerequisites.
For additional support, Enterprise customers can reach out to your account manager.