> ## Documentation Index
> Fetch the complete documentation index at: https://ona.com/docs/llms.txt
> Use this file to discover all available pages before exploring further.
# Project visibility
When you create a project, you become its admin. Default visibility depends on your organization's tier:
* **Enterprise tier**: projects are visible to admins only by default, until access is granted to specific groups or users via the Share dialog
* **All other tiers**: projects are shared with the entire organization by default
On the Enterprise tier, the Share dialog also lets you grant access to specific groups and individual users. For more on this, see [Sharing resources](/ona/organizations/sharing-resources).
To give a team admin access to **all** projects in the organization, assign the [Projects Admin](/ona/organizations/organization-roles) role to their group.
## What visibility controls
Project visibility controls who can discover a project in the UI and who can use it to create environments. It does not change who can access the underlying repository outside Ona, and it does not hide a project from organization admins.
In practice, visibility answers three questions:
* who can see the project
* who can create environments from it
* whether the project is broadly available or limited to a smaller team
## Change visibility
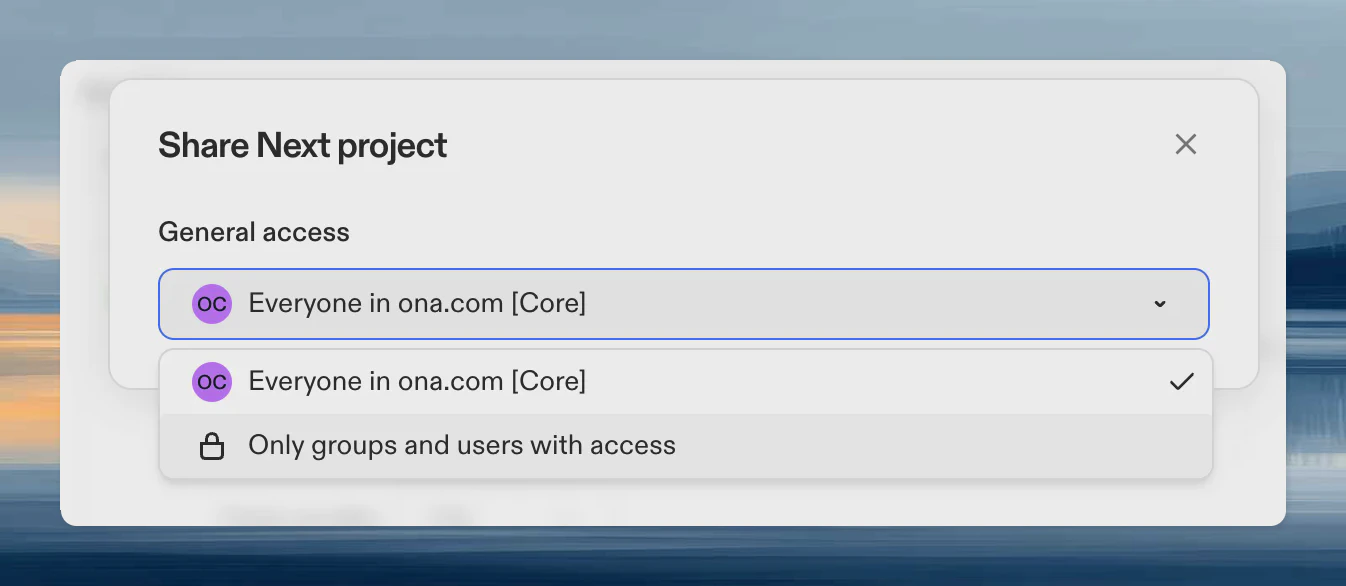
1. Open the project from your dashboard
2. Click the **Share** button in the project header
3. Under **General access**, select:
* **Everyone in {org}**: all members can see and use the project
* **Only groups and users with access**: restricted to explicitly added groups and users
Projects cannot be hidden from admins.
 ## When to use each mode
* **Everyone in {org}**: use this for common services, shared internal platforms, templates, and repositories many engineers need.
* **Only groups and users with access**: use this while a project is being prepared, when access should be tightly controlled, or when the project should only be available to specific teams.
If you need more control, use [Sharing resources](/ona/organizations/sharing-resources) to grant access to specific users or groups.
## Create an environment from a shared project
Once a project is shared with you, you can create an environment from it directly. On the **Projects** page, click **Create Environment** on the project card. The environment inherits the project's repository, secrets, and configuration.
## Access dependencies
Project access alone is not always enough to create an environment. A user also needs access to at least one runner used by that project.
If someone can see a project but cannot start an environment from it, check:
* whether the project is shared with them
* whether a compatible runner is shared with them
* whether organization policies restrict environment creation
## Related
* [Create your first project](/ona/create-first-project)
* [Sharing resources](/ona/organizations/sharing-resources)
* [Organization roles](/ona/organizations/organization-roles)
## When to use each mode
* **Everyone in {org}**: use this for common services, shared internal platforms, templates, and repositories many engineers need.
* **Only groups and users with access**: use this while a project is being prepared, when access should be tightly controlled, or when the project should only be available to specific teams.
If you need more control, use [Sharing resources](/ona/organizations/sharing-resources) to grant access to specific users or groups.
## Create an environment from a shared project
Once a project is shared with you, you can create an environment from it directly. On the **Projects** page, click **Create Environment** on the project card. The environment inherits the project's repository, secrets, and configuration.
## Access dependencies
Project access alone is not always enough to create an environment. A user also needs access to at least one runner used by that project.
If someone can see a project but cannot start an environment from it, check:
* whether the project is shared with them
* whether a compatible runner is shared with them
* whether organization policies restrict environment creation
## Related
* [Create your first project](/ona/create-first-project)
* [Sharing resources](/ona/organizations/sharing-resources)
* [Organization roles](/ona/organizations/organization-roles)