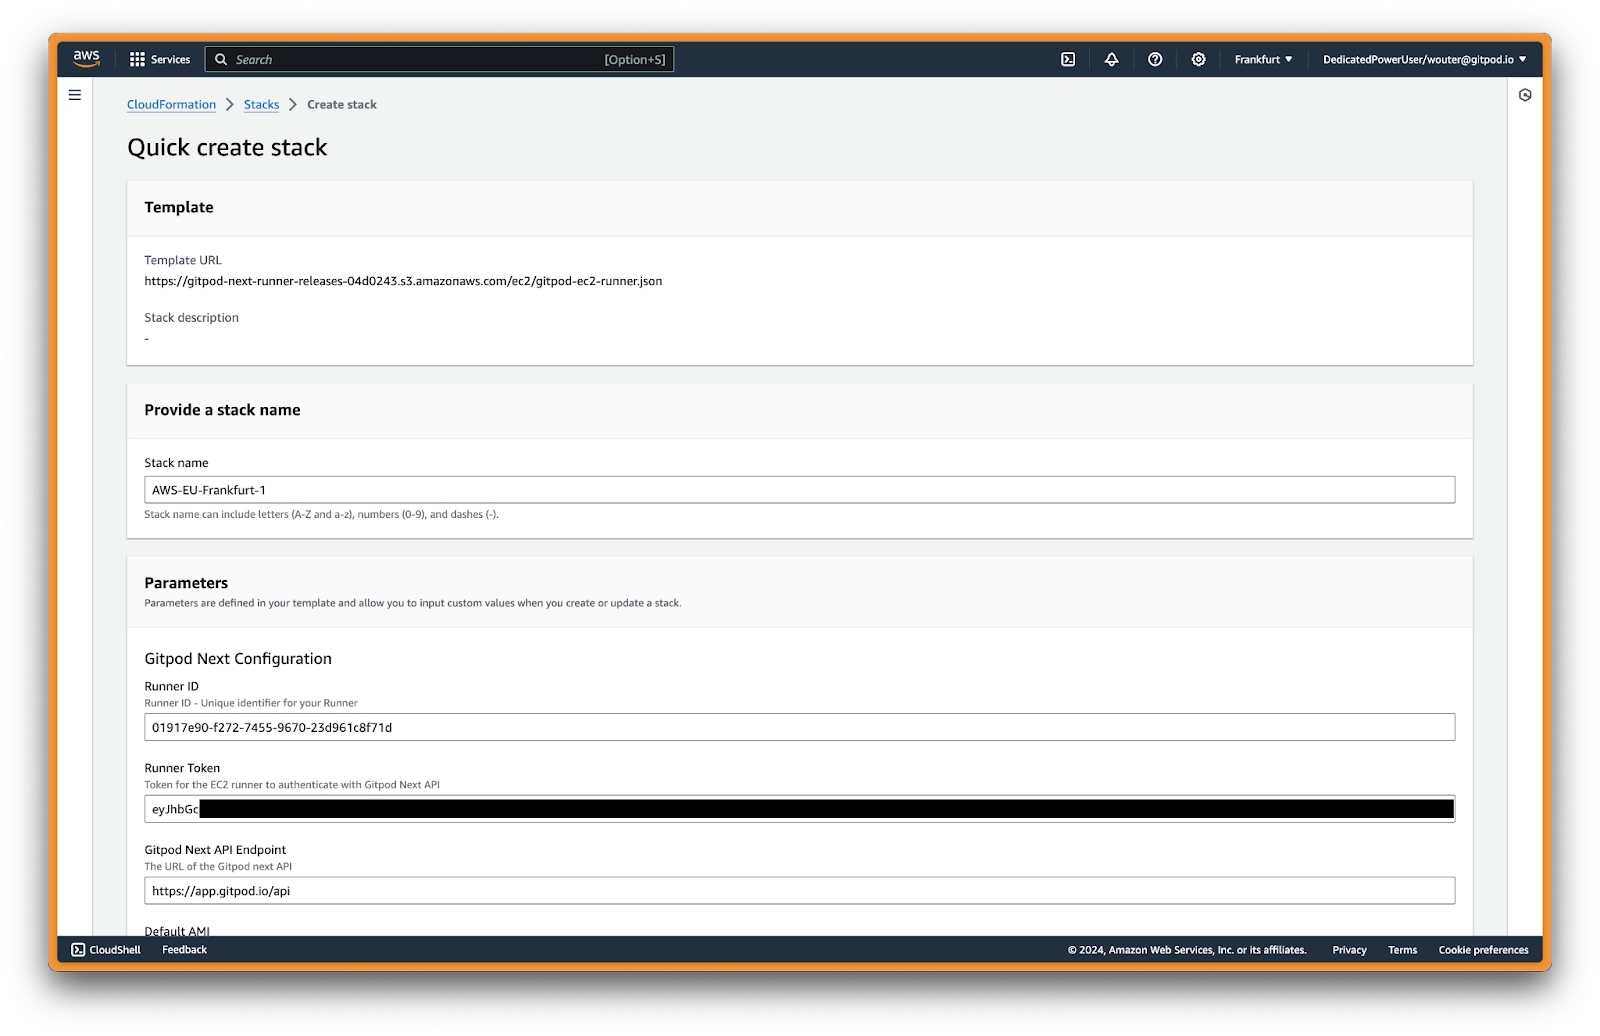
Deploy your AWS Runner using CloudFormation. Before starting, ensure you’ve completed the prerequisites.
Create runner in Ona
Go to Settings → Runners and click Setup a new runner:
From the list of available providers, choose AWS.
Choose a name and select the AWS region to deploy the Runner into. Then, press Create. This creates the Runner reference in Ona.
Runners are regional, and can only launch Environments in the AWS region
they are deployed in. For multi-region support we recommend setting up
multiple Runners in different regions. The region cannot be changed once
deployed.
Ona configuration
The Runner ID, Exchange Token, and API Endpoint are auto-generated. Do not modify these values.
Network configuration (required)
VPC and subnet settings for the Runner.
| Parameter | Description | Example Value | Required |
|---|
| VPC | The VPC where the Runner will be deployed | vpc-12345abcd | ✅ Yes |
| Availability Zones | AZs for high availability (select 2-3) | us-east-1a, us-east-1b | ✅ Yes |
| EC2 Instances Subnet | Private subnets for EC2 instances (can be non-routable from internal network). Should match the number of AZs | subnet-123abc, subnet-456def | ✅ Yes |
| Loadbalance Subnets | Subnets for load balancer with CIDR ranges routable from your internal network. Should match the number of AZs | subnet-123abc, subnet-456def | ✅ Yes |
- Select 2-3 Availability Zones for high availability
- EC2 subnets: Use private subnets, must be sufficiently large for your expected workload
- Load balancer subnets: Must have CIDR ranges routable from your internal network for user access
- Ensure connectivity from user locations via VPN, Direct Connect, or Transit Gateway
DNS configuration
Domain name, SSL certificate, and load balancer visibility.
| Parameter | Description | Example Value | Required |
|---|
| Load Balancer Visibility | Choose between internal or internet-facing | internal | ✅ Yes |
| Domain Name | Your domain name for access | yourdomain.com | ✅ Yes |
| Certificate ARN | ARN of your SSL certificate from ACM | arn:aws:acm:us-east-1:123456789012:certificate/abc123... | ✅ Yes |
- internal: Load balancer is only accessible from within your VPC (recommended for private deployments)
- internet-facing: Load balancer is accessible from the internet (only if using public subnets)
Network configuration (optional)
Additional settings for enterprise security requirements.
| Parameter | Description | Example Value | Required |
|---|
| Custom Security Group for Load Balancer | Security group to attach to the load balancer for traffic control | sg-abcdef123 | ❌ Optional |
| HTTP Proxy | HTTP proxy server URL | http://proxy.company.com:8080 | ❌ Optional |
| HTTPS Proxy | HTTPS proxy server URL | https://proxy.company.com:8080 | ❌ Optional |
| No Proxy | Comma-separated list of hosts to bypass proxy | .internal,169.254.0.0/16,... | ⚠️ Required if proxy configured |
| Custom CA Certificate | Custom certificate authority from SSM Parameter Store | {{resolve:ssm:/ona/ca-cert}} | ❌ Optional |
- If not provided: An automatic security group will be created that allows all traffic (0.0.0.0/0) to ports 80 and 443
- If provided: You can specify a custom security group to narrow down the allowed traffic sources for enhanced security
Proxy Configuration:
When configuring HTTP/HTTPS proxy, NO_PROXY must include: .internal, 169.254.0.0/16, app.gitpod.io, and .amazonaws.com.
Proxy Update Behavior:
- Runner infrastructure: Changes take effect immediately after CloudFormation update
- Component-specific timing:
- Content initialization: Effective after environment restart
- Devcontainer: Effective after rebuild
- Docker in Docker: Effective after container recreation
Custom CA Certificate:
Use CloudFormation dynamic references to retrieve certificates from AWS SSM Parameter Store. For syntax details, see SSM Parameter Store documentation.
Custom CA certificates work in runner, content init (SCM), and docker pull operations. However, they are not supported in devcontainer and devcontainer image build phases - you must add CA certificates to your images for these use cases.
Deploy
- Review all parameters
- Check the box acknowledging CloudFormation will create IAM resources
- Click Create stack
Deployment typically takes 20-25 minutes. Monitor progress in the CloudFormation Events tab.
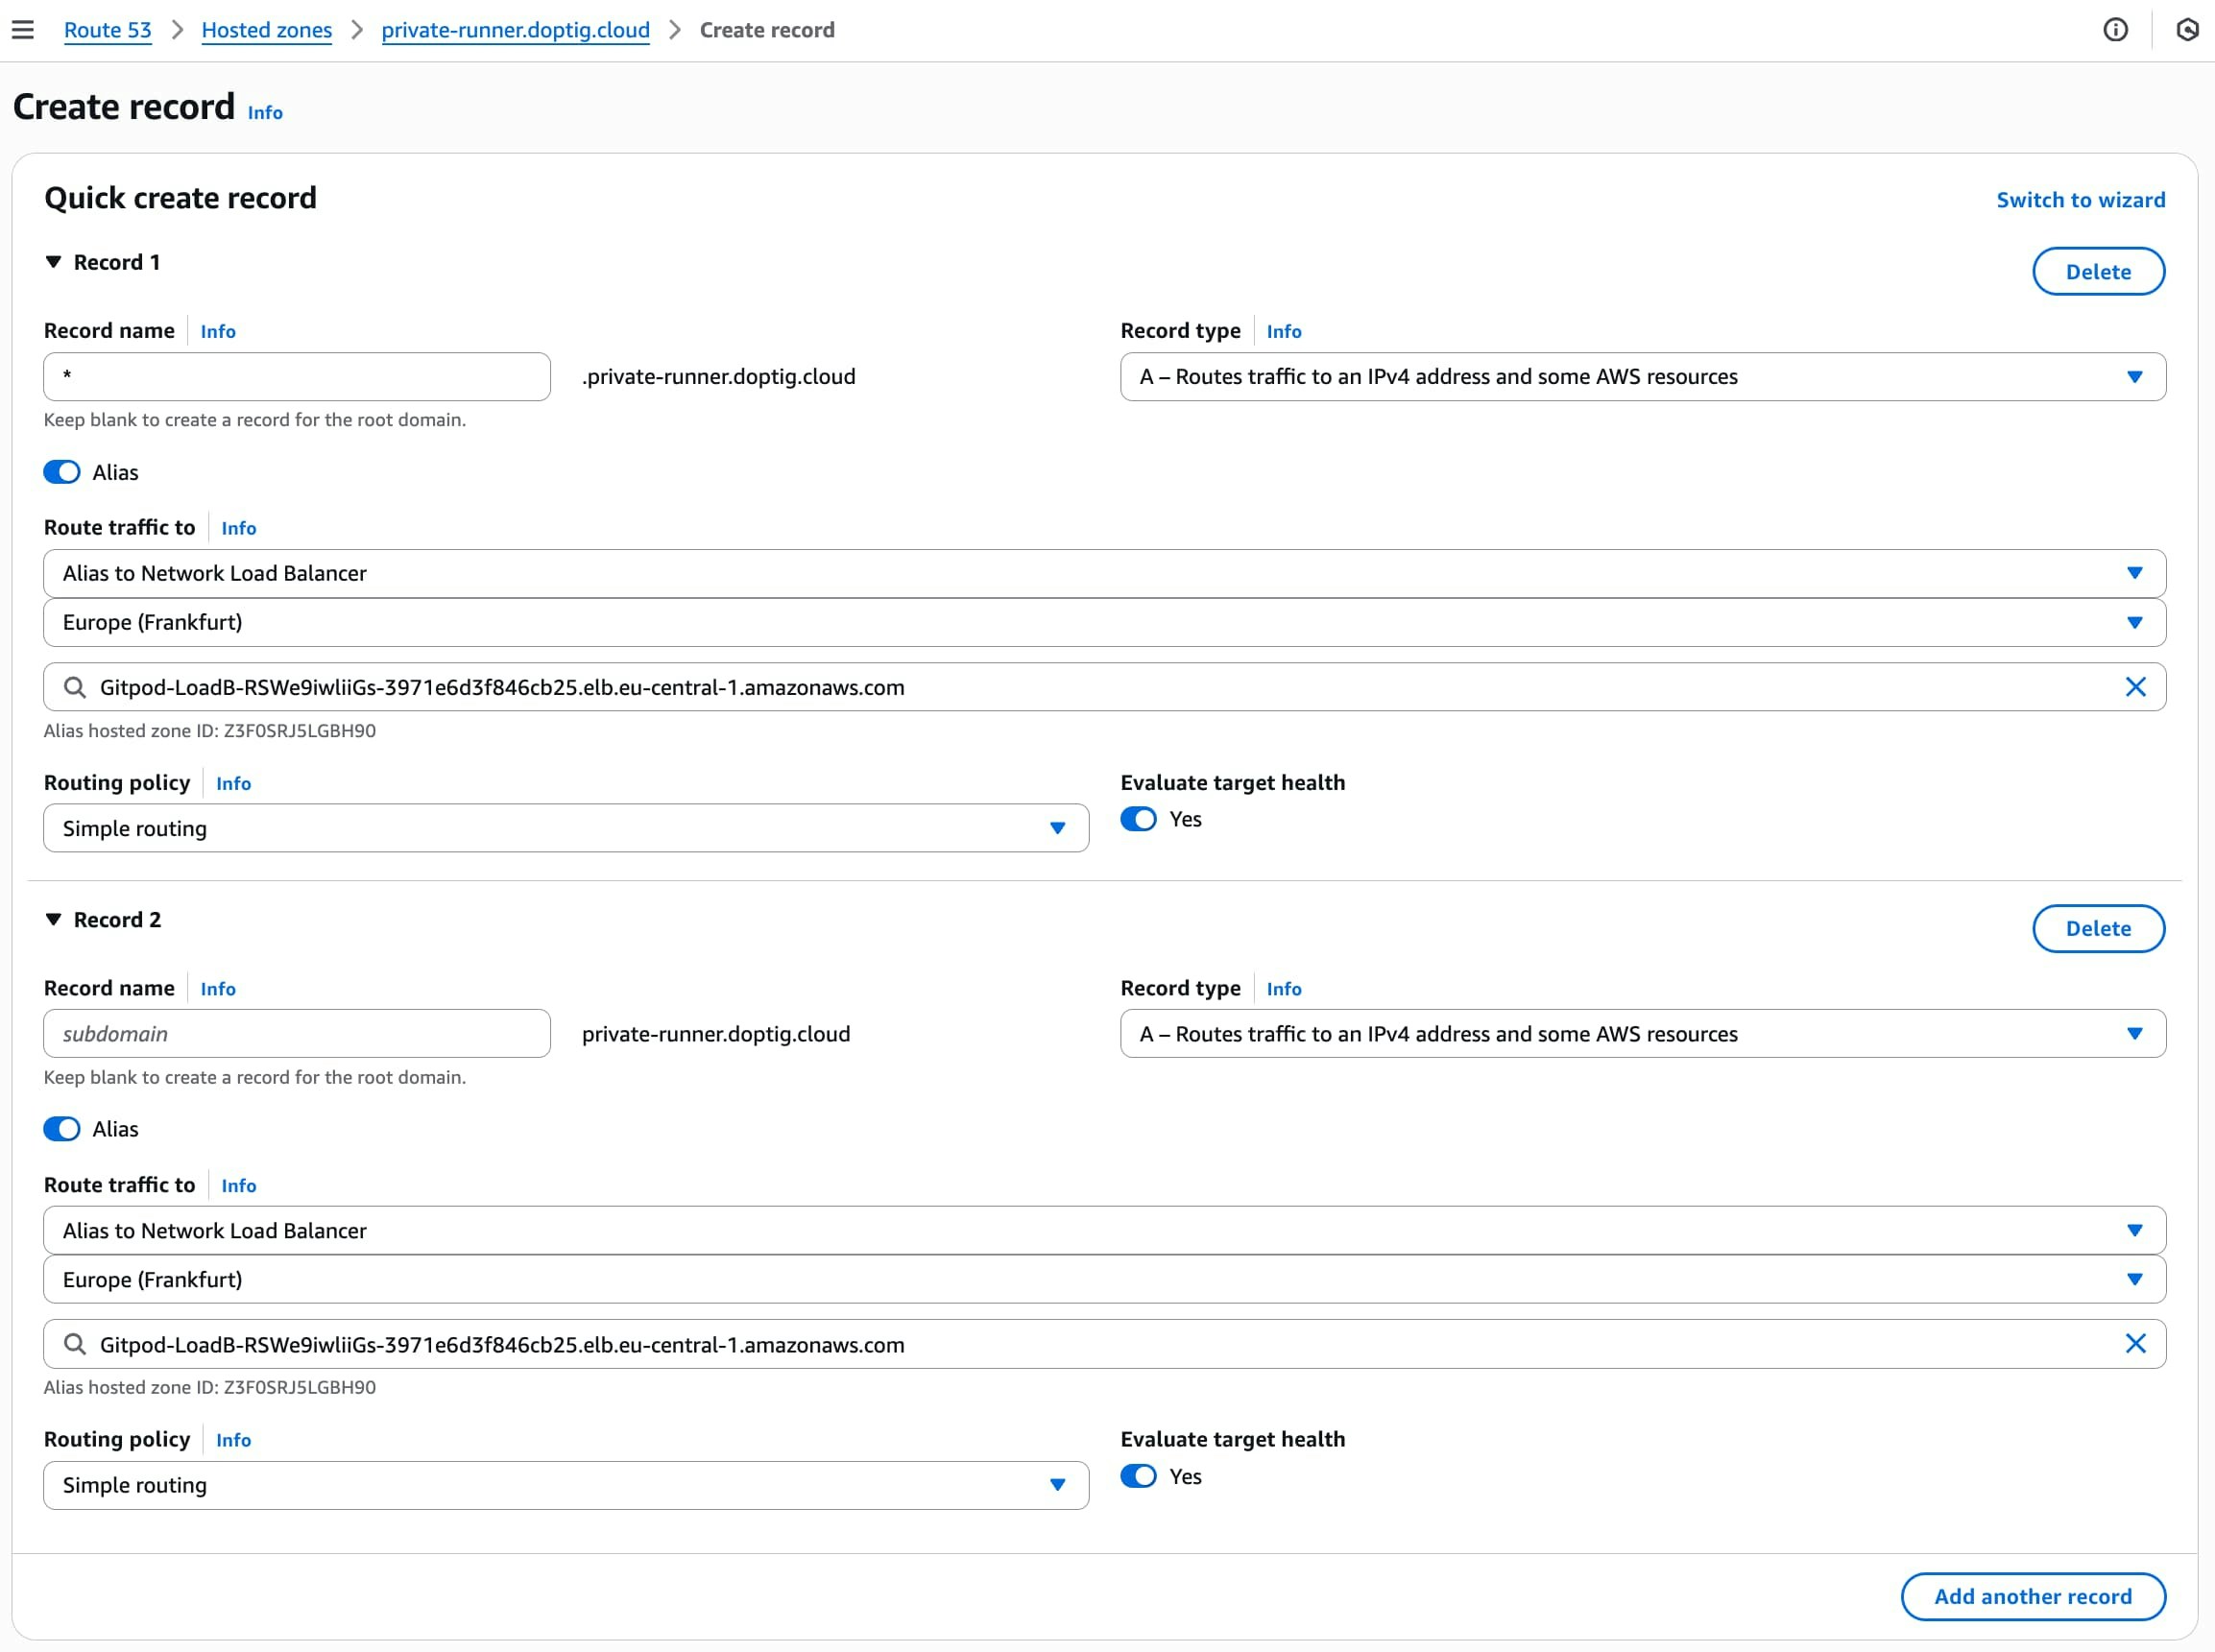
Route 53
Create alias records pointing to your Network Load Balancer:
| Type | Name | Alias Target |
|---|
| A | yourdomain.com | Alias to Network Load Balancer → your region → your load balancer |
| A | *.yourdomain.com | Alias to Network Load Balancer → your region → your load balancer |
Other DNS providers
Create CNAME records pointing to your load balancer DNS:
| Type | Name | Value | TTL |
|---|
| CNAME | yourdomain.com | internal-LoadBa-XXXXX-123456789.us-east-1.elb.amazonaws.com | 300 |
| CNAME | *.yourdomain.com | internal-LoadBa-XXXXX-123456789.us-east-1.elb.amazonaws.com | 300 |
Verify deployment
Test connectivity from within your VPC:
curl -k https://yourdomain.com/_health
nslookup yourdomain.com
Next steps


